It has been over a year since I first tried Lumē Deodorant, and I’ve been using it almost that entire year (minus a few weeks as an experiment). I’ve made 4 purchases from their company, usually of discounted bundles (the only thing junk email is good for is discounts), and I’ve spent $130.52 total. I have ALSO tried a couple different aluminum free deodorants in that time to see how they rank up against my Lumē. First, HERE is my most recent review of Lumē Deodorant.
Next, here are the other two aluminum free deodorants I tried against Lumē:
Dove 0% Aluminum Deodorant in Cucumber and Green Tea
Native Deodorant in Cucumber & Mint
“I think, somehow, Target fills us with hope as we walk down their clean aisles, items curated to scream “TAKE ME HOME” to every basic mom, such as myself, so that when we get up to the register and they explain calmly that they are going to remove several hundred of our hard earned dollars from our bank account that we don’t blink an eye but smile vapidly and have instant buyer’s remorse.”
You had me at Dove
Dove has been my go-to for years. But will the aluminum free version work?
Dove 0% Aluminum Deodorant smells good… until I sweat right through it with my stinky pits within 30 minutes of applying it. Come on, Dove. I’ve spent hundreds of dollars on your regular deodorants over the years, slowly poisoning myself with aluminum. The least you could do for me is give me a natural deodorant that WORKS. Well, to be honest, I didn’t expect much after using Lumē for so long. I used the Dove 0% only a few times (just to make SURE it wasn’t a fluke). It wasn’t a fluke. Unfortunately, this deodorant did not keep my stink away.
Going Native
I was really hopeful for Native deodorant. First of all, I found it at Target. And I think, somehow, Target fills us with hope as we walk down their clean aisles, items curated to scream “TAKE ME HOME” to every basic mom, such as myself, so that when we get up to the register and they explain calmly that they are going to remove several hundred of our hard earned dollars from our bank account that we don’t blink an eye but smile vapidly and have instant buyer’s remorse. So when I saw this $12 “paraben and aluminum free” deodorant on the shelf, I thought, “why the hell not?!”
This stuff smells amazing. But does it keep away the bad smells too?
The first thing I noticed about the Native Deodorant is that it smelled super yummy. It had a distinct essential oil or extract smell rather than other deodorants with laboratory created “parfum” smells like something you throw in your gym bag to keep it from smelling like the bacteria factory it most certainly is. Native’s sharp and clean scent was sure to blast my stanky pits to kingdom come with freshness. I applied it after a shower, just like I had with the Dove, to give it a fighting chance at combating my underarm bacteria.
“Do I have to chase my two gremlins? You betcha. Do I sweat because they raise my blood pressure? Oh, probably. But if these deodorants can’t DEODORIZE me in the most common activities of my life, I can’t make them a staple of my hygiene routine.”
Unfortunately, it also fell flat for me in terms of smell protection. Now, to test these, I wasn’t doing any strenuous exercise like I had done with the Lumē months ago when I was shoveling several cubic yards of river rock in 90-100 degree weather out in our yard. Both the Dove and the Native could hardly handle my day to day mom life. Do I have to chase my two gremlins? You betcha. Do I sweat because they raise my blood pressure? Oh, probably. But if these deodorants can’t DEODORIZE me in the most common activities of my life, I can’t make them a staple of my hygiene routine.
Hello, Lumē, My Old Friend…
So every time a new “deodorant” has failed me, I’ve found myself going back to Lumē. Just like running into the arms of an old friend who I know is going to wipe my sweat away and kill the smelly jerk bacteria that keep haunting my pits. Lumē has been there for me. And to top it off, I had a representative FROM Lumē contact me about my last review concerns and make suggestions on how I can test their product better. The best part is that their suggestions actually helped! In my last review, I stated that I wasn’t sure how long my body’s “detox” period was because my hormones and a few other factors were making that unclear. This meant that even though the Lumē was still working, it wasn’t lasting as long as it had previously and I was unsure of the cause.
Lumē has been working overtime for me for a year. But is it still number 1?
The Lumē representative that contacted me suggested that I try a clothes detergent that had enzyme technology to fight and kill the bacteria that can build up in clothes. Honestly, I don’t know why I hadn’t tried this sooner. I knew of these detergents but was unsure if they could really help me. So, per her suggestion, I tried Pursil Liquid Laundry Detergent in the Odor Fighter variety I found at my local grocery store. It specifically boasts “Odor Fighting Technology” and has seemed to work very well for me. It hasn’t made the problem go away 100%, but it’s drastically better than it has ever been.
Since changing to an odor fighting detergent, I feel like the Lumē has had a better chance to work to its fullest potential. The only time I’ve found the Lumē to fail at all anymore is when I work up a deep sweat in my mommy fitness class. Especially during the time of the month when my hormones are most haywire, I tend to go through days of excessive sweating that is hard to mask without showers twice a day. Sheesh. Isn’t motherhood beautiful?!
Conclusion
So, in short, here’s what I’ve learned. If a deodorant doesn’t boast an aluminum free alternative that actually KILLS the bad bacteria that makes you smell in the first place, its MUCH less likely to actually work. Now, I have heard good things from people through the mommy-sphere who have had positive experiences with many “natural” deodorants. But, for me, they don’t work if they’re not getting rid of the bacteria.
*As an Amazon Associate I earn from qualifying purchases. This means if you purchase anything through my sponsored links, I receive commission at no additional cost to you. My views and opinions are not swayed because of this; I only recommend products and services I love.)*
Full disclosure: I DO NOT make any money or get any promotional kickbacks from Trusst Brand for my review. I am reviewing this product only as a consumer/customer.
I wore traditional underwire bras for almost 20 years of my life. Being larger chested made the underwire a necessity. It wasn’t until I got pregnant with my first baby that I considered a change. I wanted to do what was best for my baby and my body, so at that time I invested in some bras without underwire. Underwire-less bras took some getting used to because I instantly felt exposed and unsupported. Once my mind caught up to what my body had already realized, I found that I was actually way more comfortable. I nearly turned into a bra-burning mad woman when I noticed that I had developed bruising and muscle indentations under my breasts from the years of underwire digging in to support my ample chest. No wonder we women love taking our bras off at the end of the day!
After realizing my freedom, I ended up wearing wireless bras for about three years during my pregnancies and the postpartum breastfeeding journeys afterwards. I kept promising myself that when I finally finished breastfeeding, I’d buy some new, cute bras seeing as how I had just spent the last three years in the rotation of the same 4, milk-stained, incredibly unflattering stretchy bras. I started to venture back out into the retail fashion world that I had been absent from for an embarrassingly long time to find that I didn’t know where to start. Luckily, we live in a day and age where computers automatically read our minds and somehow know exactly how to advertise what we want. I began seeing more and more ads for bras and intimates. I checked some of them out but wasn’t willing to take the plunge on investing in bras that I couldn’t try on from companies that charged restocking fees.
The Trusst Brand’s Marjory The T-Shirt Bra is a huge upgrade from my worn-out stretchy-bras. The material is buttery soft and the lines you see on the cups do not show through most shirts.
Body After Babies
An unfortunate reality of carrying two babies and breastfeeding them for a combined 16 months was that I ended with completely different breasts than I started with. To make matters more complicated, we moved to a different city a year ago, and the availability and selection for what I lovingly refer to as “big girl bras” is next to nothing. I tried Target, but they didn’t keep my size in store, and what I bought online from them was not what I would consider an everyday bra due to its regular style underwire. Ouch! All other retail stores in our area were the same story. I even tried on what some would consider the “granny panties” of bras that offered full support and very little breathing room. Seriously! I felt like I was being suffocated. Plus, it wasn’t really the look I was going for; torpedo boobs and visible bra sticking out from under all my tank tops was not what I had in mind. I looked into bras from Cacique, intimates made by the Lane Bryant brand. I like the quality and selection of Lane Bryant clothes, so I figured I’d be safe. But what I couldn’t get past was their restocking fee. Since I wasn’t able to physically visit one of their stores to try on bras, and I knew that I’d inevitably need to return one or more trying to find the perfect fit for me, restocking fees were a deal breaker. Several more online retailers, including Adore Me, ThirdLove, and a couple others left me pretty discouraged for similar reasons.
I began planning a six hour round trip drive just to be able to visit a store where I MIGHT be able to find and try on bras that fit me. Thankfully, internet marketing had my back. I saw one more bra ad that sparked my interest. Trusst Brand bras first caught my interest because of their name. I thought using the word truss in their name was clever because, as Wikipedia states, “A truss is an assembly of beams or other elements that creates a rigid structure.” I thought, “well, at least I can expect these bras to have good support!” What I didn’t expect to find was a brand that not only had invented their own technology to help large chested women, but they also guaranteed their work AND did their best to make it affordable. Of course, most “big girl bras” are a financial investment, so price tags didn’t shock me much, but I still wanted to get the most out of my budget.
A unique feature of the Trusst Brand’s Naomi: Convertible Bra is the extended side panels that help smooth your figure by tucking in that troublesome armpit fat that loves to sneak out the sides. I love this feature!
Try Before You Buy
I found that not only was Trusst Brand willing to give me 40% off my first bra (by signing up with my email) but they also have a program to try before you buy. Trusst Brand’s try before you buy program sounded too good to be true, so I made sure to read ALL of the fine print before signing up. I found that their program was actually very simple, and there was little to no fine print. You take their online “quiz” to find out your size (which is important because Trusst doesn’t follow the same sizing as most bra manufacturers). This might sound like an annoying inconvenience but I’ll share what I learned from trying the Trusst sizing in the next section.
Trusst Brand’s “Try Before You Buy” system allows you to choose three bras to try on (any sizes or styles) at no initial cost and only pay for what you keep in the end. This means that you can have three bras sent to your house at no initial cost to try on in the comfort of your own home. If you choose to keep any of them you pay for what you keep, but not right away. If you decide to send any bras back and exchange them for different styles or sizes, they will not charge you until you have everything in-hand that you intend to keep. At the time that I made my purchase, I exceeded the minimum requirement for free shipping so even though I exchanged one bra for a different size and sent one back entirely, I didn’t pay any shipping. And no restocking fees! It was great.
Trusst Brand’s Sizing
It was hard for me to trust the fact that Trusst Brand had done their homework in creating a solid sizing chart that translated from traditional sizes to their own. So when I made my initial “Try Before You Buy” purchase, I chose one bra in the size they recommended and two in a size up from that because I was afraid that their sizing was too small. It turned out that I was way off. The size that they had measured me for was nearly perfect. The larger sizes I chose were much too big. Traditionally, I’m a DD but the Trusst Brand sizing chart measured me for (what they call) a D. See why it made me nervous to order their suggested size? Thanks to their super easy returns system, I was able to send back and exchange for the exact bras I wanted.
Special features that make these bras even more worth the cost: strong construction, generous hook closures, rose gold hardware, and a cross-back hook option.
The last thing I’d like to note about the size the Trusst Brand measured me for is that I still feel like it might be slightly too big for me but that might be because around the time that I was measuring myself and ordering the bras, my body was still adjusting to being done breastfeeding. I may have lost an inch or so of fat where the bra band sits, which means that even though I keep my bra on the tightest setting, the band is still a little loose on me. But it may be possible that they measure a little generously in the band size. I’ll have to do a follow-up on that if I buy another bra from them in the future.
Trusst Bra Quality
Over the years, I’ve had the opportunity to try many different bras from different sources and quality levels. When I was young and on a tighter budget, I got my bras from department stores. Department stores carry a pretty wide variety of bra qualities, but current prices seem to reflect an inflation of cost without much progress for quality. The materials and makeup of the department store bras may have improved slightly over the years but the prices seem to have gone up more than they’re worth, in my opinion. That doesn’t mean it’s impossible to find something good there, but it means you may have to work harder to find it.
Eventually, I “graduated” to what I thought at the time was higher quality bras from Victoria’s Secret. They’re definitely slightly better than what you can buy from a department store, but you pay a bit more for the name brand. It was always hard for me to find a style in VS that not only fit me but was practical AND flattering. Being larger chested narrowed down my choices to begin with, but finding a style I liked that worked under regular clothing and didn’t cause me to spill out in all the wrong places was difficult. I spent years wearing VS bras but was completely underwhelmed by the cost to comfort ratio. Why did I have to pay so much money for something that wasn’t completely comfortable for my body?
The interior lining material of both types of bra I tried from Trusst Brand was so soft and comfortable against my skin with the bonus of being moisture-wicking. Plus, the sewn parts seem very durable and do not irritate my skin. Most of the time I can easily forget I’m wearing anything!
Finally, after dealing with the changes my body has gone through after having kids and realizing that I’m willing to pay a little more for comfort over cuteness I found Trusst Brand bras. My first impression when I took the bras out of their packaging is that the material they use to make them is buttery soft. The material works really well under regular t-shirts and thin tank tops. Plus, it’s very soft on the skin. The cups are nicely shaped and give me way more lift than I’m used to! I was a little worried when I first put the bra on that I’d look like my boobs were going to knock satellites out of the sky, but once I put a shirt on over the bra my chest didn’t look odd at all. I guess I’m just so used to my new old boobs that I didn’t know what to expect from my new new boobs, haha!
Technology > Underwire
An image from the Trusst Brand website showing their patented support structure.
When I first started looking for new bras, I figured I’d have to make some sort of sacrifice and that I’d have to live with some level of discomfort. When I first found Trusst Brand, I chose them based on the fact that they had a wide range of sizes, plus they had a great exchange and return policy. What I didn’t count on was finding all of those things from a company that had ALSO developed a brand new technology to help large-chested ladies find a more comfortable alternative to underwire without compromising support. Sounds too good to be true, right? Well, they did it. Here is a little bit more on the technology you find in every Trusst Brand bra.
The image to the right shows an illustration of the Trusst Brand’s patented support structure. It’s made of a hard plastic, which allows for it to be easily moldable while still being light so as not to add weight to an already heavy load. The plastic piece has some shapes that pop out three-dimensionally above the main curve, which gives the whole shape its strength. The nice thing is that those popped-out shapes are hollow. This means they use less plastic to make them, making them lighter and cheaper to make (less cost to pass on to the customer), while still providing a strong shape.
When I first started reading about this new technology, I was skeptical about its comfort. I thought for sure that the bottom of the bra cups would still push against my ribcage to provide support and leave my skin bruised and dented. That is always the struggle I came across with traditional underwire. Once I got the bras and tried them on, I found that this was not the case for Trusst Brand bras at all. Not only is the inside material soft and comfortable on skin, but the shape of the bottom of the cup (where the plastic support sits) does NOT push into the ribcage but sits perfectly spaced from the body while keeping a good form and not losing support or causing breast tissue to slip out the bottom. Trusst Brand has done an amazing job at padding the bra just right to prevent you from feeling the support structure while not over-padding the bra and making it feel bulky or fake. I can wear these bras all day without discomfort. I’ve only had them for a couple months, so I will do a follow-up review once I’ve put more miles on them and can truly attest to their lifespan through normal wear and tear.
In Conclusion
Trusst Brand seems to offer everything I’ve been looking for in a bra company. They have a great product, created with groundbreaking technology, backed by great policies, and the convenience of online purchasing. The only thing I hope they are able to change in the future is to expand their color and pattern availability. With proper care, I’m imagining getting a lot more life out of these bras than any I’ve purchased before. They’re built for comfort AND built to last. So far so good. I look forward to creating a positive follow-up review in the future. But for now, I give this product a 5 out of 5 bear tracks rating.
I give this product 5 out of 5 bear tracks. That’s my first product with that high of a rating!
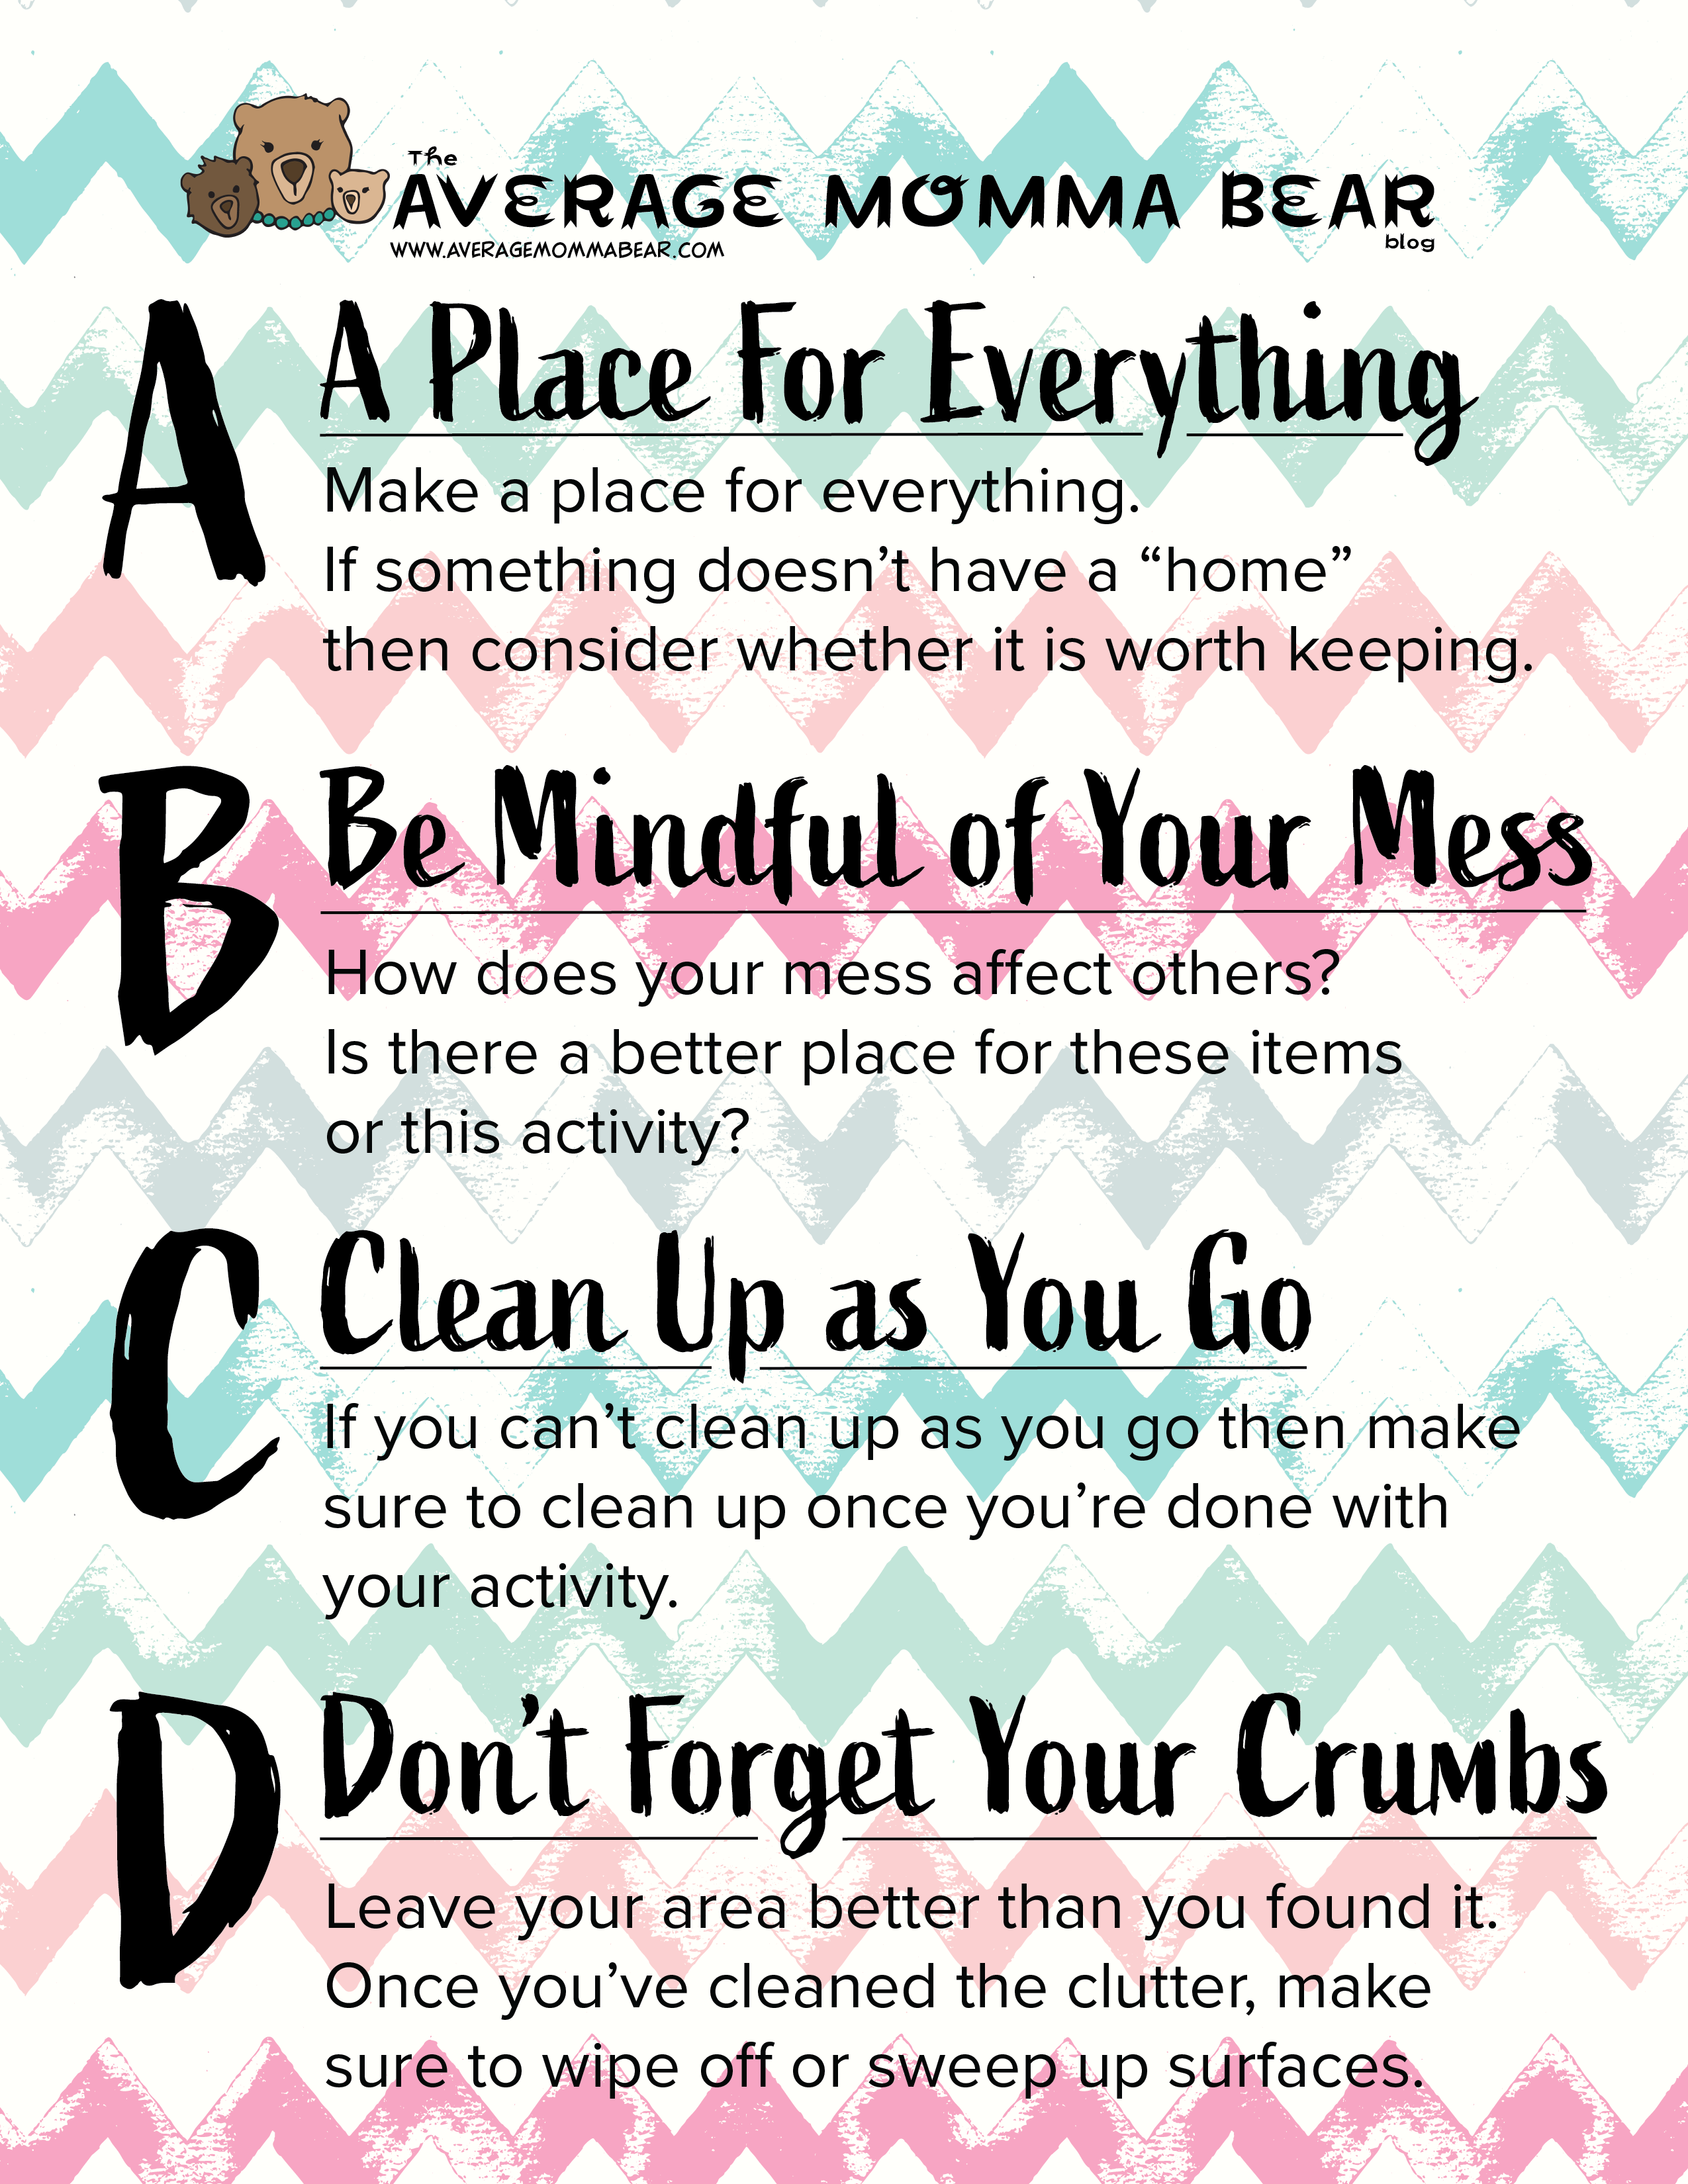
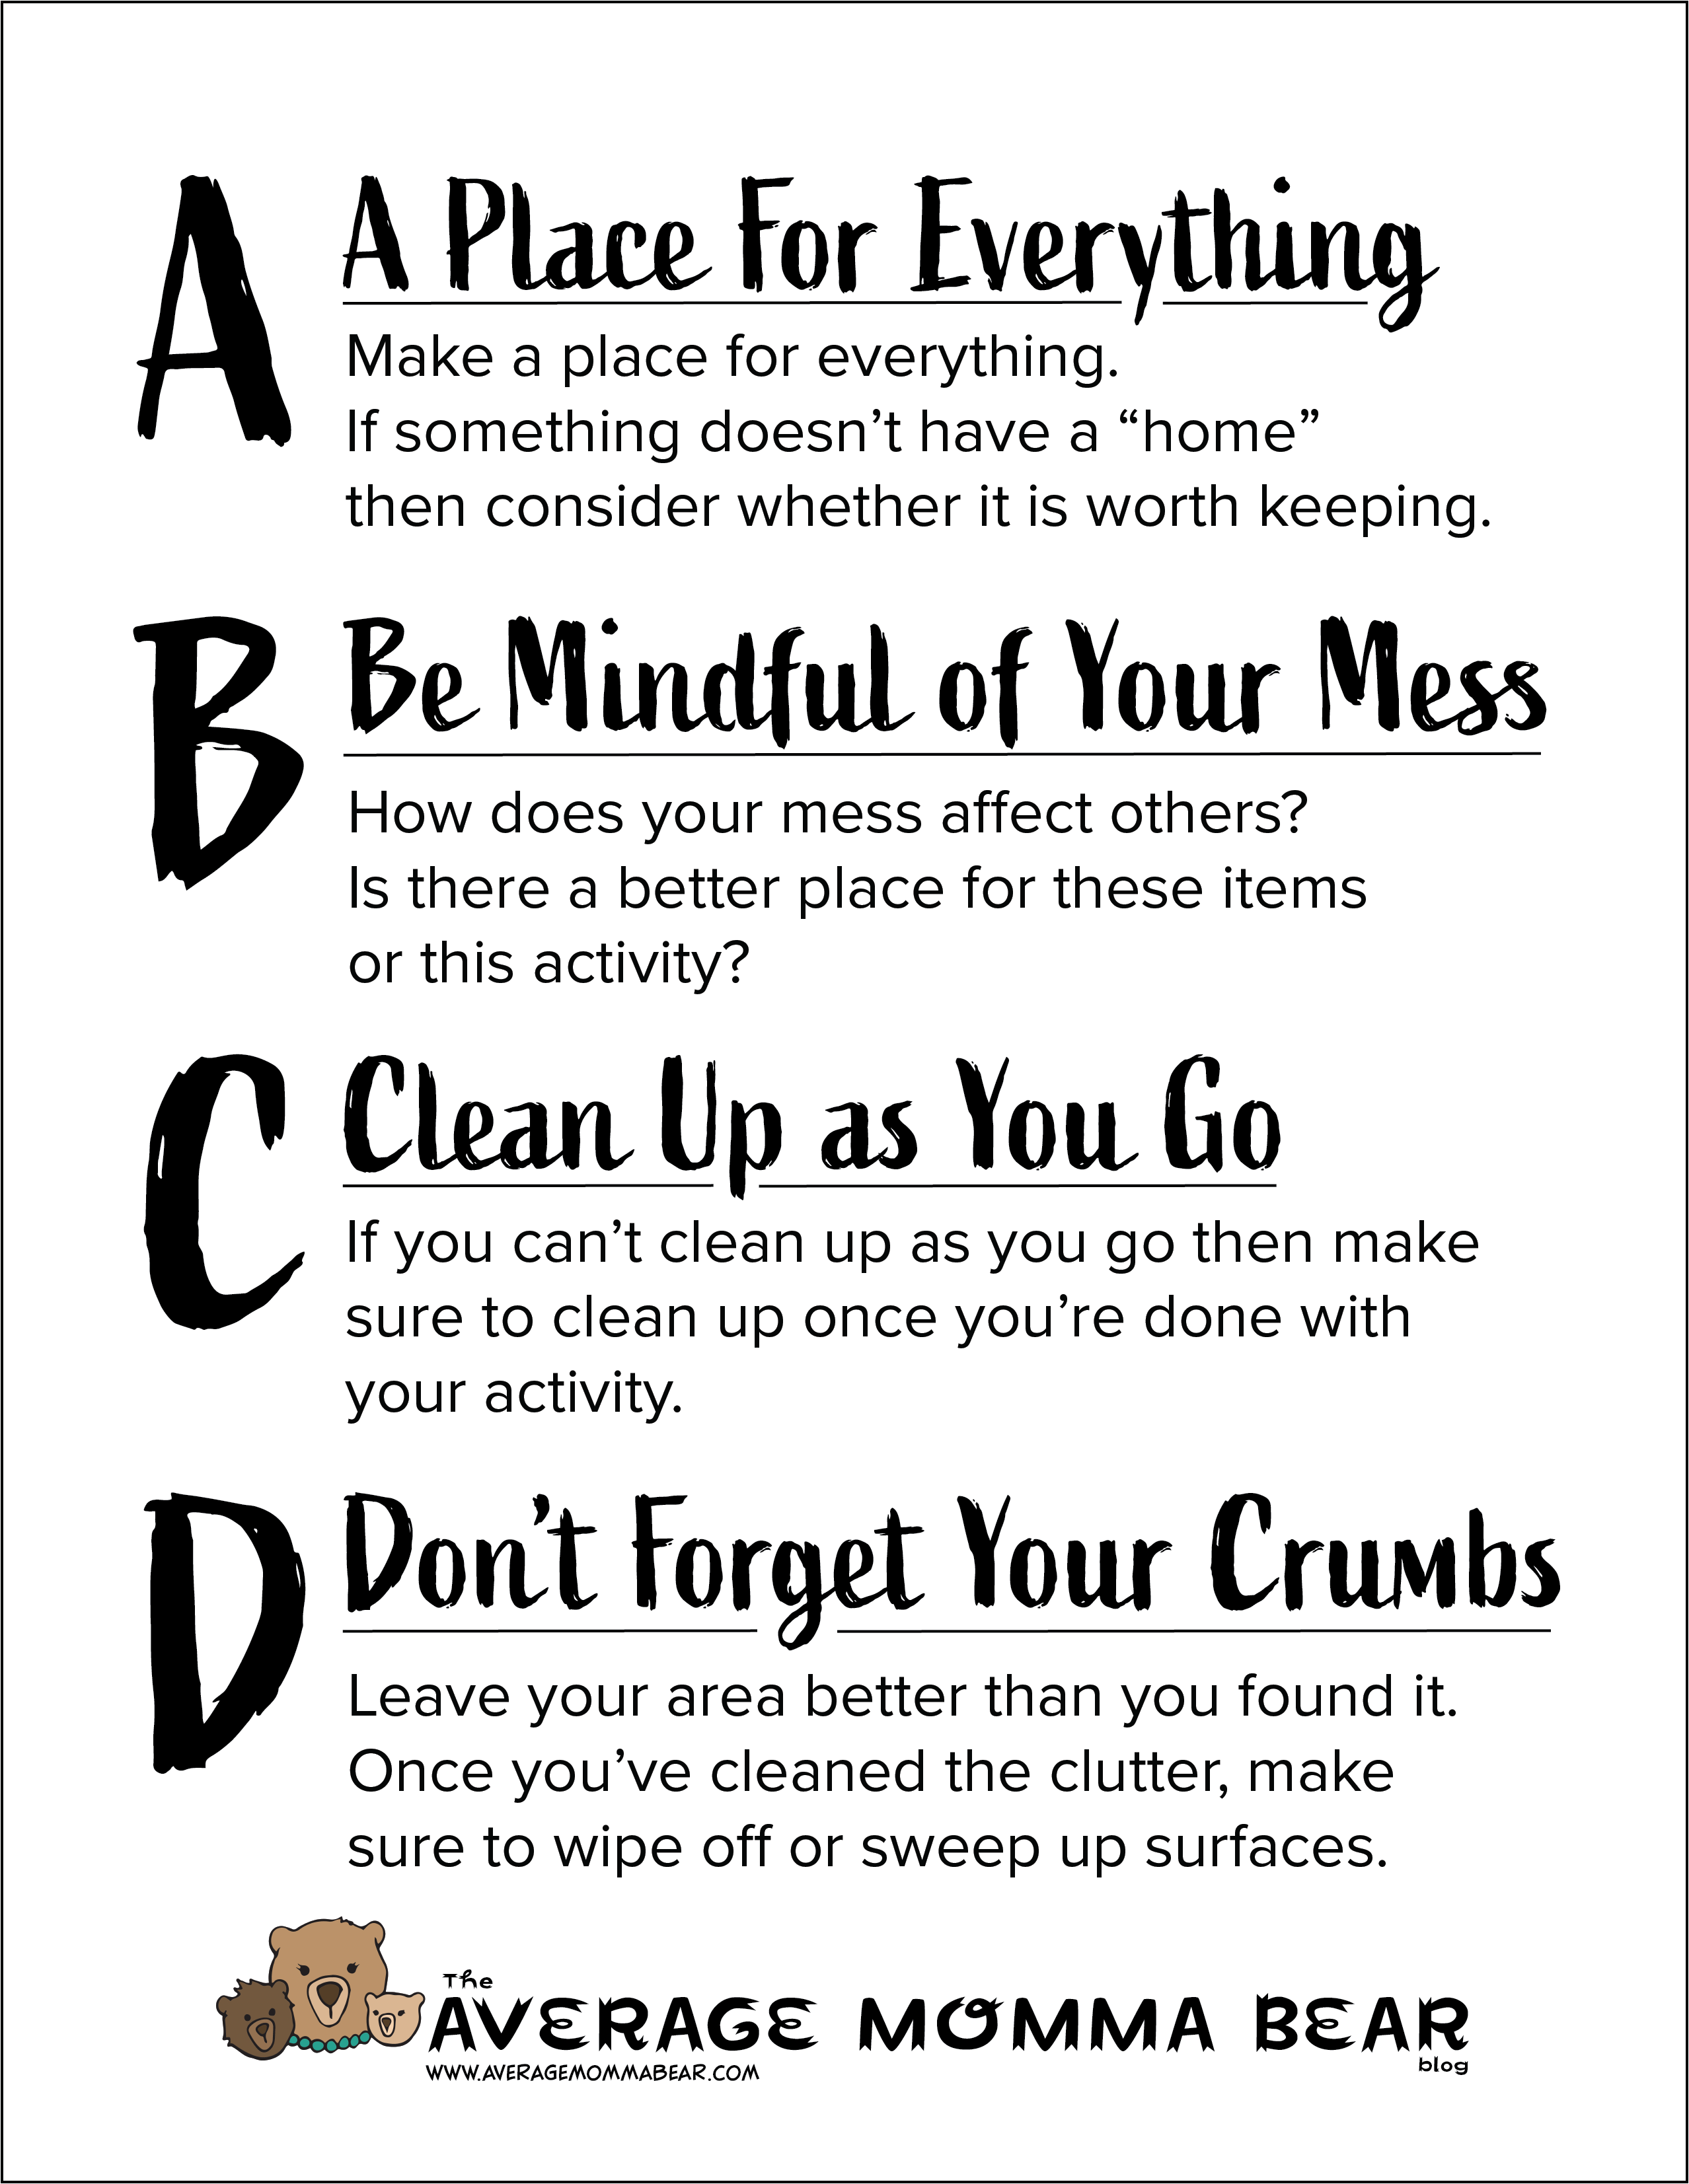
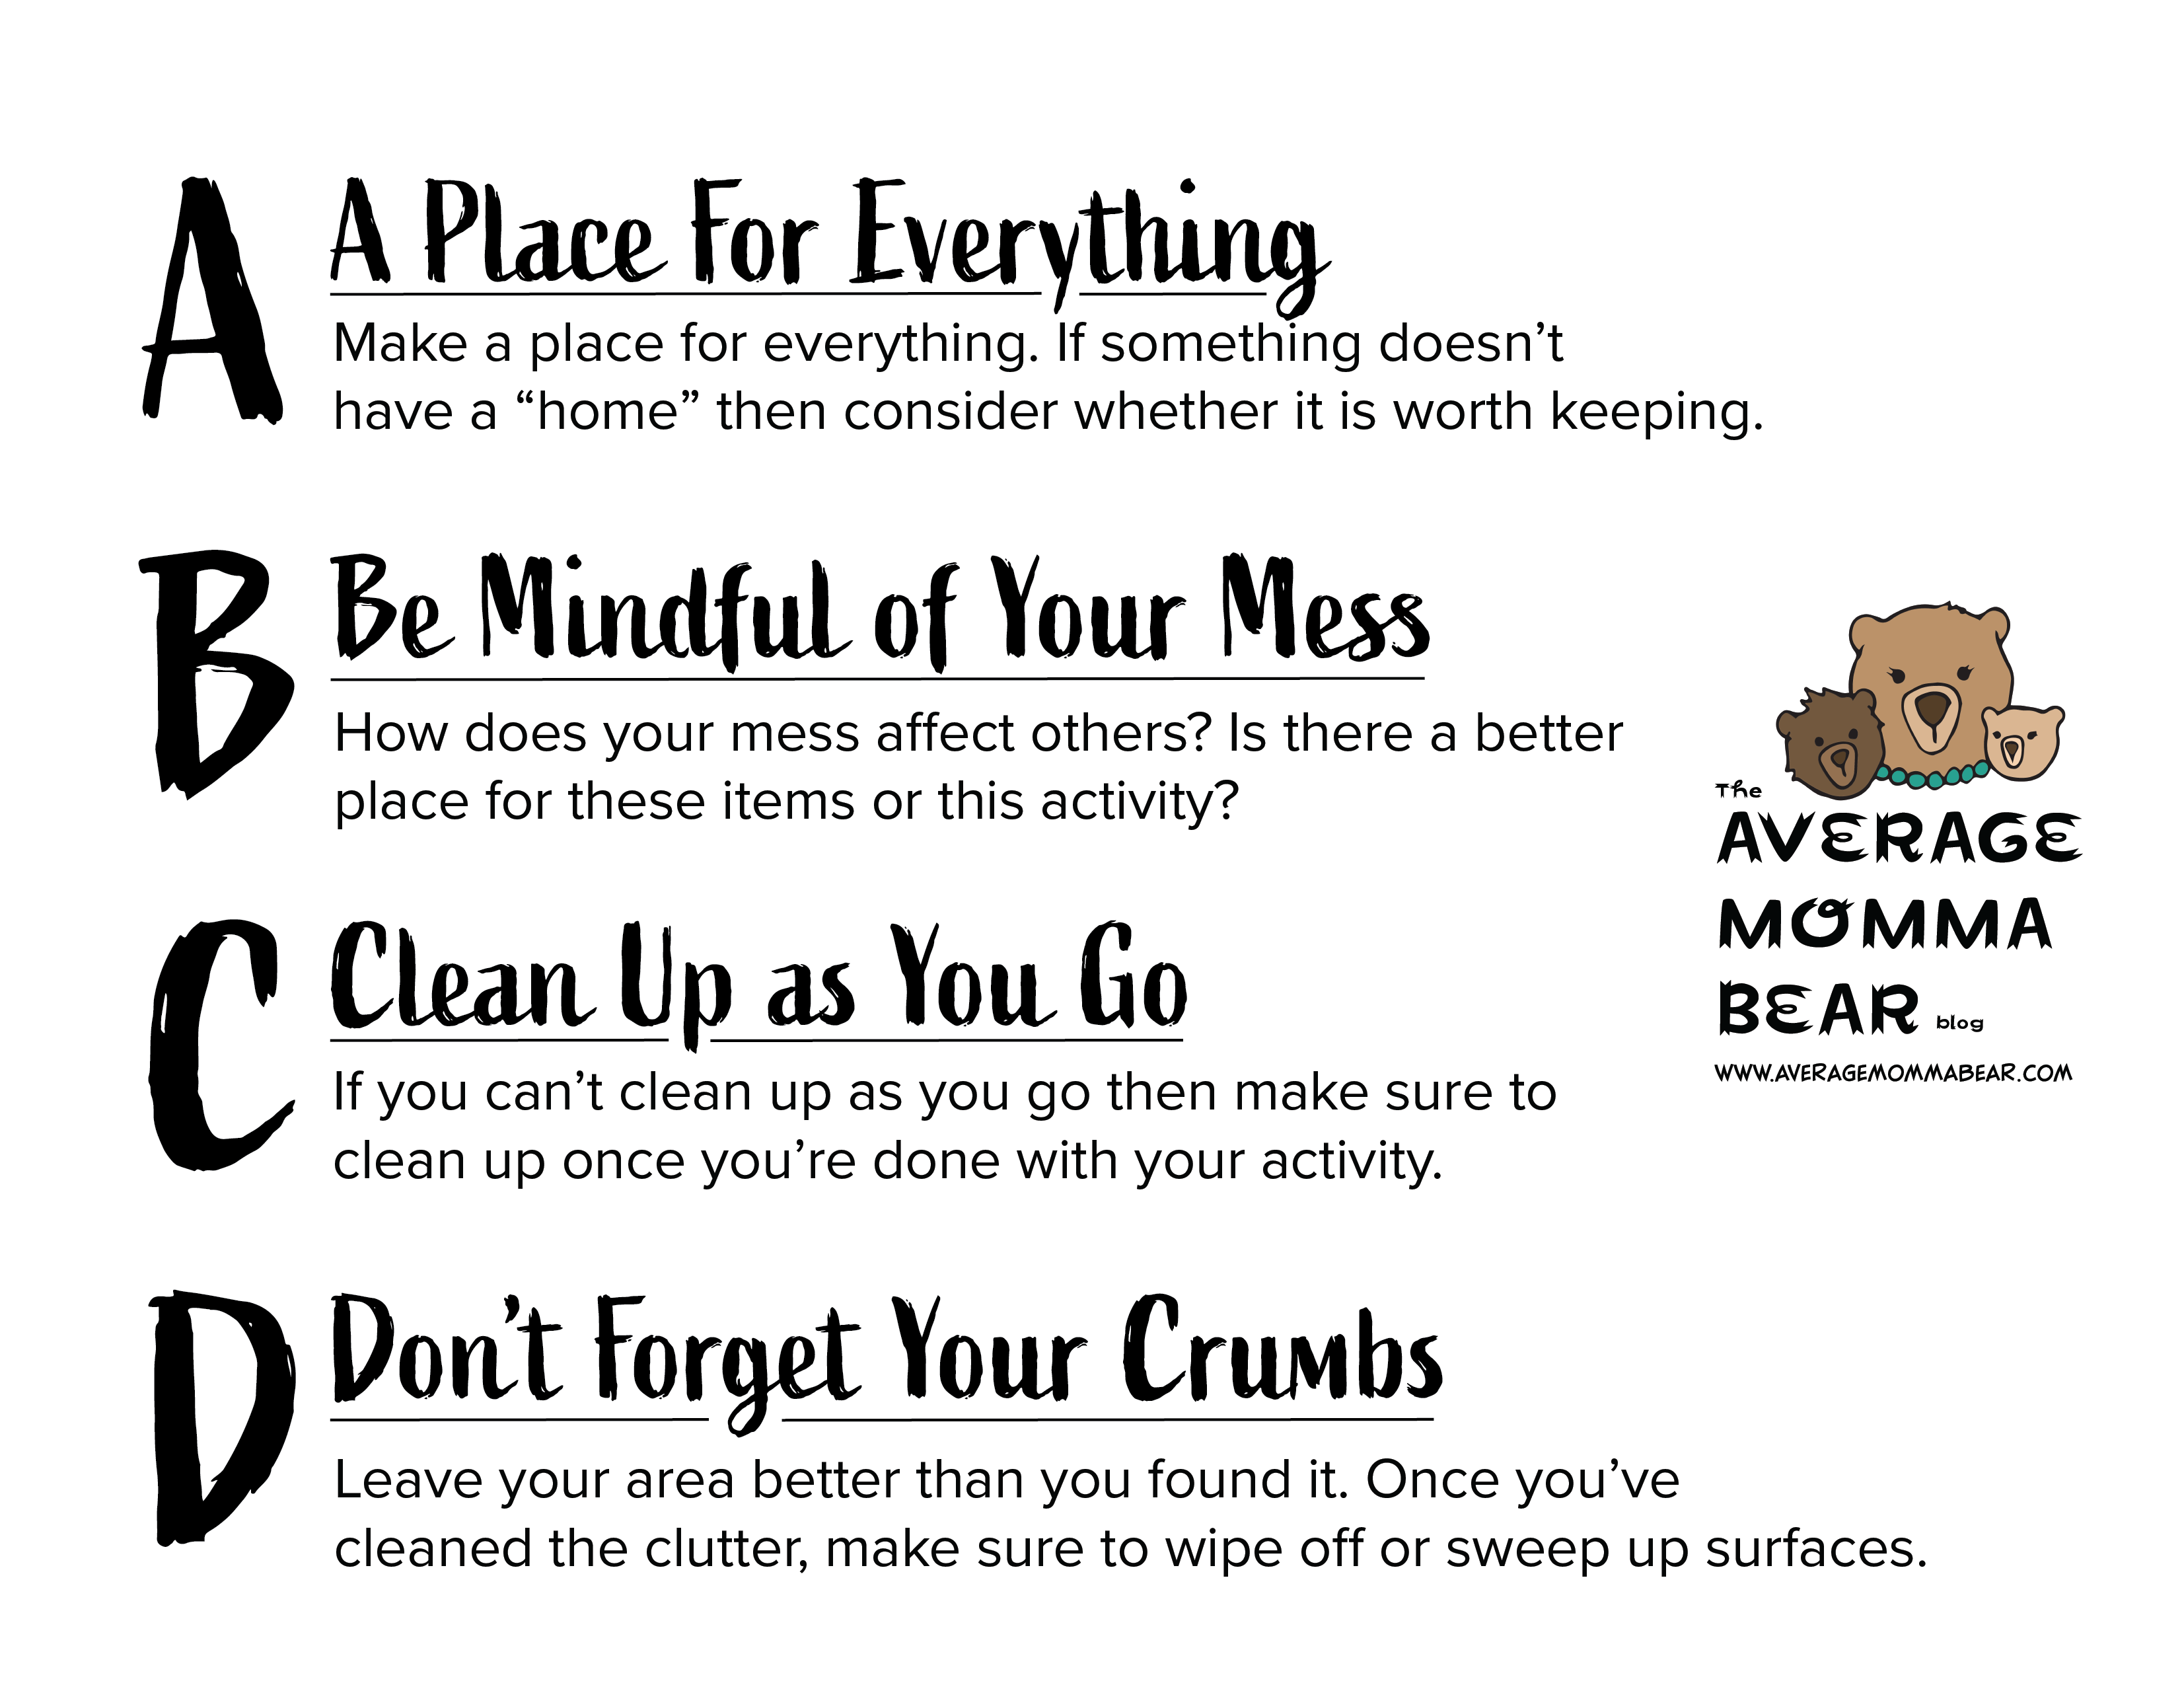
Clutter happens to all of us. But just because it’s a reality doesn’t mean that you can’t conquer it. I’m excited to share these cute little signs I made as a gift for you! They’re great for classrooms, play rooms, bedrooms, or anywhere! Print as many as you want and post them as a great reminder of where to start on your journey of overcoming the mess. If you practice my A, B, C & D rules you can start to build a good habit! Be sure to check out my POST about the first 5 steps I take when cleaning and organizing a cluttered area. I’ve also written about my secret to keeping my bathrooms clean HERE. Good luck!
Cleaning and organizing does not come easy to everyone. If you’re hoping to improve your methods and attack some cluttered areas, you’ve come to the right place. I have a passion for cleaning and organizing, but that didn’t always come naturally to me; I had to work at it over the years. Now that I’ve found some shortcuts and tips, I love sharing them to help others. Here are the 5 main ideas I use when first attempting to clean and organize something.
Number 1: Break it Down
This idea applies both to physically breaking things down to fit into the space better and to breaking the job down into manageable pieces. For example, if you want to organize a whole room, start with the closet. Even that might need to be broken down even further (i.e., organizing clothes before other items). This idea can take an overwhelming project and turn it into bite-sized pieces. Dedicate your time and energy into doing things carefully and slowly. Be aware of the fact that a project like a whole room might take several C&O (cleaning and organizing) sessions. Typically, I dedicate myself to one project per weekend since that’s the only time I can really focus on a task.
Our old high chair has a great break-down feature of folding up so it fits well in the space in our shallow closet under the clothes.
In regards to breaking things down physically, this is definitely the first thing I do when I approach a project. Is there anything being stored in this area that could be broken down to take up less room? My most recent project was a closet stuffed full of baby items that we’ve grown out of in our current stage. This included things like a bassinet, a jumper, a baby swing, a high chair, etc. Some of these items were made with built-in storage features like collapsable legs or removable covers, but many of them can be broken down further. If you have no plans to use these items in the near future, breaking them down to their easiest-to-store size can be a huge help to you in the meantime. I go in to better detail below in number 4 about breaking items all the way down and the best way to store them.
Number 2: Vertical Space
Vertical space often goes overlooked and underused. If something can be stacked upright as opposed to laying down it can create a lot of extra space. You can also store items in stackable boxes. Depending on how large your items are, you can typically find shoebox-sized plastic bins at the dollar store that work great for stacking to make use of your vertical space. And make sure to label, label, label! Check out the last section, number 5, for more information on that. If you’re storing things like books or folders, make sure to stand them upright. If you still have some vertical space above those books or folders, look into making or buying small shelves that can create another shelf for stacking above them. Refrain from stacking books or folders on top of one another. This makes it extremely difficult to access books on the bottom should the need arise. And if you awkwardly pull something from the bottom, and it knocks down the whole stack, now you have a new mess on your hands. It’s better to think ahead for the sake of accessibility.
In photo #1, I am illustrating a good use of vertical space. The closet space extended vertically beyond the doors so I made use of that vertical space by stacking things upright. In photo #2, I show how things like folders and papers can be placed in a more upright position to save space as well.
Number 3: Out With the Old
Holding onto something “just in case”? Chances are, if that case ever happens, your feelings and circumstances might be different enough that you may not even need the thing you’re holding onto. For example, sometimes I hold onto some shirts or outfits with a plan that I’ll wear them again someday after I magically lose weight and gain confidence. In reality land, if the stars aligned and I was able to wear those outfits again, I’d most likely be more excited to buy new clothes because my tastes change over time as well as my budget and the available styles. As a personal rule, if I haven’t worn something in 6 months, I consider donating it. If I haven’t worn it in a year, I do. This rule can apply to anything you’re storing. If you don’t have a specific plan for the item, consider donating it after storing it for 6 months to a year. This will help keep your storage levels at a more manageable level and make room for newer items that may need storing.
Number 4: Keep it Together
This idea goes along with breaking items down. If you take something apart or break it down into smaller parts, think ahead to a time when you may need to reassemble it. Before I take things apart, I always make sure I have three things handy (other than tools): a small Ziploc baggie, a permanent marker, and tape (packing tape works best, but most tapes will work). As I remove small parts, screws, nuts and bolts, I place them all in the baggie. Then I label that baggie with the name of the thing I took apart and tape the bag to one of the larger pieces to make sure they stay together. Just throwing the small parts baggie in with the larger pieces creates a risk of losing them. Make the effort to keep the parts together. This method also works great if you’re disassembling furniture when moving. Labeling the baggie and taping it to the piece of furniture has saved me from losing the small parts several times.
Garbage bags work great to keep all pieces together but aren’t the best long-term solution. If something needs to be stored long-term, look into getting it its own storage container.
Number 5: Label Now, Find Later
Labeling things is a labor of love. It takes a lot of extra work and planning to keep things organized in the long run. I find it best to label things as I go and to commit to finishing the job completely, which means labeling things as best as possible before moving on to another section. Too many times have I started to label things only to get distracted by another section that needs my attention, and when I come back to where I was originally working, I’ve forgotten what I’ve packed in which bin. I find the easiest way to label is to use a white duct tape or colored masking tape and a permanent marker. This is the fastest, cheapest way to label. If you’re looking for a more polished look to your organization, you can always take things a step further and invest in a label maker or, better yet, use a vinyl cutting machine to stylize your own personalized labels. But unless you’re hoping to get a lot of likes on Instagram and saves on Pinterest, I suggest going with the quick and easy tape and marker method. It’ll keep you from hating the whole process and giving up before you finish.
In Conclusion
These methods only scratch the surface of deep cleaning and organizing, but they’re a great place to start. They’ll help you tackle any clutter, great and small. Just keep in mind that breaking your C&O jobs down into smaller chunks is the way to go. If the stuff you’re cleaning and organizing hasn’t gone anywhere in years, there’s no real rush if it means things don’t get done right.
Full disclosure: I DO NOT make any money or get any promotional kickbacks from Lumē for my review. I am reviewing this product only as a consumer/customer.
Well, here I am again. Back almost 8 months later to give you an update. I first tried Lumē deodorant back in January of this year (2019) and was pleasantly surprised by the results. But I knew, looking forward, that I wanted to conduct a little experiment to truly test the results. As I mentioned in my original Lumē review HERE, I’ve experienced sweating and odor since I hit puberty in middle school many, many moons ago. I’m not shy about it anymore, but you can be sure that I’ve put this product to the test.
Detox
I’ve read that when switching over to a more natural deodorant (without aluminum and some synthetic chemicals) your body tends to go through a bit of a detox period. Before trying Lumē, I had been using Dove deodorant for many years, believing that it was the gentlest non-natural deodorant I could find. That might have been true (it’s an unfounded theory), but I did experience clogged pores, ingrown hairs, and darkened skin under my arms consistently while using Dove deodorant. This leads me to believe that it wasn’t as gentle as I would have liked.
The first time I tried Lumē, I found that my detox period was surprisingly short, but I think that was due to the fact that it was still winter, so my sweat levels really didn’t test the limits of Lumē’s capabilities. During my first trial run with Lumē, I did notice an improvement in the health of my underarm skin. After my detox period, my underarm skin was smoother, lighter in color, and less prone to ingrown hairs after shaving.
Putting it to the Test
The weather this summer has been abnormally mild for us, but my armpits are still under a lot of stress, hormone level changes, and more temperature changes than they were the first time I used Lumē. We’ve shoveled literal tons of rocks in 90°+ weather this summer, plus I was finally able to finish my breastfeeding journey with my youngest, so my hormones have been up and down like a rollercoaster. It is possible that I’m still in the midst of my second detox period while using Lumē, but it’s been over a month since I started the new stick, so I’m hoping that’s not the case. To say I’ve been putting the product to the test is an understatement. I have noticed that I have been abnormally smelly…hooray. But I do feel like that has started to taper off.
This second time around, I don’t feel like I’m getting the same distance out of the Lumē formula that I was the first time. I’m definitely not getting more than 24 hours coverage out of the deodorant, plus I’m having to reapply occasionally, so I may be using up the stick faster. I’m hoping to be able to do a third review of the Lumē products later on this year, and I can update that review to reflect how fast I’m using the products based on the time of year or weather temperature.
What’s That Smell?
One thing I noted in my original Lumē review was that I didn’t like the smell of the original scent. In fact, I think that was the only thing I didn’t like aside from the cost. The original scent is called Lavender Sage. Usually I really like both of those scents, but for some reason I didn’t like the way Lumē had combined them. It smelled too much like chemicals to me (even though that’s not what I was smelling).
This second time around I was planning to order the unscented stick deodorant, but when I went to order, I noticed that they had added several new scents. Aside from the Lavender Sage and Unscented, they added Juniper Berry, Jasmine Rose, and Silver Spruce. (These sound like names of kids you see trending on Instagram…) I chose to get two–one Juniper Berry and one Jasmine Rose–just in case I didn’t like one of them. Once I got the sticks, I noticed that neither smell really stood out to me as especially appealing, but I liked the Juniper Berry more, so that is what I’ve been wearing. I can imagine a lot of people will like the Jasmine Rose, but I’ve never really liked the smell of rose other than straight from the flower. I have a feeling that the scent might grow on me when I start using it. I’m also interested to try the Silver Spruce eventually. Initially, I didn’t order that scent because I was afraid it would be too masculine of a scent for me, but I think I’m now willing to give it a try.
Overall
After giving Lumē deodorant another try, I can say I do still enjoy the product. I’m using more than I had back when I initially tried it due to harsher conditions, but I think I get enough coverage that I don’t clear a room with my stench. I still don’t feel as fresh as I’d like, though. I’m not crazy about the scents that they offer either. Maybe it’s more that the base scent is something I’m not fond of, and the additional smells added to it are not agreeing with me. In reality, though, I don’t smell the scent often after I apply it, which is probably for the best. Ideally, you shouldn’t smell like anything unless you want to be distracting.
I think the most valuable thing I’ve gained from using the Lumē product is cleared and improved skin in my underarm region. Since puberty, my armpits have been a point of reservation for me. I’ve always struggled with excessive sweating, sweat marks, odor, and generally unappealing underarm skin. For years, I’ve tended to cover up and hide the problem, ashamed to show my armpits or wear anything other than black. After using Lumē, I’ve noticed an almost instant improvement of my skin. My underarm skin has been smooth, less bumpy and dark, and less prone to ingrown hairs. That said, I feel that the novelty of the product has worn off, and I’m a little disappointed that I’m constantly worrying if people around me can smell me. I do hope that it’s possible that I’m not fully through my detox period and that my freshness will improve with time and usage.
Based on the differences from my original experience, I think I might have to downgrade my rating to give this product: 3 out of 5 Bear Tracks. Hopefully my impression of this product will improve by my next update!
Let’s just get this out on the table now. Potty training sucks. It takes all the fun out of raising a tiny dictator and turns it into…well, poop. If you’re lucky. I used to be hopeful about potty training. My mom told me I potty trained in a night when I was my son’s age. She said all it took was me peeing my pants at night one time to motivate me enough to use the toilet. I’ve heard all sorts of similar stories from parents. In an online mom-group, I read a ton of success stories that filled me with confidence in that we’d be 100% potty trained in no time!
On the advice of MANY other moms, I read a highly recommended potty training book. This book was well written and suggested a method that aligned with my own thoughts and feelings about PT (potty training). Better yet, it made me believe that it would only take us a week to fully day train! I was willing to split up day and night training if we’d only need a week. That sounds great!
Me- genuinely wondering if we’ll ever be done with potty training.
When I first read the PT book, I was 8 months pregnant with our second kid. Looking forward to the future, I knew my toddler would be just about the right age to start PT when the baby arrived. My husband and I both read the book to make sure that we were on the same page with the training method. I read the book twice to make sure all the rules stuck in my mind. We schooled Grandma and Grandpa on our chosen method since we’d be living with them during this big life change. We bought the travel potty, the potty seats, flushable wipes, a couple of potty-related kid’s books, and enough puppy wee-wee pads to blanket the entire house multiple times.
We hid the entire living room floor in the wee-wee pads and covered the couch in towels. Potty training was upon us. But we knew we wanted to focus on it after the baby arrived. At the end of my pregnancy, I was so uncomfortable that I knew I wouldn’t be mobile enough to help my son to the potty over and over. We also knew that once I had the baby, my husband would be on paternity leave, giving us one more person to help. We were so hopeful. What was a week of our time to focus on such an important step in our lives?
As I write this, we’re over 6 months into our potty training journey. Yup. You read that right. 6 freaking months. And we’re still not done yet. I’m not writing this to tell you HOW to potty train. I’m not writing this to tell you which method is best. And I’m sure as heck not writing this to tell you that potty training is easy, fast, or terribly convenient. I’m writing this to tell you that potty training is freaking hard no matter which age you start or how smart your little genius is. But over the last six months, we’ve tried many different methods, tricks and hacks and I’m writing this to tell you which of those tricks worked for us.
1- REWARD SYSTEM
The potty training method that I chose to follow expressly discourages a reward system. But hey, we’re a family of rebels and our parenting motto is “Whatever Works!” because we all get to a point sometimes when it’s more about just getting things done. We didn’t start out our training with a reward system in place. Again, we started this adventure as hopeful parents. Weeks into our PT journey when we were deep in discouragement, we decided to give rewards a try. We started PTing in the fall so we had tons of pre and post Halloween candy at our disposal. One of my favorites that I kept stocked in the house was candy corn. Love it or hate it, most kids don’t care. It’s a special, sweet treat. Our rule was one corn for a pee and two corn for a poop. For a time, it was a great motivator. You could substitute a different food treat in place of candy. I’ve also heard of people using potty charts with stickers given as a reward. If you’re not opposed to a reward system, test out the things that motivate your child.
Sometimes you just have to go with your gut.
The last thing I want to mention about this method is that it did NOT completely ruin our PT results. This singular trick is not the reason we’re still struggling to get to 100% trained. The reward system worked well for our kid, for a time. We were actually able to quit the reward system cold turkey because we eventually ran out of candy corn when it went out of season. Thankfully, our toddler is pretty flexible to rule changes like that, and after asking multiple times finally gave up and accepted the fact that he didn’t need a reward to use the toilet. This method helped transition us from the little, portable potty to the big toilet. So, I consider it a small win in the long game.
2- BATH CRAYONS
These were an item that we already had laying around from bath time. Bath crayons are washable crayons that can be used on the walls of a shower or bath tub. We found that they work great on the glass doors of the shower in the bathroom we mainly use for PT. Many times we found ourselves stuck in the bathroom with a stubborn toddler parked on the potty waiting for results. We were spending anywhere between 10-30 minutes in the bathroom with our son who refused to go on command even when we knew he needed to. So, what do you do to pass the time? We’ve read books, watched videos with him on our phones, or just sat and memorized the back of the shampoo bottle. But once we figured out we could use the bath crayons, we opened a whole new world of bathroom entertainment.
These are the bath crayons we use. They’ve come in handy so many times in our PT journey.
We used the bathtime crayons to draw on the glass shower door immediately adjacent to the toilet. We worked on our ABC’s, colors, numbers, etc. But the most helpful was learning new words. I would write a new word on the door that was related to our training, regardless of how long the word was. Our favorite word was “COOPERATE” which was written above definitions like “to help” and “work together.” While my son sat, trapped and bored on the toilet, I would read the big word to him and give him a little explanation and story to define it. My son amazed me when we came back after only doing this a couple of times. He not only remembered all the words (not quite site reading but more memorization) and had a grasp of what those things meant. This helped us a lot in our journey because my son is BIG on communication.
I was also able to use the crayons to draw or write things my son was interested in and create stories around those to help him learn concepts like “focusing” thanks to something Cookie Monster once said, team members “obeying” the direction of the captain on a football team thanks to his love of the Seahawks, and I also fabricated a story about how Stormtroopers have to “communicate” to Darth Vader when they need to go potty. That one might not be canon, but it worked for us! You know your kid best. Use these tools to your advantage when helping them learn about the PT process. And if you don’t have a shower door to draw on you can always just use regular paper and tape it to a wall and use regular crayons or markers. Time to get creative in the bathroom!
The shower door is a great opportunity to learn new things since we spend so much time in the bathroom while potty training. Here, we learn words we commonly use plus new words that can help us in our PT journey. Right now our big word of the week is “communicate” which has been a big speed bump for us.
You can also use the bath crayons (or dry erase markers) to draw on the inside of the toilet seat. If your child is having a hard time focusing on staying on the toilet, you can flip them around backwards (facing the toilet seat) and let them draw on it to pass the time. This worked for us for a while and made for some interesting bathroom art to surprise the next unsuspecting toilet user. Click HERE for a link to the bath crayons we use. These ones work really well and also wipe off without a lot of effort. We found them for a few dollars at Walmart and I don’t make any money off this recommendation.
3- TALLY MARKS
While we’re on the subject of the bath crayons, I want to mention one of our latest tricks. We’ve started writing a tally mark on the shower door for every pee and poop made without an accident. Unfortunately, when there is an accident, we erase that line of tally marks and start over. We started this idea without a solid plan for it. We weren’t offering a specific reward or punishment. We just wanted to build into practice the idea that the tally marks hold value.
It’s hard to get a good picture of it but this is our crude tally mark portion of the shower door. Obviously, we’ve had a recent set-back in the pee department.
Recently, after another big accident-related set back, I impulsively offered ice cream as a reward for accumulating 40 tally marks. In the past, my son has only hit 36 tally marks without an accident as his personal record, and he’s never had ice cream in his two and a half years on this planet. So, I’m not sure if it means a darn thing to him, but I’m willing to try it. For science! And for ice cream! Because we all know Momma Bear is going to get some of that ice cream too for her hard work.
Alternatively to the tally marks providing a reward, they can also provide a means of understanding hard work lost. When we have an “accident” (and, to be clear, these are hardly accidents at this point because my son knows the rules, knows our routines and still refuses to use the toilet without prompting) we erase all of the accumulated tally marks for either pee or poop depending on the accident type. When we do this, we make sure to stress that these tallies are valuable and that we’re disappointed to have to erase them. I do see that my son is starting to understand their value, and losing them finally has some significance to him. I am curious to see WHEN (because I remain hopeful) my son reaches 40 tally marks, if getting ice cream makes a positive impact on him in terms of motivations. Stay tuned in for an update!
4- TAKING SOMETHING SPECIAL
This trick came to me on a whim. We had been struggling for weeks to get my son into the bathroom at our prompting (based on his regular and predictable pee schedule), and every time we even mentioned the word “bathroom” it became a massive fight. It became increasingly difficult to keep our composure and creative a positive experience. At one point, before prompting for a bathroom break, I decided that I was not going to use my usual verbal prompt. Instead, I would ask him these words exactly: “What are we taking with us?” I didn’t give him any warning, or any context for the words’ meaning, but I would get up and start to suggest specific toys or items in the room to “take with us.” Then, once he had selected the items, we would carry them to the bathroom (without any resistance, surprisingly), and find a place for them on the bathroom counter while we did our business. It worked! And it still works!
Today’s “chosen” few consists of some magnet tiles, a horse, a spider, a dog toy, and Mommy’s hair clip. Whatever works.
Every time we use this method, we take something different. We’ve taken every toy, some more than once. We’ve taken really obscure objects from different rooms in the house. We’ve even taken random pieces of paper, ads from the mail, or small bits of (what I consider) trash. There have been very few items that I have said “no” to taking with us. Because remember, WHATEVER WORKS. Sometimes we take a specific toy to “show” it how we go potty like a big kid. Or we take a specific book to read. It’s really about the novelty of getting to choose (almost) anything to take with us. Most of the time my son puts the items on the counter and completely forgets about them while we’re taking care of business! This method is probably my favorite.
5- RESPONSIBILITIES
This PT trick has been an interesting one for us. We started working these responsibilities early into our routine. At first, we were having to help our toddler with every step because he was still in that physically awkward phase where things like pushing his pants down was too difficult for his little fingers. Slowly, over many MANY repetitions, he’s been able to take over the responsibility of moving his step-stool, putting up the toilet seat, placing the potty seat on top of the toilet seat, pushing down his own pants, sitting down on the potty seat without assistance, flushing the toilet, writing the tally mark on the shower door, and moving his step-stool to the sink for hand washing.
“Having these responsibilities has helped him understand better WHY we’re potty training.”
All of these things are steps towards his potty independence. All of these learned routines have saved me a lot of work. Having these responsibilities has helped him understand better why we’re potty training. The latest responsibility we’ve given him is to pee standing up. This one seems to be particularly special. For months, we offered it to him as an optional change but he kept refusing. We didn’t push it because we wanted him to feel ready. Thankfully, he found that peeing standing up “like Daddy” was a very special privilege, and it has been the most successful milestone we’ve had in months. I know this particular responsibility doesn’t work for girls, so once we get to the potty training age with my daughter, I’ll let you know what new methods we come up with.
Overall, potty training has been an uphill battle for us. We’re still not through it. But these 5 methods have helped get us through different stages and learn new things about what our toddler needs and how to communicate with him. I don’t expect anyone reading this to need or use all of these tricks. Hopefully, you’ll only need one or two. But I wanted to compile them all in one place so that you can keep them in your parenting “tool kit” and only use what you need. I’d love to hear about any other methods, tricks or hacks that have worked for your family. Please feel free to add a comment or two to this post and share your PT wins or struggles with the Average Momma Bear family.
There are thousands of ridiculous gadgets on the internet today. Kitchen gadgets is probably the genre with the greatest number of unnecessary items. I worked for 5 years at a retail job that focused largely on kitchen gadgets. I’ve seen it all- strawberry hullers, banana slicers, corn cob butterers. If there is some process that takes place in the kitchen, some hopeful inventor has devised a gadget to “make your life easier.”
Because I spent 5 years exploring what we called the gadget wall, I had the chance to try many gimmicky gizmos. Some of them withstood the test, and some of them became clearly unnecessary. One gadget that I never saw in the store but ran across during one of my late night online impulse buys was called Onion Goggles.
At first, I thought it was silly. Sure, cutting onions sucks…but does it really require eye protection? But, thinking back to all the times I’ve cut onions, I reconsidered my skepticism. It seems like every time I cut onions, my eyes pour tears in defense against the onion’s stinging particles released from the cut. It’s a job I dread. I spend a lot of time cooking. I’m the main cook in our house, and I genuinely enjoy cooking, so I come across this problem frequently. Many times, my husband offers to cut the onions for our dinner because he knows how seriously I react to them. Apparently, his eyeballs are a lot tougher than mine!
So, I purchased a pair of onion goggles and waited for my first opportunity to use them. Recently, we had a meal of pulled pork sandwiches, and I wanted to make caramelized onions to go with it. Caramelizing the onions brings out their natural sweetness and goes very well with the tangy zing of the barbeque sauce on the pork. So, I busted out my newest kitchen fashion accessory and gave them a try.
I wish you could smell pictures!
I was very skeptical. Over the years, I’ve tried many of the Old Wives’ Tales based around ways to keep onions from hurting your eyes and had yet to find one that works. I’ve tried leaving the roots on while cutting the onion. I’ve tried using a very sharp knife. I’ve tried coating my knife in several different substances before cutting into the onion. I’ve tried many others. None of them worked for me, so the onion goggles were really my last effort before giving up on fighting it.
I needed to cut up the entirety of my red onion, so I was able to give my goggles a fair first try. As I began to cut the onion, I noticed that the lenses started to get what looked like tiny water droplets on them. That must be what normally gets in my eyes. Yikes! To me, that was physical proof that the goggles worked. After getting through an onion cutting experience tear-free, I’d say that these onion goggles lived up to their purpose. I’ll be keeping them handy in my kitchen from now on.
With the onion goggles I didn’t have to worry about cutting myself because of impaired vision so I was able to get perfect slices!
If you’re looking to get a pair for yourself, I’m not here to recommend any specific brands, but I can recommend some criteria for your search. Make sure that the goggles you purchase come with some sort of particle blocking material around the frames where they sit against your face. This is the main protection against the onion’s sting. Additionally, it is useful to purchase a pair with a strap that goes around the back of your head to hold them on rather than them just sitting on your nose like a regular pair of glasses. Even with a foam barrier between the glasses and your face, if they’re not held against your face tight enough, there will be plenty of gaps for onion particles to sneak in and make your purchase pointless. The pair I purchased were like regular glasses but came with an optional band that attaches to the frame. This band worked perfectly and was quite stylish, if you ask me! They made me feel like a kitchen superhero!
Kept my eyes protected AND made me look cool! Haha!
I wouldn’t call myself cheap, but I appreciate a bargain. Especially when it comes to equipment and clothing for my children. I still end up spending plenty on them, but when I can save a few bucks here and there, it means I can splurge on the more fun stuff.
Getting hand-me-downs and re-gifts is a great place to start when you’re expecting a child, but as you get further in, you start to realize how much stuff you actually need for a baby. Of course, there are some things that are more of a luxury and not a necessity. But there are some items that end up on every baby registry or wishlist. A stroller is one of them.
When I found out I was pregnant with my second baby, I started to think about what life would look like with a newborn AND a toddler. How do I keep track of both of them at the same time when we’re out and about? How do I get both of them from one place to another outside of a vehicle? It all started to sound overwhelming, but I was determined to make the transition from one to two as easy on myself as possible. I struggled with anxiety when I became a mom the first time, and I was intent on preventing a repeat situation.
Dreaming of a Two-Seater
I told myself years ago (before I had kids) that I never wanted to have to juggle a double-stroller. Well, that bit of pride went right out the window when I discovered multi-function strollers. They now have double strollers (for two children) that convert into different seating functions. You can have two seats for toddler-sized kids, or two spots for baby carriers (good for twins), a spot for an older kid to stand and hold on, or any variation of those options.
My bargain stroller almost totally clean!
Since I love a bargain, I was determined not to pay full price for one of these luxury baby vehicles. I saw how the stroller I had for my first child got beat up, used heavily, and tossed around, and this made me less excited to sink several hundred dollars into something that received that much wear and tear. So, I started bargain shopping.
Thankfully, there are as many people trying to get rid of their old child-rearing gear as there are trying to buy it, so I had plenty of options to choose from. Once I narrowed down the make and model of the stroller I wanted (based on reviews I read on new ones combined with input from other moms), I jumped on the Facebook Marketplace and searched my surrounding area for the stroller I wanted.
I lucked out and found one for a fraction of the cost of a new one. It was practically free! I knew this most likely meant that it had some wear and tear, but at the price they were asking, I could hardly be picky. Once I picked up the item, I found that it wasn’t so much wear and tear that I should have been concerned about but more dirt and grime. Yuck! I know kids are messy, stinky, sticky, icky, cute, little creatures but this stroller had seen some action!
I had seen some Pinterest post months before about soaking a stroller in a bathtub filled with water and soap, but I wasn’t quite willing to submerge my stroller in water. Plus, I wanted to be able to let it dry out completely, which seemed tricky when washing it inside the house. Luckily, I was pregnant with an end-of-summer baby so I had great weather for my experiment.
The Nitty and Not-so-Gritty
I decided to wash my not-so-new stroller like I used to wash my car. (I say “used to” because I just go through the car wash now…I don’t have the time or energy to wash my own car anymore.) I cleaned the stroller in my driveway with a hose fixed with a spray nozzle that had multiple spray options. Here’s the breakdown of my method:
Scrub brushes like this make the job easier.
Open up stroller completely and remove any loose debris. Turn it upside down and shake it out if need be. Vacuum it out! There are a lot of methods that could work for this part.
Remove anything on the stroller that you don’t want getting wet. This could be any bags or extra things hanging off the stroller that don’t need cleaning.
Open/extend all canopies as they will also be getting a scrub down and need to be easily accessible.
Get a hose hooked up to water, preferably with a spray nozzle that offers at least one higher pressure setting.
Spray the heck out of that stroller. Get every nook and cranny. Use the high pressure setting to blast stains and grimy surfaces. *Watch out for flying fishy crackers!*
Using regular dish soap and a scrubby brush (I used the kind I use on dishes, and it worked fabulously), scrub every surface of that stroller until you get a decent lather all over.
Using the high pressure hose setting, spray off all of the soapy surfaces until water runs clear.
Check surfaces for any necessary re-scrubbing.
Once stroller is clean of soap and dirt, leave in a warm, dry area or in the sun to dry.
***Don’t leave the stroller in the sun too long because some material colors could fade. Make sure to spin the stroller around every 15 minutes or so to speed up drying in the sun. Also, don’t leave a wet stroller in a warm, dark place or you could cause mold to grow on it. Similarly, don’t fold up the stroller if it is wet or even damp for the same reason. Fold it up once the material surfaces are COMPLETELY dry.***
You may need to go over some sections more than once. Seriously, kids are gross! But so much fun, amirite?! I purposely used just regular dish soap for this task because it is a mild detergent. I’m sure you could use something else, but I wouldn’t suggest it. You don’t know how some cleaners could affect the integrity of the stroller’s surfaces. You wouldn’t want to weaken materials or corrode the stroller’s moving parts.
This process took me maybe 30 minutes to complete, and it changed something that was garage-sale-quality into consignment-shop-quality for only minimal effort and no extra money. This process could be used on things like playpens, baby seats, high chairs, etc. But you SHOULD NOT use this process on car seats, as car seats have very strict rules on cleaning so that their structural integrity and safety are not compromised. Please do your research or ask a qualified car seat safety specialist for the proper methods of cleaning a car seat.
Full disclosure: This review DOES NOT make me any money. I am reviewing this product only as a consumer and do not stand to profit from any promotion of the product. I do NOT sell this product.
Any woman who has been pregnant before has noticed changes with her body. It wasn’t until I had given birth to my first child that I began to notice many things about my body that had changed and were still changing. Of course, carrying a baby inside your body will change your shape and the way some things function, but there are other changes, sometimes subtle, that you don’t notice right away.
Months after I had given birth to my son, I started to notice my hair changing. I was in denial for weeks that it was falling out. I had heard other moms talk about losing their hair, so I knew it was a possibility, but I didn’t believe it would happen to me. I thought having thick hair would save me from that. As I slowly started to lose my hair, I also noticed that my eyelashes had thinned out to a point that not even mascara could help. So, I started to look for options.
I had heard about eyelash extensions and other options similar to that, but I wasn’t willing to resort to that until I had exhausted all of the options I could do at home. I knew that eyelash extensions were only temporary and had to be done by a professional esthetician. This wasn’t a great option for me as a new mother. I didn’t have enough time in my days to leave the house for appointments like that. I wanted an option that I could do at home by myself.
“I wanted an option that I could do at home by myself.”
For months, I saw advertisements from a friend showing before and after pictures of women who had tried a product called Lash Boost from Rodan & Fields. This product was specially formulated to grow your lashes out as naturally as possible. Of course, I’m always skeptical of products coming from direct sales companies like Rodan & Fields. I, myself, have been a part of a couple MLM (multi-level marketing)/DS (direct sales) style companies in the past. Some companies sell really great, quality products and others do not. I had heard a lot of good things about R&F products, but I was still skeptical.
A friend of mine who is a consultant for R&F was running a deal on the Lash Boost so I figured it was a good time to try it. I had no idea how much it would cost, and when I found out the reality of the price tag, I almost backed out. It is expensive! That was my first impression. And because I had never purchased any other products from R&F, I had no basis for estimating the price to start with. But realistically, if growing my lashes out was important to me, Lash Boost still ended up being cheaper than going the route of eyelash extensions. The first tube I purchased was an experiment because I didn’t know if it would work or how long the tube of product would last me.
The Lash Boost product comes in a skinny, silver container, about the size of a mascara tube. When I first got it, I thought “this stuff better work for this price!” Initially, I felt kinda disappointed because I had paid so much for such a small tube. It turned out that that tube lasted me about 2 ½ months. So, once I did the math, it turned out that the value of the product wasn’t as bad as the initial sticker shock. Thankfully, R&F gives you control over when your next product shipment is purchased and shipped. This meant that I was able to push out the purchase of my next tube for a couple months. Not having to pay the full price every month was a bonus. You also save a bit on the product by signing up as a recurring customer. Of course, those types of “discounts” are always factored into the price of the product anyhow, but it was nice to have a discount as long as I could stay on top of the reorder date.
Now that I had my product, I was ready to try it. I had no idea how long I could expect to try it until I saw results. I also had no guarantee that it would work for me at all, but it was worth a try. I told myself that I would give it a month, and if I saw no results, I would stop using it.
“I told myself that I would give it a month, and if I saw no results, I would stop using it.”
After a month of trying Lash Boost, I did see results. I was surprised at how well it had already been working. Initially, the only issue I had with it was that it left the skin on my eyelids a little red where I placed the product at night. It looked like I was wearing a dark pink eyeliner. I was a little concerned at first, but after using the product for a month, the redness started to go away. This may sound concerning to some of you but there was no swelling, pain, or other signs of a bad reaction other than the skin redness, so I was willing to risk it.
Top image was before using Lash Boost. Bottom picture was after 3 months of daily use- mascara used to highlight lash length.
I continued using the product and continued to see results. My eyelashes grew in length and thickness. I finally started to feel less like a hot mess mom and more comfortable in my own skin. Lash Boost worked so well, in fact, that I rarely felt like I needed mascara to accentuate my eyes, but when I did use it, the mascara did a great job of highlighting my already long lashes. It was nice to finally feel like I didn’t need to wear false eyelashes when I wanted to dress up. It was nice to feel proud of my own lashes. It helped me feel pretty, and I’m not ashamed to admit that.
As I write this, I have been using this product for a little over a year now. I did notice that after about 6 months of using Lash Boost, my lashes had reached what I consider to be their max length and thickness. Anything after that has been just staying consistent with the product to keep the look intact. There was a period of time after I had given birth to my second baby when I was too tired to remember to apply the products during my bedtime routine like usual. I did begin to notice a decrease in length and thickness of my lashes during that time. Once I noticed that, I made sure to continue my evening applications, and it seemed that my lashes recovered quickly, and I was able to regain my max lash length and thickness.
My most current results. Mascara used to highlight lash length.
Overall, I have been happy with this product. I love my results and have had to exert minimal effort to attain them. Once I factored the cost into my beauty regimen budget, it wasn’t as shocking as it was at first. Thankfully, other things in my regimen became more affordable, so the tradeoff evened out in the long run. In a future post, I will review the skincare products I have been using from another company and how their value is the best I’ve come across in my many years of trying various products.
I give Lash Boost from Rodan & Fields 4 out of 5 Bear Tracks!
It seems to be common that if you were born with a certain type of hair, you end up wishing you could change it. I’ve heard this said for almost every hair type. If you have complaints about your hair, I can almost guarantee that there is someone out there in the world wishing their hair was exactly like yours.
Fine-haired people wish their hair was thicker or had more body. Thick-haired people wish they had fine, manageable hair. Straight-haired people wish for curls, and curly-haired people want to straighten their hair. I remember that when I was a kid, many girls were jealous of my long, thick braid. My mom kept my hair in a braid to protect it from getting tangled, since she had been letting it grow my entire life. I was blessed with thick hair, but let me assure you, this is as much a curse as it is a blessing.
“I was blessed with thick hair, but let me assure you, this is as much a curse as it is a blessing.”
I’ve met many hairdressers who express their envy of my thick hair but also curse it once they find out how long it takes just to blow-dry it. And changing the color or adding highlights? Fuhgettaboutit. All of this may sound like a big, stupid humble brag to many of you, but I assure you, there’s another point.
A couple years ago I found a solution to my thick hair curse. Every summer I spend several months feeling miserable from the heat. My hair has always acted like a scarf on my neck and a knit hat on my head all year round. That might be okay in winter, but during the summer it is pure torture. And keeping my hair in a ponytail or bun for months at a time gets really boring and doesn’t let my scalp breathe.
After dealing with this for years, I decided that I would shave off all of my hair from about the top of my ears down. This allowed me to get rid of half of my hair but also gave me the option to hide the undercut beneath my regular length hair.
Postpartum Hair Loss
On a side note, I was a bit concerned about postpartum hair loss with this haircut. I did not have my head shaved during my first pregnancy, but after I had my first baby I ended up losing a lot of hair. My hair started thinning out along my hairline, and I got bald spots near the sides of my forehead. I just did my best to ignore it or cover it up until it started to grow back. When I became pregnant the second time while having the undercut, I was afraid that I would have to deal with the same type of hair loss as with the first. Luckily, it seemed that my hormones were more forgiving after having my second child. Plus, my hair was lighter and easier to manage because of the undercut. And since I was pregnant in the summer, it was also very helpful in keeping me cooler than normal.
Here are the pros and cons I have discovered to getting an undercut.
UNDERCUT PROS:
Much cooler head temperature.
With my hair up, I can feel a breeze on my skin.
My hair dries a lot faster.
My hair sits straighter and flatter.
Getting my hair colored takes half the time that it used to, and it is usually cheaper!
Hats fit me better!
I have a very versatile style between up and down looks.
I can get my undercut shaved at a salon for cheap or do it myself for free.
Styling my hair takes a fraction of the time that it used to.
UNDERCUT CONS:
The breeze can be a little cold on my scalp in the winter.
If I ever want to grow it back out again, it will take a long time to catch up with the rest of my hair.
Keeping my undercut shaved regularly becomes a challenge with my fast growing hair.
If I dye my undercut, my hair will grow out with a very small section of color on it.
My long hair likes to velcro to my shaved undercut when I’m trying to separate the two.
Conclusion
I would recommend this type of hair cut for anyone looking to stay low maintenance while also being able to have fun with hair styles. I don’t do a lot with the styling because I rarely have the time since becoming a mom. But this cut allows me to hide the undercut for a softer and more feminine look while also giving me the flexibility of pulling it back or up to reveal the shaved parts for a more playful and edgy look. If you’re not willing to commit to cutting off half your hair and not being able to grow it back quickly then definitely avoid this type of cut. Below are picture examples of the simple ways I have worn my hair while having the undercut.


