Cleaning and organizing does not come easy to everyone. If you’re hoping to improve your methods and attack some cluttered areas, you’ve come to the right place. I have a passion for cleaning and organizing, but that didn’t always come naturally to me; I had to work at it over the years. Now that I’ve found some shortcuts and tips, I love sharing them to help others. Here are the 5 main ideas I use when first attempting to clean and organize something.
Number 1: Break it Down
This idea applies both to physically breaking things down to fit into the space better and to breaking the job down into manageable pieces. For example, if you want to organize a whole room, start with the closet. Even that might need to be broken down even further (i.e., organizing clothes before other items). This idea can take an overwhelming project and turn it into bite-sized pieces. Dedicate your time and energy into doing things carefully and slowly. Be aware of the fact that a project like a whole room might take several C&O (cleaning and organizing) sessions. Typically, I dedicate myself to one project per weekend since that’s the only time I can really focus on a task.
Our old high chair has a great break-down feature of folding up so it fits well in the space in our shallow closet under the clothes.
In regards to breaking things down physically, this is definitely the first thing I do when I approach a project. Is there anything being stored in this area that could be broken down to take up less room? My most recent project was a closet stuffed full of baby items that we’ve grown out of in our current stage. This included things like a bassinet, a jumper, a baby swing, a high chair, etc. Some of these items were made with built-in storage features like collapsable legs or removable covers, but many of them can be broken down further. If you have no plans to use these items in the near future, breaking them down to their easiest-to-store size can be a huge help to you in the meantime. I go in to better detail below in number 4 about breaking items all the way down and the best way to store them.
Number 2: Vertical Space
Vertical space often goes overlooked and underused. If something can be stacked upright as opposed to laying down it can create a lot of extra space. You can also store items in stackable boxes. Depending on how large your items are, you can typically find shoebox-sized plastic bins at the dollar store that work great for stacking to make use of your vertical space. And make sure to label, label, label! Check out the last section, number 5, for more information on that. If you’re storing things like books or folders, make sure to stand them upright. If you still have some vertical space above those books or folders, look into making or buying small shelves that can create another shelf for stacking above them. Refrain from stacking books or folders on top of one another. This makes it extremely difficult to access books on the bottom should the need arise. And if you awkwardly pull something from the bottom, and it knocks down the whole stack, now you have a new mess on your hands. It’s better to think ahead for the sake of accessibility.
In photo #1, I am illustrating a good use of vertical space. The closet space extended vertically beyond the doors so I made use of that vertical space by stacking things upright. In photo #2, I show how things like folders and papers can be placed in a more upright position to save space as well.
Number 3: Out With the Old
Holding onto something “just in case”? Chances are, if that case ever happens, your feelings and circumstances might be different enough that you may not even need the thing you’re holding onto. For example, sometimes I hold onto some shirts or outfits with a plan that I’ll wear them again someday after I magically lose weight and gain confidence. In reality land, if the stars aligned and I was able to wear those outfits again, I’d most likely be more excited to buy new clothes because my tastes change over time as well as my budget and the available styles. As a personal rule, if I haven’t worn something in 6 months, I consider donating it. If I haven’t worn it in a year, I do. This rule can apply to anything you’re storing. If you don’t have a specific plan for the item, consider donating it after storing it for 6 months to a year. This will help keep your storage levels at a more manageable level and make room for newer items that may need storing.
Number 4: Keep it Together
This idea goes along with breaking items down. If you take something apart or break it down into smaller parts, think ahead to a time when you may need to reassemble it. Before I take things apart, I always make sure I have three things handy (other than tools): a small Ziploc baggie, a permanent marker, and tape (packing tape works best, but most tapes will work). As I remove small parts, screws, nuts and bolts, I place them all in the baggie. Then I label that baggie with the name of the thing I took apart and tape the bag to one of the larger pieces to make sure they stay together. Just throwing the small parts baggie in with the larger pieces creates a risk of losing them. Make the effort to keep the parts together. This method also works great if you’re disassembling furniture when moving. Labeling the baggie and taping it to the piece of furniture has saved me from losing the small parts several times.
Garbage bags work great to keep all pieces together but aren’t the best long-term solution. If something needs to be stored long-term, look into getting it its own storage container.
Number 5: Label Now, Find Later
Labeling things is a labor of love. It takes a lot of extra work and planning to keep things organized in the long run. I find it best to label things as I go and to commit to finishing the job completely, which means labeling things as best as possible before moving on to another section. Too many times have I started to label things only to get distracted by another section that needs my attention, and when I come back to where I was originally working, I’ve forgotten what I’ve packed in which bin. I find the easiest way to label is to use a white duct tape or colored masking tape and a permanent marker. This is the fastest, cheapest way to label. If you’re looking for a more polished look to your organization, you can always take things a step further and invest in a label maker or, better yet, use a vinyl cutting machine to stylize your own personalized labels. But unless you’re hoping to get a lot of likes on Instagram and saves on Pinterest, I suggest going with the quick and easy tape and marker method. It’ll keep you from hating the whole process and giving up before you finish.
In Conclusion
These methods only scratch the surface of deep cleaning and organizing, but they’re a great place to start. They’ll help you tackle any clutter, great and small. Just keep in mind that breaking your C&O jobs down into smaller chunks is the way to go. If the stuff you’re cleaning and organizing hasn’t gone anywhere in years, there’s no real rush if it means things don’t get done right.
Choosing wall colors, cabinet styles, furniture, decor, and making it all work together is hard enough. What about trying to define and capture your own style? Sure, you can cruise Pinterest for hours, days, years and save a million amazing ideas, but how do you take that collection and make it your own?
There’s a reason those Instagram pictures and Pinterest pins of farmhouse, boho, shabby chic home decor have thousands of shares and saves. They’re beautiful. They feel intentional and put together. Personally, I’m obsessed with many of those and strive to make my house look like the pictures I see online, but in reality, I know my house will never look like those. This might be for a few reasons. First of all, those pictures are staged and heavily edited. I know no one who has a family, especially kids, can live in a house that looks like that 24/7 and stay sane. I also know myself well enough to know that I always try to recreate the home decorating styles I see online but my personal style frequently creates an odd mashup that might not be Insta-worthy.
Decor examples from Pinterest (could not trace original author) using a neutral palette with some contrasting patterns or color. *Not my photos*
The common thing about most of those extremely popular decor styles is that most of them are based on a neutral palette. The main base color is usually a stark, clean white, and the majority of the large accent pieces are neutral browns, tans, and creams. Some designs incorporate black as the contrasting color, while some even go as far as to use a single, non-neutral color as an accent.
As much as I would love the look of a neutral palette, I tend to require a little more color in my personal designs. I do my best not to go overboard with color. A little goes a long way. That rule applies to all of the suggestions further in this post. That being said, some bold color choices can make for a playful and interesting aesthetic. Below, I have included a picture of the dining room wall I painted in my last house. I chose a bright teal because it is my favorite color, and I wanted to create a unique “pop” of color among our mostly neutral paint palette. Adding fun, geeky decor to your home is a nice way to hint at your style, but adding just the right color to a wall can brighten your day and put a smile on your face when you look at it.
A bold teal color I chose for my dining room wall. This became my favorite wall in the house because it breathed life into the otherwise neutral color palette and gave a beautiful color contrast to any artwork placed on it.
Getting to design your own interior space can be overwhelming, but it can also be freeing. Take into account the things you’re interested in. If that happens to be neutral, pattern heavy, boho-inspired, green spaces, then good news- there’s tons of inspiration for you online! But if you’re more like me and appreciate something a little more unique and a lot more geeky then I have some wonderful resources and ideas for you ahead.
“Our family is full of geeks. I can trace it directly to my geeky parents.”
Our family is full of geeks. I can trace it directly to my geeky parents. My husband and I have definitely passed it on to our kids. Because of this, I love finding ways to incorporate our personal, geeky style into our interior decoration. It can be tricky if you’re hoping to stay away from in-your-face, obvious fandom references. I have taken the time to compile several extremely geeky color palettes (found at the end of this article) that reflect different fandoms. These colors can be easily incorporated into your designs with subtle tricks such as decorative throw pillows, wall art, and thoughtfully placed knickknacks or more visible, yet aesthetically pleasing, hints like full colored walls, bedding, or murals.
These ideas should be used in small amounts. Too many of these ideas in one place can get a little too busy and quickly become tacky. So, try to spread the geekery throughout your house. It will be more like an Easter egg hunt for your guests to discover and less like a visually overwhelming mishmash from wall to wall. One way to hide geeky clues in plain sight is to add home decor items like the ones below. (All items can be found at ThinkGeek.) These items can easily be accents in rooms where they blend in with other regular decor. The red clock could be used in a farmhouse style kitchen as an interesting color contrast piece. The towels could be used as decorative hand towels, placed on top of solid color towels with similar palette. The constellation light could be a sweet feature on a guest room nightstand to brighten someone’s night.
Small decor pieces like these can easily be worked in to existing decor schemes to add geeky flair. (These items can be found on ThinkGeek.com)
Here is an example of geeky decor that can be added to even the most elegant dining room. These Harry Potter themed plate and flatware sets (also found at ThinkGeek) are a great way to hint at something without being too obvious. Don’t even mention their theme to your guests and see if they discover it for themselves!
Beautiful Harry Potter dinnerware and flatware can be an elegant way to geek up your dining space. (These items can be found on ThinkGeek.com)
If you happen to have a home theater or a movie viewing area, you can always find beautifully done, artistic posters that celebrate some of your favorite movies. The posters below are just an example of the great ones you can find on the internet. Nowadays, there is such a vast collection of artwork like these that you can use to hint at your fandoms rather than being blatant with an obvious movie poster. Take it a step further and put these artistic posters in wooden poster frames before hanging them. It will create an even more sophisticated and intentional look for your media room.
These posters would be beautiful in a family room or theater. What better way to showcase your favorite geeky movies than with these works of art? (These posters can be found on ThinkGeek.com)
Bedding doesn’t have to be boring. Adding some geeky bedding to your boudoir can allow you to sneak in some geek while allowing the rest of the room to be more neutral. Here are two good examples of geeky bedding that aren’t too flashy or juvenile. You could also carefully add in a themed pillow or two, nestled in with some matching, solid colored throw pillows.
These bedding sets are a fun way to use subtle, geeky prints in the bedroom. The example on the left is a Star Wars theme with TIE Fighters mixed in with the geometric pattern. The example on the right is a damask print using Harry Potter artwork for a more elegant approach. (Both sets found on ThinkGeek.com)
A bedroom is also a great place to make use of the fandom-based color palettes. For example, if you’re looking to hint at what Harry Potter house you belong to, you can always choose a color from the House’s palette, paint your walls with it and use the House’s secondary color as an accent in the decor. Here, I have provided two examples where I used the main color from one represented Hogwarts’ house (Ravenclaw in one example and Slytherin in another) and used the room’s decor as the secondary colors used in the Harry Potter movies. This is a neat way to use bold color schemes without overwhelming the visual aesthetics of the room. The remaining colors should stay neutral to keep the room from feeling too visually “heavy.”
Using Sherwin-Williams online color sample generator, I created two examples of room decor using Harry Potter House colors as wall paint and the secondary color in the room decor.
Using bold colors in your house doesn’t have to be scary. In our last house, my husband and I decided to incorporate our geeky personal touches into some of the most visible places. We researched the exact blue color of the TARDIS from Doctor Who so that we could paint our front door to match it. We wanted to make our front door look as much like the TARDIS as possible without being too obvious. So, we chose a door with windows at the top and used the bright blue paint color to give people that “hmm, this reminds me of something…” feeling every time they looked at it. We actually ended up loving the bright blue color so much that we decided to paint our powder room with the same color. It turned out great! It made that little room feel special and different without being out of place. Check out the photo of our TARDIS blue bathroom below.
We used Sherwin Williams 6811 – Honorable Blue as the paint color for our front door and powder room. This color was the closest color matching the TARDIS blue from Doctor Who.
Wall art can be a tricky decorating tool. So much of the wall art that you can buy in stores looks like stuff you see on the walls of a hospital or dentist’s office. Finding artwork that adds a little bit of geekery into your decor without being blatant can be tough too. Here are a couple examples I found that could work in a pinch. Below, you can see the first is a set of prints based on the art found in the newest Zelda video game, Breath of the Wild. That game has amazing visuals, but I liked that this art set was simple and graphic. Add these into a boho-feel room, and they’ll blend right in. You could even convince your guests that you purchased them abroad, haha! The second piece of art is a clever take on a classic piece of artwork. I love this one because it has a lot of color and visual interest. You could pull colors from this painting to add into your room in other decor pieces- pillows, lamp shades, rugs, etc. to bring the whole room together and keep this painting from standing out too much. Both of these examples have a lot of versatility in helping you visually pull a room together with simple decor using either style or color scheme.
Two great examples of artwork you can hang and enjoy in your home. Guests might not even notice the geeky hints!
And don’t forget about decorating outside your house! The front porch is the first thing people see when they come to visit you. If you’re like me and enjoy letting guests know a little about you before coming into your house, a geeky doormat is a great addition. To accent our Doctor Who door color, we found a great doormat that read “It’s Bigger on the Inside.” This was such a fun conversation piece when other “Whovians” would visit our home and recognize the geeky decor hints. Especially since our house really did look bigger on the inside!
Overall, there are a lot of possibilities and ways you can hint at your fandoms with your interior decor. It takes a light, creative touch. This is a subject I could write a whole book on if I had the time! And no, I don’t make any money off of my recommendation of ThinkGeek, but if you’re looking for anything from decor to gifts to clothes that are geeky in nature, that’s the place to go.
As promised, here are my fandom-based color palettes below. Each color has been assigned a hexadecimal color code (or hex code) that can be found at the bottom of the palette. You can read my previous post where I outline several websites I use when creating color palettes like these. These hex codes are used on several of the sites listed in my post to correspond to specific colors. With these hex codes and the websites I provide, you should be able to replicate these colors in other places for your own use.
Feel free to refer to these palettes when needing geeky color combinations, but please cite me as author. I put in a lot of time and effort developing these collections. Also, I would love to hear any suggestions you have of other fandoms for which I should make color palettes. If I use your suggestion, I will credit you in the next color palette post!
A few of my other favorite fandoms. The Harry Potter colors were borrowed from somewhere else (author unknown) because I felt that they were already pretty accurate. The rest of the palettes are my creations, most sampled directly from pictures of these fandoms.
My husband and I moved in together when we got married. We had just purchased a home that was big enough to grow a family and had everything we wanted. It was a dream come true. What we didn’t see coming and couldn’t predict was that the city we chose to start a life in would change drastically and cause us to rethink our entire family plan.
We started looking at options to move, hoping to relocate far enough away from our current city but stay within the same state. I started shopping for houses, looking at different cities and towns outside of where we were currently living. Due to certain circumstances, we knew that we couldn’t make another mortgage purchase for a couple years so we had time to take things slowly and figure out our plans piece by piece.
Even with the long and flexible timeline stretched out before us, we quickly became overwhelmed with the size and complexity of our possible move. On top of that, the issues within our current city were pushing us out more and more. Was there a way that we could speed up our timeline and escape as soon as possible? Then came a big “what if” question. When I first asked it, I thought for sure it would be immediately shot down. It’s crazy! Preposterous! We don’t have the money for that! Etc. Etc.
What if we could buy a piece of land and build our dream home over an extended period of time? Surprisingly, the question didn’t fall flat. We were both quiet for a few minutes trying to poke holes in the idea with the realities of our situation. But we couldn’t! So we began trying to figure out how one goes about building their dream house.
Step one was to buy a piece of land. For the sake of keeping this post at an abbreviated length, I’ll just say that over the course of several months we found the perfect piece of land and made the purchase. I may get into details of land purchasing in a different post.
The next step that we needed to figure out was how to design our dream home and turn it into a drawing that a builder could actually use. Here are the things I learned along the process:
Step One: Gather Ideas
I started by brainstorming with my husband a couple lists, defining all of the things we wanted to have in our dream house. Number of bedrooms, bathrooms, floors, special use rooms, special features. No matter how ridiculous they seemed, we wrote them down. Once I had those lists, I started to gather visual examples for the ideas on those lists.
An example of my Pinterest boards where I collected and organized my home design ideas.
I started with Pinterest. On Pinterest, I was able to create pin boards for all the rooms, features, and visual aesthetics we wanted. On those boards, I collected as many examples I could find. It also helped me find new and different ideas. I also found that there are thousands of floor plan links to look through for good starting points. Pinterest also has a function that suggests similar visuals, so if you find a particular type of floor plan that you like, you can find many variations of it there. This is how I found the original floor plan after which we modeled our design. Of course, each floor plan has copyrights, so you’ll have to make significant changes to any that you choose or pay a fee for the right to use it.
Step Two: Draw Up Some Floor Plans
Regardless of how you begin to assemble your floor plan, it can be a very helpful starting point just to start sketching ideas. After searching Pinterest for floor plans, I took a few that fit most of our requirements and combined them to start with. I used a couple methods for doing this. The first was to grab some good ol’ fashioned graph paper and hand-draw up some rough plans. Put rooms next to other rooms. See how they fit and flow together. I used a light table (you can also use a window with light coming through it) to stack the floors on top of one another to see how they line up.
Another option for drawing up floor plans is to try out the many different home design apps that exist. I tried several. Always try the free versions first to see if you like them. None of them are perfect, but many of them are helpful. Depending on your level of dedication and time available, these apps can be very useful for visualizing your floor plan ideas.
Here are some things to keep in mind when designing or choosing your floor plans:
The plans that you initially design will be VERY different from the plans you end up with from a designer. This is not a bad thing. Just be prepared to compromise and change.
Hallways are a huge waste of square footage and can drive up the cost of your house.
Consider the layout of your land. Which way does the sun rise and set? Where are your views? If your land gets significant wind storms or road noise, make sure to place rooms in your design methodically based on those (and other) environmental factors.
Are there going to be baby rooms/nurseries in this house? Consider placing those rooms far away from the noisier/high traffic rooms like the kitchen, living room, garage (due to garage door noise), theater/game/play room, etc.
If your land is sloped, consider putting in a finished daylight basement.
Roofing can be one of the most expensive parts of building a home. If you can have less square footage to cover in roofing, it could save you money. As an example- try to design multiple, stacked floors rather than a sprawling rambler-style house.
Step Three: Find a Designer/Architect
Something I learned early into our design process was that you need someone to draw up your blueprints regardless of how intricately you’ve drawn up your floor plans. There are varying levels of how much a designer provides you for your build process. This depends on the specific design firm and what they offer for their services. A designer and architect are generally the same thing, but they may refer to themselves as one or the other. Either way, a designer/architect is there to take your ideas and make them into something that works visually.
One of the many versions of our floor plans.
They usually have experience in knowing how a house should flow and what ideas work and what ideas are not worth considering. It is in your best interest to take their advice. Of course, I can’t speak for every designer out there, but you should choose one who has had a proper education and can show you a portfolio of work that fits with what you’d like for your house. They should be able to answer your questions, interpret your ideas, and steer you in a direction that gets you well on your way to building your dream home.
The designer we chose offered some very thorough job packages that covered everything from the exterior and interior design processes as well as the civil engineering and permits. We chose this because this was our first experience with the home building process, and we wanted to make sure that things were being done right.
Additionally, civil engineering is one of the most important parts of your home’s design process. Some design firms may offer this service in-house, but some may not. If they don’t, you’ll have to find a separate civil engineer. A civil engineer is the one who takes your visual house plans (from the designer/architect) and turns them into something that actually functions. They make separate plans for your lighting, your vent systems, plumbing, electrical, roofing structure, etc. These plans are necessary for your builders, which we will talk about more in a future post.
A few things to keep in mind during your design phase:
Be very clear with your designer/architect on what their prices include. You might be surprised to find later on that something like civil engineering or permitting could be a separate charge all together.
Listen to the suggestions of the designer. They should have the skills and experience to answer all of your questions and concerns. They also know when something just isn’t possible or might be out of your price range.
Make sure you talk with your designer about what your home building price range is. Be very honest with them about how much you are looking to spend on the actual building of your home. They will then be able to keep your designs within that range.
Know that there may be a lot of revisions and back and forth during this part of the process. Be patient and know that you’re that much closer to perfection.
Be very honest and verbal about your questions and concerns. You need to get your plans exactly how you want them, and you cannot assume that your designer knows what you’re picturing in your head.
Find a designer who is familiar with the permit processes and code requirements for the specific county your house will be built in. Different counties have different requirements to pass inspection, and if your designer doesn’t catch them all the first time, it could lead to expensive rework.
It is possible to find a designer who runs permits for you. This is very helpful if you are unfamiliar with the process. They will know what permits need to be filed and when and can help make sure those are completed on time.
In the end, this process should be fun and exciting. You should begin to see your ideas turned into real plans. Plans you can hold and show other people. It makes a huge difference to do your research first. Know who you are doing business with because you will be spending a lot of time and money on the design process. This is also an area of the process that you don’t want to skimp on. Being cheap with the design plans can cause a lot of rework and could end up costing you more in the long run.
An example of something your designer might be able to provide you alongside your floor plans.
Moving sucks. Generally. I’ve moved 9 times in my adult life. This doesn’t include the double-digit times my family moved us before I was in college. During the 9 times I’ve moved I’ve learned a lot. I’ve learned what helps and what doesn’t because I spent the first 5 of my moves doing it the way we’ve all done it. Start packing too late. Cram anything and everything into boxes. Run out of boxes. Run out of tape. Get overwhelmed. Ask friends and family to help with the moving in exchange for pizza or beer. Barely get enough help. Everyone’s exhausted.
Every time I’ve had the opportunity to move I’ve learned a new tool or tip that has made my life easier in the process. Currently, we are in the middle of our biggest (and hopefully last) move in terms of size and distance. The last time I moved was a few weeks before my wedding when I moved all of my belongings into my (now) husband’s garage. It was a surprisingly easy move because of the things I’ve learned.
I’ve felt compelled to share my tips with anyone who will listen (or read). So here are my top 10 tips for an easier move:
1. Create a Packing Kit
This tip is one of the easiest and most helpful things you can do for yourself even before you start packing. Start by finding yourself a box or container that is easy to carry like a fishing tackle box or a plastic storage box with a handle on the lid. Here is an example of the box and contents I used for this move:
This box will become and stay your go-to container for your packing needs. This keeps things organized and helps calm some chaos. This box should follow you everywhere while you pack and even through the move to the other side. You’ll want to pack it with things you need before AND after the move. Things you would put in this box could be:
-Packing tape (with extra rolls)
-Large permanent markers (for marking boxes)
-Colored tapes (for marking boxes)
-Box cutters (for packing mistakes AND for unpacking after the move)
-Zip Lock baggies (to collect things like push pins, nails, random misplaced hardware, etc.)
-Measuring tape (can come in handy when you’re planning what furniture to keep or purge)
-Small scissors (for cutting twine or stubborn tape)
2. Boxes
Some people know that you can go to the grocery store and ask for free boxes. But rarely are those good packing boxes. Those are, at best, banana boxes with holes for handles. For my past moves I was fortunate enough to be working a retail job or know someone who was. This gave me a great resource for different sized boxes that were very helpful for packing and this was my go-to for years.
But this move, I found yet another great resource for packing boxes. If you haven’t found and connected with your local Buy Nothing group I STRONGLY encourage it. Moving boxes are only one of the many great things you can find there. If you’re unfamiliar with what Buy Nothing is it’s exactly what it sounds like. It’s a community of people (usually based on where you live) asking for and giving things freely. The link to their website which will help connect you with the appropriate Facebook group can be found HERE.
In a Buy Nothing group you can ask for certain things you’re looking for (i.e. moving boxes, a cup of sugar, a shower head, dog collar, paint brushes, to borrow a lawn mower, insight into legal issues, etc.). Almost anything you can think of is an appropriate ask on Buy Nothing. You can also gift anything you’re trying to get rid of without expecting anything in return (which is great when you’re getting ready to move!). Have too many ceramic mugs? Post it! Want a specific plant in your yard gone? Offer it up! Ready to part ways with your kid’s old clothing? Gift it! I’ve given and seen some of the weirdest, most random things and they’ve been happily received by some person living near me. So don’t be afraid to try.
In short, this resource is incredibly valuable for many things. But for the purpose of this post, it can be a great place to find moving boxes. They will most likely be used but you will be surprised at what some people are willing to give. Among the hundreds of free moving boxes I’ve received from my Buy Nothing community, many of them were brand new and unused! People can be so unexpectedly generous! You have nothing to lose and so much to gain!
The last thing I’ll say about Buy Nothing groups (because I could go on and on) is that they also connect you with your community in a very unique way. You get to know the people you’re trading with. You make new friends. Once you’ve moved, you can also join the Buy Nothing group of the new community you will be moving to and find someone to gift your used moving boxes to once you’ve unpacked. It means you don’t have to worry about packing your recycling and garbage bins full of packing materials. It’s win win!
3. Organize and mark your boxes
For every move before our current one, I labeled the boxes as I had for years- with the general contents of the box. This time I tried something a little different. I was determined to start our packing process early. I knew that I would be almost 9 months pregnant by the time we were moving and I did NOT want to leave packing for the last minute. Plus, we knew we’d be moving in the hottest part of the summer. That’s a baaaaad combo when you’re ultra pregnant! I also knew that we were planning to keep the majority of our belongings in storage for over a year while our new house was being built. This meant that I had to stay organized and leave myself the ability to find things easily that I had already packed. For example, early on I packed up my lesser used items from the kitchen. A month later, I needed my rolling pin that only gets used about twice a year. If I had just packed it in a box labeled “kitchen stuff” I’d be going through several boxes just to find it and making more work for myself in the end. Instead, here was my organizational method:
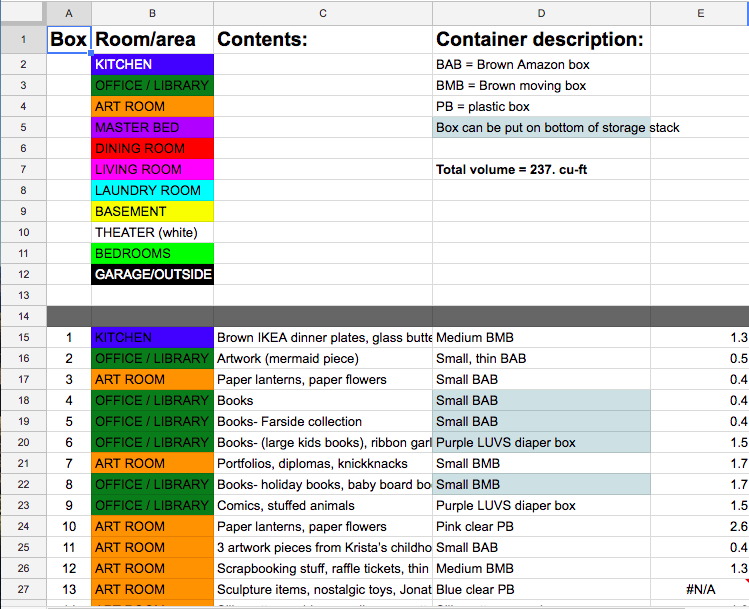
Start by making a spreadsheet. There should be at least three columns. My main columns were: BOX NUMBER, ROOM (color coded), and CONTENTS. Each box received a number that corresponded with the spreadsheet row. I then decided which room the contents of this box needed to end up in (not necessarily where they came from but that can work too if you haven’t planned that far ahead). To color code my boxes I purchased a set of different colored masking tapes from Amazon. I needed enough different colors to be able to set main rooms apart so that boxes can be easily delivered to the correct rooms when we move into our new house. A link to the tapes I purchased can be found HERE. This is just an example of what you can use, I don’t make any money from featuring it. Each tape color then corresponded to a color on my spreadsheet in the second column so that I could see at a glance which boxes went where. That way I could also group boxes by room if I needed to search for an item I forgot to record.
A small part of my moving spreadsheet.
The third column is where I recorded almost every item I placed in the box. This came in handy many times. All I had to do to find something specific was use the search function (or the find and replace function) to quickly find all the rows containing a specific word.
We added a couple more columns because I’m scary organized. Possibly a little obsessed with organizing. I added a column for the type of box (general size and type or identifiable markings) and my husband added a column to track the cubic space the box took up based on its general measurements. The only reason we had this is because we were trying to fit the most of our belongings into a specific sized storage unit and wanted to be able to estimate how much could fit. These last two things aren’t that helpful to everyone but they worked for us. Play with it and see what helps you the most. The most important part is tracking the box number to the contents.
A completely packed and labeled box ready to be moved!
Once you have your spreadsheet just remember to mark the box with its number on all sides as well as the colored tape that corresponds with the room it will need to end up in.
4. Downsize (sell and give)
Once we knew that we were going to need to store our belongings for a year we had to become very selective on what we were keeping and what would be cheaper to just buy later on if we needed it again. I can be a pack-rat so I tend to try and save money by saving things. So it didn’t occur to me that it would possibly be cheaper to re-buy an item later rather than to pay to store it for over a year. This may not be the case for you since not everyone needs to store their belongings during a move but it’s something to consider when you’re making the decision to keep or toss things.
This is another place where the Buy Nothing groups can come in really handy. I was able to give away so many things to my group which saved me trips to the dump, trips to the thrift store donation line, or room in my garbage can. And it meant that someone else was getting use out of the items rather than them just becoming piles at the garbage dump. It was also convenient because the general Buy Nothing practice is that you offer up an item and the person who is chosen to receive that item comes and picks it up from your doorstep. You don’t even have to leave the house! This detail was huge for me as a pregnant mom with a toddler. Any reason to NOT leave the house was helpful during this busy and tiring time.
I was also able to make use of the Facebook Marketplace for some items that were worth something to me. Facebook Marketplace is a slightly more convenient version of Craigslist. You still can’t be 100% sure of people on there, and there are a lot more flaky people than Buy Nothing but it serves its purpose and, if used with caution, can be very helpful in your downsizing.
Get rid of clothing you haven’t worn in years. Even if you plan on fitting back into things, your tastes may change between now and then. When I started looking at some of my clothes like that I realized I could get rid of almost all of the ones I had been holding onto for years. But I still kept a few of my favorite pieces. If you have children, reassess the items you are keeping for them. Will it be necessary for possible future children? Is is a nostalgic item for me or my children? If yes, then it’s a good idea to keep it. Otherwise, find someone to gift it to. When I was pregnant with my first, I got 90% of my baby items from my local Buy Nothing group. The people on there were amazingly generous and saved us a ton of money. Plus, it cleared space in their homes! Again, it’s a win for everyone. And I’ve been able to give back some of the items we were gifted so that some other family can get use out of them.
A couple of cabinets marked as “empty”
5. Mark empty cabinets and rooms
This was something I tried in my last move and I’m doing again because of how much it helped me mentally. Moving can be overwhelming. Especially if you’re a task-oriented person like myself. Knowing that your task list goes on and on is daunting but every step forward can help keep you motivated. I had to break the big-picture down into bite-sized chunks for myself. To do this visually, I would place a colored sticky note on the door of a cabinet I had emptied or a room that I had emptied and cleaned. I did this all the way up until moving day. That way I could walk around the house and see at-a-glance what I had already completed and what still needed to be done. It also helped me to feel as though I was making progress even when it felt like I still had a lot more to do. It’s a simple solution to lower some of the stress of moving.
6. Packing materials
Stuffed animals packed on top of books
My family has a book collecting problem. Every time we move we end up with an entire library to pack up and heft around with us. Over the years I’ve downsized a little but still had to come up with tricks to make things easier on us. I’ve found that packing books into smaller boxes is one method. But because my family basically hordes books, I have to think a little bigger. I usually choose to fill medium boxes about half way with books and then pack lighter materials on top of them to use the space while keeping the box from getting too heavy. I’ve found that I can use things like stuffed animals, guest room pillows, throw pillows and blankets to fill that space. This works out well for us because we also have an overabundance of nostalgic stuffed animals that have followed us since childhood and that collection only ever gets bigger!
7. Pack each box methodically
I know we don’t always have an abundance of time when preparing to move. Many times this is why boxes get packed haphazardly. Random things get thrown in together just for the sake of saving time or as a result of procrastination. In my experiences, I’ve found that it can help your sanity to be a little more methodical about your box packing. Something I’ve tried in my last move and current move is to pack with the idea that I know where I want things to end up in my new house. This makes my life a lot easier once I get to the unpacking phase of the move. If you have towels or pillows that are meant for a specific room, put them in boxes that are to be moved to that room. If you’d rather all the linens be kept in the linen closet or laundry room, pack and label them to be delivered to that room. It will make less work for you in the end.
8. Get movers!
I’m aware that not every move allows funds for professional movers. Sometimes we’re moving because we don’t have the money to stay where we are. In those cases, getting movers usually means depending on the kindness of your friends to help you physically move your stuff. I’ve been there many times. But! I would like to encourage you to try something different when you can. Even if you have to save up for it or cut back on some spending to be able to afford it, hiring movers to move your stuff is so worth it. It takes one of the biggest hassles of moving and makes it happen almost magically.
Labeled boxes make it easy to see which room they go in.
If you are considering movers, do your research. If possible, find a local company or a smaller, family owned business. But make sure they offer some sort of insurance on your items in case of accidents. It is very important to look out for yourself in these situations. When researching companies, look for user reviews and read a lot of them. Some companies just don’t hire well and this can hurt you in the long run. They could be cheaper but there could be a greater chance that your belongings could be broken, misplaced or stolen. I got very lucky with my first movers because they were amazing. Unbelievably fast, reliable and charged a very fair rate. Of course, distance is a factor. If you’re making a long distance move it will be considerably more expensive than a local move. But run the numbers. It could still be more valuable to pay a little more for movers and regain some sanity rather than have to juggle renting a truck, packing and then driving that truck long distance, unpacking and then returning that truck. Take the time to compare! It could save you some money AND some stress.
9. Make a grocery list
Before you move, sit down and make a list of all the food and non-food items you might need on the other side. On your moving day, you may choose to throw out some perishable items rather than juggle having to move them. This means that on the other side, once you’ve moved into your new place you might be missing a few essentials! Will you have enough toilet paper, paper towels, milk, eggs, etc.? Do you have easy to eat foods like cereal for breakfast or toastable foods. What about microwave dinners just in case you can’t get your pots and pans unpacked fast enough for dinners during your first week. Think ahead and give yourself some options. Do you have easy snacks for kids that won’t require using a lot of dishes? Once you have a list you can always designate someone or go to the store yourself once you arrive in your new city. That way you will not be left sitting in your new house, surrounded by packed boxes and wondering how to survive.
Another good list to make is a list of things to keep accessible during your move. Make sure you have beds, bedding, pajamas, toiletries, etc. accessible and easy to find as soon as you’re done moving your belongings into your new house. This will keep you from having to find where those items were packed while you’re already overly tired from moving.
10. Pizza night!
You’re in your new house, your belongings are still packed, you’re tired from the whole endeavor. Who wants to cook dinner?! NOT YOU! Not anyone else for that matter. It’s understandable. Cut yourself some slack and keep enough money in your wallet for pizza or something equally as deliverable for move-in night dinner. Then kick back, enjoy a slice or five and know that you’ve made it through another of the most annoying adventures that humans have to endure. Well done!