Full disclosure: I DO NOT make any money or get any promotional kickbacks from Lumē for my review. I am reviewing this product only as a consumer/customer. Click HERE for my current follow-up review of this product.
That being said, I feel there’s something else you should know. I’m stinky. Well, not right now but more often than I’d like to admit. I’m a mom, and unfortunately, I’m pretty low on my own priority list. So my showers usually happen at night before I go to bed and after the cubs are already sleeping. I’ll be real and admit that I don’t get the luxury of a daily shower. I sometimes have to go a few days without showering because sleep is more important to me than de-stinkifying myself. I’ve also been blessed with prodigious stink-making abilities, so deodorant has been my best friend since puberty.
All of this together means that my deodorant is usually working overtime to keep me socially acceptable. Years ago, when pit stains were the biggest of my insecurities, I depended on clinical-strength deodorants to keep me sweat and stink-free. Unfortunately, those are terrible for the endocrine system, affecting the body’s hormone production. In retrospect, it actually explains a lot about my hormone struggles through the years. In recent years, I’ve been using regular Dove deodorant because it has been the gentlest on my skin while also working well to keep me stink-free.
In the past, I’ve tried a couple different natural deodorant options, neither of which worked for me. I’ve heard some people say that natural deodorants work, but you have to be willing to let your body adjust to them. Sorry, I don’t have time for that. I don’t want to stink for what could be weeks or months just because I’m “working through a few things.” So I’ve been convinced for a while that I would never find a “natural” deodorant that works for stinky ol’ me.
Recently, an ad came through my Facebook feed (sometimes marketing works, people) that caught my eye. I’ll admit that it initially caught my eye because it was a video commercial with a lot of bright colors. But as I watched, I noticed their added humor about what is normally a fairly taboo topic. A silly ad for deodorant? I’m listening… The best part of the commercial, in my opinion, was that every time I came up with a question about the product, they answered it! By the end of it, I was sold. I jumped online and bought some. But I was still skeptical.
They claim that this deodorant, called Lumē, is an aluminum-free alternative to most others on the market. I have personal reasons for wanting to pursue an aluminum-free deodorant, but without getting preachy, HERE is a simple article giving some insight into aluminum-based deodorants and how they can affect our bodies.
The Lumē brand also claims it can be used anywhere externally on the body where odor occurs. It was developed by a gynecologist who wanted to find a better way to kill odor causing bacteria without using materials that could harm your body. They sell both a stick-style deodorant and a tube/cream-style to be applied with your hand. Both seem to be the same formula, just different applications.
The first thing I noticed when I tried this product was the smell. It was a little strong for me. It was citrus-y and almost chemical-y. (Yes, those are scientific adjectives.) I’m still not a huge fan of the scent, but I found out through further research that they also sell an unscented version, which I plan to try next. Yes, you read that right! I do plan to purchase this product again. Here’s why:
The Lumē brand claims that you can get 72 hours of protection out of their product. That is still up in the air for me. I chickened out after about 30 hours. Thankfully, the product did seem to continue working, but I could tell it had started to wear out its effectiveness around the 24 hour mark. It also could be that once my body adjusts to the bacteria balance, I may get longer use out of one application. But I’ll have to add an update at a later time when I’ve done some further testing.
The biggest positive I found in this product is that it worked. It kept me from getting stinky for at least 24 hours, even while chasing down toddler bear all day and juggling a breastfeeding baby bear. I actually felt like I sweated a little less than I normally would as well, but that could have been a fluke. Since I’ve been consistently taking my amazing multivitamin and probiotics for the last couple years, they have helped me balance my hormones, which, in turn, has helped regulate my body temperature and decrease my usual intense sweating. But I’ll go into that further in a future post.
The only negatives I found about the Lumē products are the price and the smell. It’s a pricey stick of deodorant at about $14 and $19 for the tube. Yikes! I know. But with the idea that it should last about three times as long as your daily-application, aluminum-filled deodorant, it evens out to be about the same cost over time. One great thing I noticed is that they offer free shipping, which probably means that the shipping cost is built into the price of the product. Something to keep in mind any time a product claims “free shipping.” But, hey, at least I didn’t have to see an additional cost in my checkout cart. As for the smell, I’m curious to see if their “unscented” scent is truly unscented and keeps me…unscented.
Overall, I would give Lumē deodorant a positive review. It is the first deodorant I’ve tried that has eliminated the need for aluminum but has worked immediately and for a realistic length of time. I normally expect to re-apply my deodorant daily. But with all other natural deodorants I have tried in the past, I had to re-apply them multiple times a day. That is wasteful and annoying. Lumē seems to have found a good recipe for healthy and effective. If it was just mediocre, I probably would not have wasted my time writing a review.
This is one of my family’s favorite recipes…to eat! It is made with yogurt in place of oil or butter. The end result is a very moist, spongy banana bread. It’s so addicting, especially once you realize there are fewer calories with the yogurt substitute. Muahahaha! Look for the * symbol for notes and options noted at the end of the recipe.
Prep time: approx. 15 minutes
Cook time: approx. 35-45 min for bread, 15-20 min for large muffins, 12-15 min for mini muffins
Ingredients:
1 1/4 cup sugar*
6 oz (3/4 cup) vanilla yogurt*
2 large eggs
3 large medium ripe bananas*
1/4 – 1/2 cup buttermilk (optional)*
1 tsp vanilla extract
2 1/2 cups flour
1 tsp salt
1 tsp baking soda
2 cups mini chocolate chips (optional)*
Brown sugar for sprinkling
No Oil Banana Bread Ingredients (without buttermilk)
Instructions:
Before you turn your oven on, remove all but the bottom rack. These need to be cooked on the bottom rack so at least leave enough room to place your pans on the lowest rack in your oven.
Turn your oven on to 350°
Butter or non-stick spray a 13×9 pan or 2 9×9 pans. This recipe can also be made into muffins- see the note below*
Pour the mini chocolate chips into the bottom of your pan(s). Line the bottom evenly so that you cannot see the pan.* This will bake onto the bottom of the bread like a delicious, chocolate crust.
In a stand mixer, mix sugar and yogurt until smooth.
Add eggs one at a time, mixing well in-between.
Add bananas, buttermilk (opt.), and vanilla. Mix well.
Mix in flour one cup at a time, mixing well in-between.
Add salt and baking soda. Mix until smooth.
Carefully pour batter in to pan(s) while not disturbing the chocolate chips. Make sure to divide the batter evenly between the pans if you are using more than one.
Sprinkle desired amount of brown sugar over the top of the batter-filled pan(s).
Cook for between 35-45 minutes depending on your oven. It is best to check doneness with a toothpick at about 30 minutes and every 5 minutes after that until the toothpick comes out clean.
Notes:
*I usually use cane sugar rather than white sugar but both should work the same.
*I use a small container of vanilla bean yogurt but I have also tried using the same amount of plain greek yogurt as a substitute and it worked just as well but required an extra teaspoon of vanilla extract for flavor (2 tsp vanilla total).
*You want bananas that are very ripe but I have used bananas of varying ripeness. The difference is- the riper they are the sweeter and more banana-y the bread tastes.
*The buttermilk is labeled as optional because sometimes I put it in my recipe and sometimes I leave it out. The recipe seems to cook similarly either way but cooking it with the buttermilk adds even more moisture. Without the buttermilk it seems to be plenty moist and you wouldn’t notice it wasn’t in there.
*Chocolate chips are an optional ingredient and 2 cups is an approximate measurement because you can really add as much or as little as you’d like. You can also mix the chips into the batter rather than lining the pan with them. It’s all a matter of opinion.
*MUFFINS- spray and line 1-12 cup or 1-24 mini cup muffin pan(s) as you would large pans. Cook for about 15-20 minutes checking the doneness the same as you would in pans, adding 5 minutes at a time until the toothpick comes out clean.
Nutrition:
Servings as bread: 32, servings as mini muffins: 24, servings as regular muffins: 12
Based on 24 serving mini muffins baked with optional buttermilk: 1 serving is approximately 141 Calories; 2.1g Fat; 1.1g Sat. Fat; 20.6mg Cholest.; 152mg Sodium; 28.7g Carbs; 0.4g Fiber; 17.4g Sugar; 2.6g Protein.
I’ll admit it. I’m obsessed with organizing. I’m not a neat freak by any stretch of the imagination. I can be real about what daily life looks like in a house. But I get a really big thrill out of problem solving about areas that need organizing. That passion is one of the reasons I started this blog. I want to share the ideas that I’ve had to help others.
But just because I love organizing doesn’t mean I love, or even like, cleaning. The only time I enjoy cleaning is after I’ve finished it and can admire the outcome. My least favorite chore is cleaning bathrooms. Any part of it- toilets, counters, shower, etc. It’s tedious and gross. But, for myself, I’ve found that if I can make any part of the cleaning chore easier or less nasty, I’m more likely to do it.
I’ve done this in different ways all around my house. Doing dishes is easier and more fun now that I have a long-handled, soap-dispensing scrub brush instead of a stinky sponge. And cleaning toilets gets done more often now that we’re using the toilet wand method. Oh, adult life is so glamorous, isn’t it? If I could go back in time and tell my younger self about all the things I would get excited about as an adult, I’m pretty sure I’d have a good laugh at myself.
Big Scary Words
Before I became a mom, I worked for the government. Of course, the government is not known for its efficiency. It was very challenging to be a nut for organizing while working in a place that prides itself on remaining entrenched in ancient methods and outdated processes. I struggled for years while working there just to update, clean up and streamline my specific job. Towards the end of my time there, the workforce changed hands to a much younger generation, and real change began to take place. Processes were reevaluated, methods were questioned, and literal tons of excess was purged from that place to make way for a totally different way of operating.
“Processes were reevaluated, methods were questioned, and literal tons of excess was purged from that place to make way for a totally different way of operating.”
During those changes, I learned A LOT about how to find the most efficient way to do things that seem trivial or otherwise mundane. Because of that, I’ve been able apply a lot of what I learned to some of the processes and chores I do around the house. I’ll definitely be doing more articles featuring those ideas in the future because there are so many good ones. But for this article I’m focusing on an idea called “cellular management”. Yup. Sounds scary. Don’t get turned off just yet; I’ll explain it. Without having to bore you with all the background details on why it’s called “cellular management” or how that term came to be, I’ll just explain it like this:
In this method of thinking, a “cell” is specific task that needs a process and materials to be completed (example- a cooking recipe is like a cell in that way). To apply that to our real-world scenario, your “cells” are your bathrooms. Each bathroom is its own cell. Every bathroom/cell needs specific items in order to be cleaned, especially since some bathrooms are bigger than others or have different surfaces.
The OLD Way
I used to keep all of my cleaning materials under my kitchen sink. When the time finally came that one of my bathrooms got scummy enough that I couldn’t ignore it any longer, I would walk all the way to the kitchen to get what I needed for that specific cleaning job. Most of the time, this took several trips because I would forget items or cave-in and decide to clean something I hadn’t intended on cleaning in the first place.
To apply the cellular management principle, it actually works more efficiently to have a cleaning kit made up for each bathroom that is tailored to that bathroom’s specific needs. Now, I know you’re not made of money. Neither am I. But hear me out. You may have several bathrooms in your house but there are thrifty ways you can create cleaning kits that won’t break the bank.
Scenario
Let’s create a scenario that we can work from as an example. The example below shows you what could be in a bathroom and what you might use to clean each of those things:
Bathroom #1
1 Toilet
1 Shower with glass sliding doors and tiled walls
Double sink vanity with countertops and mirror
Garbage can
To clean this entire bathroom you might use the following:
Toilet scrub brush or cleaning wand and heads
Multi-surface bathroom cleaner (like Soft Scrub, Scrubbing Bubbles, or Kaboom)
Scrubby sponge or bristle brush
Disinfecting wipes
Glass cleaner
Paper towels or cleaning cloth
Garbage can liners
Rubber gloves
These would be the items you would want to gather and keep in this bathroom all the time. Clear a place under the sink for the cleaning kit, but keep it accessible so you are more likely to remember it and use it.
An example of one of my bathroom kits
On a budget?
If you’re on a budget, here are some ways you can save money on these kits in the long run. Buy in bulk. You can buy things like paper towels and garbage bags in bulk and leave a roll in each bathroom that needs it. Those will last you FOREVER. Also, there are certain cleaning supplies that can be found at the dollar store for, you guessed it, $1 each. You can buy scrubby sponges, rubber gloves, and plastic bins to store your cleaning supplies at the dollar store. You can also frequently find coupons for cleaning supplies in the newspaper or online. Shop the sales and buy multiple at one time if you can.
Assembling a kit like this could take an initial investment, but it’ll be worth it in the end. You’ll have no excuse not to clean the bathrooms. Sorry…or you’re welcome? You can even use this as a reason to teach other family members how to make use of the kit and keep the bathrooms sparkling! Good luck!
Moving sucks. Generally. I’ve moved 9 times in my adult life. This doesn’t include the double-digit times my family moved us before I was in college. During the 9 times I’ve moved I’ve learned a lot. I’ve learned what helps and what doesn’t because I spent the first 5 of my moves doing it the way we’ve all done it. Start packing too late. Cram anything and everything into boxes. Run out of boxes. Run out of tape. Get overwhelmed. Ask friends and family to help with the moving in exchange for pizza or beer. Barely get enough help. Everyone’s exhausted.
Every time I’ve had the opportunity to move I’ve learned a new tool or tip that has made my life easier in the process. Currently, we are in the middle of our biggest (and hopefully last) move in terms of size and distance. The last time I moved was a few weeks before my wedding when I moved all of my belongings into my (now) husband’s garage. It was a surprisingly easy move because of the things I’ve learned.
I’ve felt compelled to share my tips with anyone who will listen (or read). So here are my top 10 tips for an easier move:
1. Create a Packing Kit
This tip is one of the easiest and most helpful things you can do for yourself even before you start packing. Start by finding yourself a box or container that is easy to carry like a fishing tackle box or a plastic storage box with a handle on the lid. Here is an example of the box and contents I used for this move:
This box will become and stay your go-to container for your packing needs. This keeps things organized and helps calm some chaos. This box should follow you everywhere while you pack and even through the move to the other side. You’ll want to pack it with things you need before AND after the move. Things you would put in this box could be:
-Packing tape (with extra rolls)
-Large permanent markers (for marking boxes)
-Colored tapes (for marking boxes)
-Box cutters (for packing mistakes AND for unpacking after the move)
-Zip Lock baggies (to collect things like push pins, nails, random misplaced hardware, etc.)
-Measuring tape (can come in handy when you’re planning what furniture to keep or purge)
-Small scissors (for cutting twine or stubborn tape)
2. Boxes
Some people know that you can go to the grocery store and ask for free boxes. But rarely are those good packing boxes. Those are, at best, banana boxes with holes for handles. For my past moves I was fortunate enough to be working a retail job or know someone who was. This gave me a great resource for different sized boxes that were very helpful for packing and this was my go-to for years.
But this move, I found yet another great resource for packing boxes. If you haven’t found and connected with your local Buy Nothing group I STRONGLY encourage it. Moving boxes are only one of the many great things you can find there. If you’re unfamiliar with what Buy Nothing is it’s exactly what it sounds like. It’s a community of people (usually based on where you live) asking for and giving things freely. The link to their website which will help connect you with the appropriate Facebook group can be found HERE.
In a Buy Nothing group you can ask for certain things you’re looking for (i.e. moving boxes, a cup of sugar, a shower head, dog collar, paint brushes, to borrow a lawn mower, insight into legal issues, etc.). Almost anything you can think of is an appropriate ask on Buy Nothing. You can also gift anything you’re trying to get rid of without expecting anything in return (which is great when you’re getting ready to move!). Have too many ceramic mugs? Post it! Want a specific plant in your yard gone? Offer it up! Ready to part ways with your kid’s old clothing? Gift it! I’ve given and seen some of the weirdest, most random things and they’ve been happily received by some person living near me. So don’t be afraid to try.
In short, this resource is incredibly valuable for many things. But for the purpose of this post, it can be a great place to find moving boxes. They will most likely be used but you will be surprised at what some people are willing to give. Among the hundreds of free moving boxes I’ve received from my Buy Nothing community, many of them were brand new and unused! People can be so unexpectedly generous! You have nothing to lose and so much to gain!
The last thing I’ll say about Buy Nothing groups (because I could go on and on) is that they also connect you with your community in a very unique way. You get to know the people you’re trading with. You make new friends. Once you’ve moved, you can also join the Buy Nothing group of the new community you will be moving to and find someone to gift your used moving boxes to once you’ve unpacked. It means you don’t have to worry about packing your recycling and garbage bins full of packing materials. It’s win win!
3. Organize and mark your boxes
For every move before our current one, I labeled the boxes as I had for years- with the general contents of the box. This time I tried something a little different. I was determined to start our packing process early. I knew that I would be almost 9 months pregnant by the time we were moving and I did NOT want to leave packing for the last minute. Plus, we knew we’d be moving in the hottest part of the summer. That’s a baaaaad combo when you’re ultra pregnant! I also knew that we were planning to keep the majority of our belongings in storage for over a year while our new house was being built. This meant that I had to stay organized and leave myself the ability to find things easily that I had already packed. For example, early on I packed up my lesser used items from the kitchen. A month later, I needed my rolling pin that only gets used about twice a year. If I had just packed it in a box labeled “kitchen stuff” I’d be going through several boxes just to find it and making more work for myself in the end. Instead, here was my organizational method:
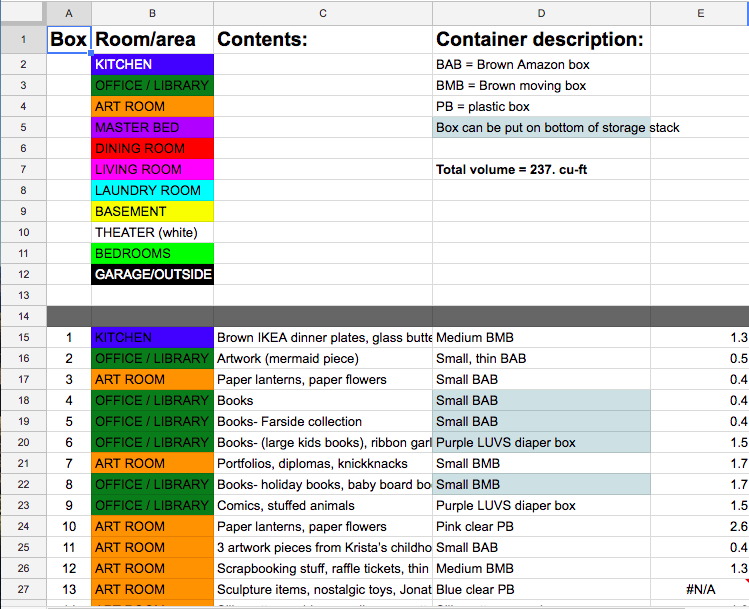
Start by making a spreadsheet. There should be at least three columns. My main columns were: BOX NUMBER, ROOM (color coded), and CONTENTS. Each box received a number that corresponded with the spreadsheet row. I then decided which room the contents of this box needed to end up in (not necessarily where they came from but that can work too if you haven’t planned that far ahead). To color code my boxes I purchased a set of different colored masking tapes from Amazon. I needed enough different colors to be able to set main rooms apart so that boxes can be easily delivered to the correct rooms when we move into our new house. A link to the tapes I purchased can be found HERE. This is just an example of what you can use, I don’t make any money from featuring it. Each tape color then corresponded to a color on my spreadsheet in the second column so that I could see at a glance which boxes went where. That way I could also group boxes by room if I needed to search for an item I forgot to record.
A small part of my moving spreadsheet.
The third column is where I recorded almost every item I placed in the box. This came in handy many times. All I had to do to find something specific was use the search function (or the find and replace function) to quickly find all the rows containing a specific word.
We added a couple more columns because I’m scary organized. Possibly a little obsessed with organizing. I added a column for the type of box (general size and type or identifiable markings) and my husband added a column to track the cubic space the box took up based on its general measurements. The only reason we had this is because we were trying to fit the most of our belongings into a specific sized storage unit and wanted to be able to estimate how much could fit. These last two things aren’t that helpful to everyone but they worked for us. Play with it and see what helps you the most. The most important part is tracking the box number to the contents.
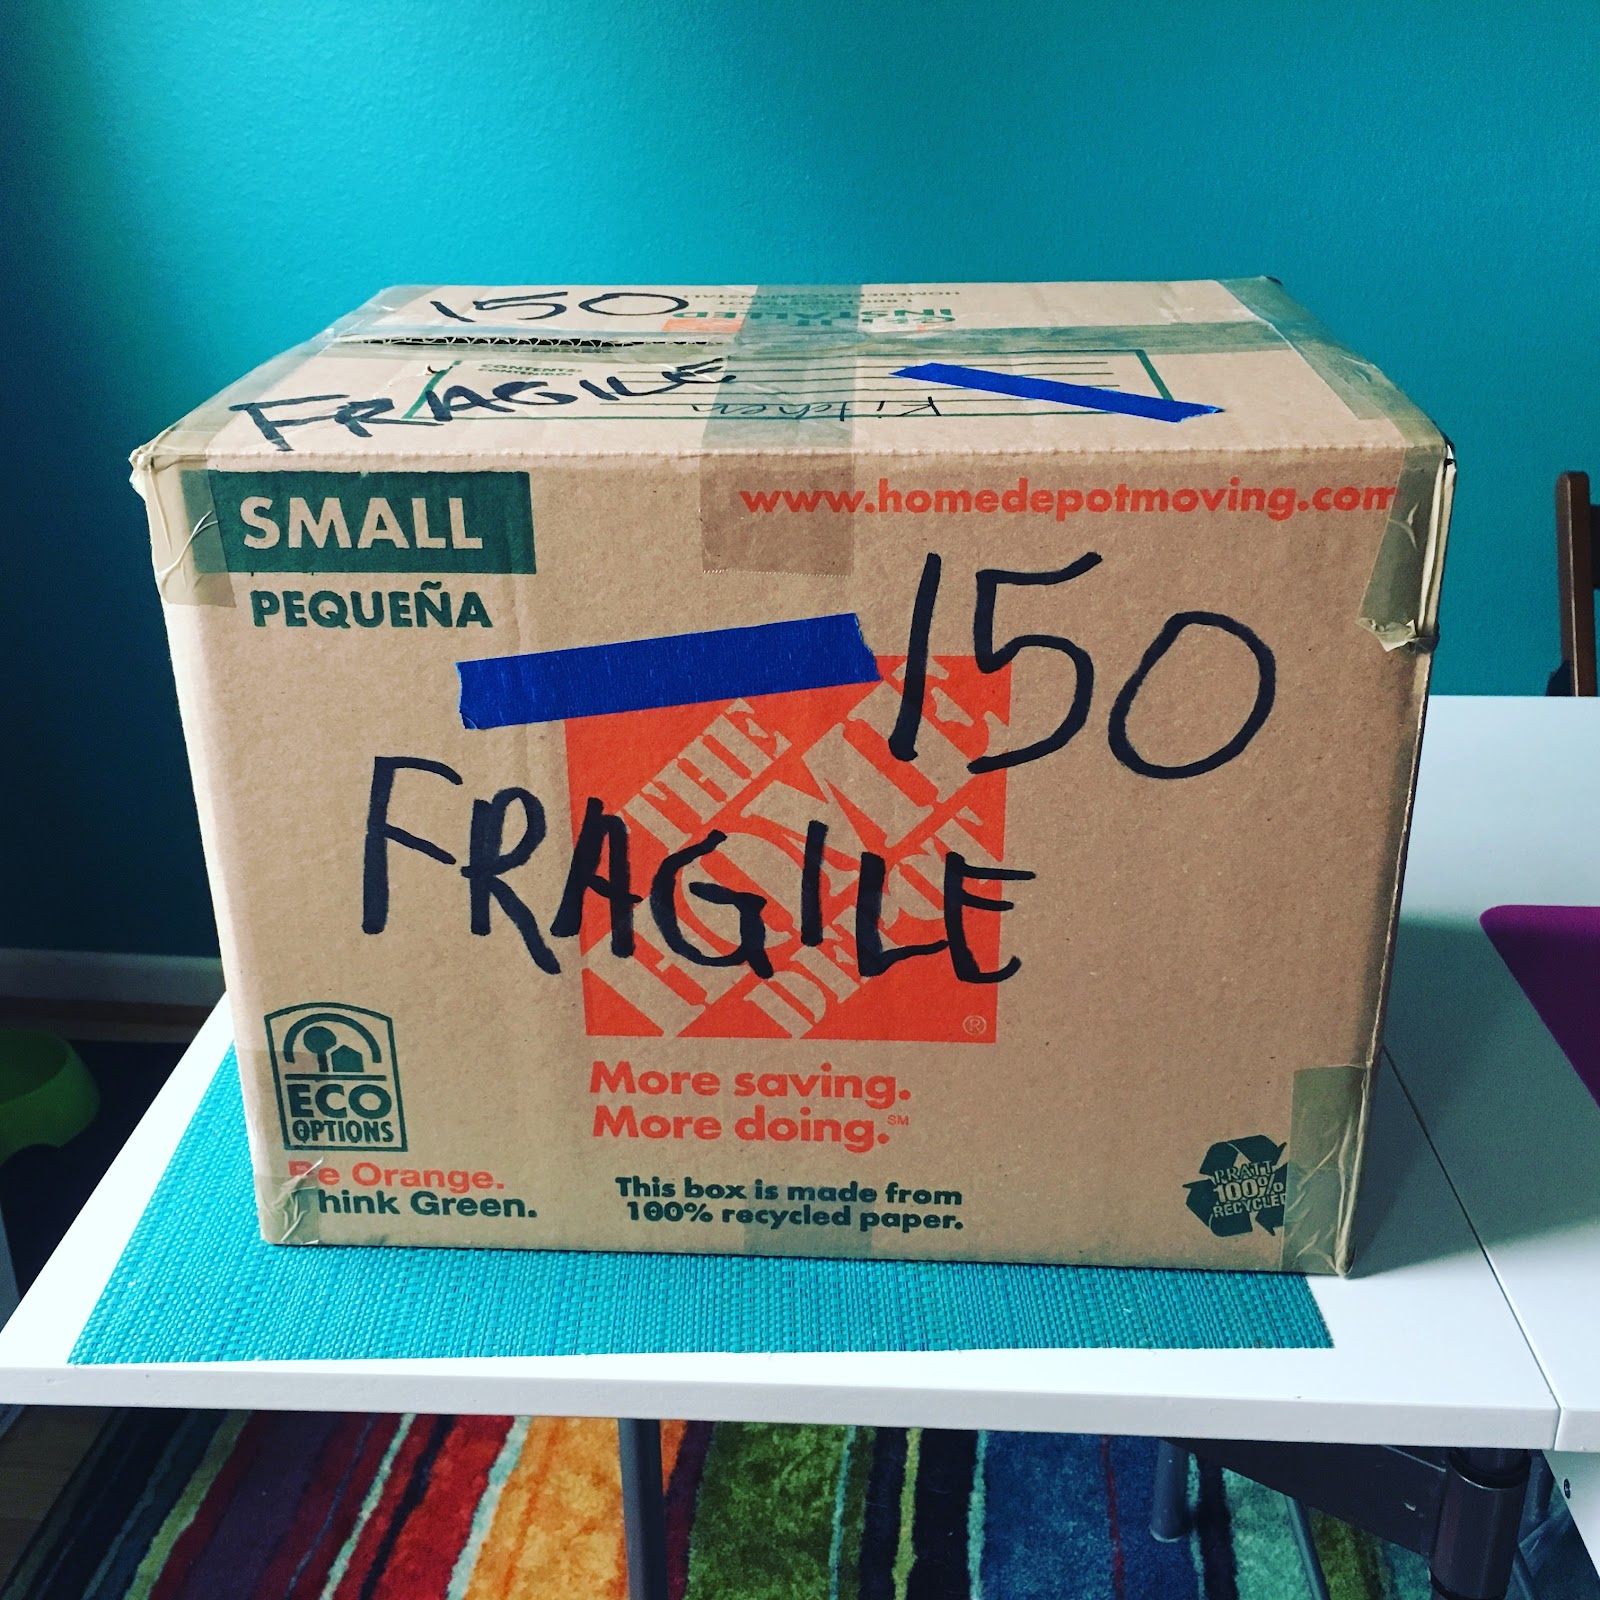
A completely packed and labeled box ready to be moved!
Once you have your spreadsheet just remember to mark the box with its number on all sides as well as the colored tape that corresponds with the room it will need to end up in.
4. Downsize (sell and give)
Once we knew that we were going to need to store our belongings for a year we had to become very selective on what we were keeping and what would be cheaper to just buy later on if we needed it again. I can be a pack-rat so I tend to try and save money by saving things. So it didn’t occur to me that it would possibly be cheaper to re-buy an item later rather than to pay to store it for over a year. This may not be the case for you since not everyone needs to store their belongings during a move but it’s something to consider when you’re making the decision to keep or toss things.
This is another place where the Buy Nothing groups can come in really handy. I was able to give away so many things to my group which saved me trips to the dump, trips to the thrift store donation line, or room in my garbage can. And it meant that someone else was getting use out of the items rather than them just becoming piles at the garbage dump. It was also convenient because the general Buy Nothing practice is that you offer up an item and the person who is chosen to receive that item comes and picks it up from your doorstep. You don’t even have to leave the house! This detail was huge for me as a pregnant mom with a toddler. Any reason to NOT leave the house was helpful during this busy and tiring time.
I was also able to make use of the Facebook Marketplace for some items that were worth something to me. Facebook Marketplace is a slightly more convenient version of Craigslist. You still can’t be 100% sure of people on there, and there are a lot more flaky people than Buy Nothing but it serves its purpose and, if used with caution, can be very helpful in your downsizing.
Get rid of clothing you haven’t worn in years. Even if you plan on fitting back into things, your tastes may change between now and then. When I started looking at some of my clothes like that I realized I could get rid of almost all of the ones I had been holding onto for years. But I still kept a few of my favorite pieces. If you have children, reassess the items you are keeping for them. Will it be necessary for possible future children? Is is a nostalgic item for me or my children? If yes, then it’s a good idea to keep it. Otherwise, find someone to gift it to. When I was pregnant with my first, I got 90% of my baby items from my local Buy Nothing group. The people on there were amazingly generous and saved us a ton of money. Plus, it cleared space in their homes! Again, it’s a win for everyone. And I’ve been able to give back some of the items we were gifted so that some other family can get use out of them.
A couple of cabinets marked as “empty”
5. Mark empty cabinets and rooms
This was something I tried in my last move and I’m doing again because of how much it helped me mentally. Moving can be overwhelming. Especially if you’re a task-oriented person like myself. Knowing that your task list goes on and on is daunting but every step forward can help keep you motivated. I had to break the big-picture down into bite-sized chunks for myself. To do this visually, I would place a colored sticky note on the door of a cabinet I had emptied or a room that I had emptied and cleaned. I did this all the way up until moving day. That way I could walk around the house and see at-a-glance what I had already completed and what still needed to be done. It also helped me to feel as though I was making progress even when it felt like I still had a lot more to do. It’s a simple solution to lower some of the stress of moving.
6. Packing materials
Stuffed animals packed on top of books
My family has a book collecting problem. Every time we move we end up with an entire library to pack up and heft around with us. Over the years I’ve downsized a little but still had to come up with tricks to make things easier on us. I’ve found that packing books into smaller boxes is one method. But because my family basically hordes books, I have to think a little bigger. I usually choose to fill medium boxes about half way with books and then pack lighter materials on top of them to use the space while keeping the box from getting too heavy. I’ve found that I can use things like stuffed animals, guest room pillows, throw pillows and blankets to fill that space. This works out well for us because we also have an overabundance of nostalgic stuffed animals that have followed us since childhood and that collection only ever gets bigger!
7. Pack each box methodically
I know we don’t always have an abundance of time when preparing to move. Many times this is why boxes get packed haphazardly. Random things get thrown in together just for the sake of saving time or as a result of procrastination. In my experiences, I’ve found that it can help your sanity to be a little more methodical about your box packing. Something I’ve tried in my last move and current move is to pack with the idea that I know where I want things to end up in my new house. This makes my life a lot easier once I get to the unpacking phase of the move. If you have towels or pillows that are meant for a specific room, put them in boxes that are to be moved to that room. If you’d rather all the linens be kept in the linen closet or laundry room, pack and label them to be delivered to that room. It will make less work for you in the end.
8. Get movers!
I’m aware that not every move allows funds for professional movers. Sometimes we’re moving because we don’t have the money to stay where we are. In those cases, getting movers usually means depending on the kindness of your friends to help you physically move your stuff. I’ve been there many times. But! I would like to encourage you to try something different when you can. Even if you have to save up for it or cut back on some spending to be able to afford it, hiring movers to move your stuff is so worth it. It takes one of the biggest hassles of moving and makes it happen almost magically.
Labeled boxes make it easy to see which room they go in.
If you are considering movers, do your research. If possible, find a local company or a smaller, family owned business. But make sure they offer some sort of insurance on your items in case of accidents. It is very important to look out for yourself in these situations. When researching companies, look for user reviews and read a lot of them. Some companies just don’t hire well and this can hurt you in the long run. They could be cheaper but there could be a greater chance that your belongings could be broken, misplaced or stolen. I got very lucky with my first movers because they were amazing. Unbelievably fast, reliable and charged a very fair rate. Of course, distance is a factor. If you’re making a long distance move it will be considerably more expensive than a local move. But run the numbers. It could still be more valuable to pay a little more for movers and regain some sanity rather than have to juggle renting a truck, packing and then driving that truck long distance, unpacking and then returning that truck. Take the time to compare! It could save you some money AND some stress.
9. Make a grocery list
Before you move, sit down and make a list of all the food and non-food items you might need on the other side. On your moving day, you may choose to throw out some perishable items rather than juggle having to move them. This means that on the other side, once you’ve moved into your new place you might be missing a few essentials! Will you have enough toilet paper, paper towels, milk, eggs, etc.? Do you have easy to eat foods like cereal for breakfast or toastable foods. What about microwave dinners just in case you can’t get your pots and pans unpacked fast enough for dinners during your first week. Think ahead and give yourself some options. Do you have easy snacks for kids that won’t require using a lot of dishes? Once you have a list you can always designate someone or go to the store yourself once you arrive in your new city. That way you will not be left sitting in your new house, surrounded by packed boxes and wondering how to survive.
Another good list to make is a list of things to keep accessible during your move. Make sure you have beds, bedding, pajamas, toiletries, etc. accessible and easy to find as soon as you’re done moving your belongings into your new house. This will keep you from having to find where those items were packed while you’re already overly tired from moving.
10. Pizza night!
You’re in your new house, your belongings are still packed, you’re tired from the whole endeavor. Who wants to cook dinner?! NOT YOU! Not anyone else for that matter. It’s understandable. Cut yourself some slack and keep enough money in your wallet for pizza or something equally as deliverable for move-in night dinner. Then kick back, enjoy a slice or five and know that you’ve made it through another of the most annoying adventures that humans have to endure. Well done!
It’s been 2½ years since I became a mother. I’ve learned a lot in this time. I probably have an encyclopedia’s worth of material I could write in regards to that already. But when I look back to what my life was like shortly after having my son I make note of a few things. The first is that it’s easy to miss signs for postpartum depression and anxiety. I missed them for an entire year before I realized what was happening and got help. But that is a topic I will write on at length in another post because it deserves the acknowledgement.
The second thing I note is my coping methods for the stress of motherhood. Being a mom is the hardest thing I’ve ever done in my life. Being a new mom was like climbing Everest in scuba flippers. I’m not entirely sure how I survived it, but I can give you at least one tip on what helped keep me sane.
Video games. Now, I know video games aren’t for everyone, but please hear me out. I’ve never been a big reader. It’s not a matter of ignorance but rather interest. I get distracted too easily when I read unless I’m surrounded by complete silence. So even if, as a new mother, I had had a stack of riveting novels to spend my time on, it wouldn’t have done much but frustrate me because I can’t really get into a book when I have a kiddo crying to be strapped to my breast every 45 minutes. Cluster feeding is no joke.
My dad introduced me to video games at a young age. I was probably close to 8 years old when he and I went to Toys ‘R Us (God, rest its soul) to buy a brand new Sega Genesis. It was life changing. My dad and I spent quality time together flying fighter jets, saving damsels in distress, and racing around as a little, blue hedgehog. That’s probably where I developed my love for video games.
Although I’ve been a gamer since then, there was a dry spell in my video gaming career after events in my life allowed for some personal rediscovery before I met my husband. Years later, when I finally had the opportunity to become a mom, I found that I had some downtime while experiencing pretty severe pelvic pain in my first pregnancy. My husband supported me and enabled me to stay at home to ensure a healthy pregnancy. But while I was couch-ridden through most of my third trimester, I got back into video games. At the time, I felt it was probably my last chance to enjoy some gaming before becoming a mom. Little did I know there would be more than enough time to enjoy games after having my son.
When we first brought our son home from the hospital, we had a lot to figure out. What would our new schedule look like with a creature that wanted to eat every 45 minutes? Turns out momma just becomes a milk factory at that point. When your life revolves around feeding an insatiable creature who depends on you for all movement and care, you start to get really good at multitasking. Breastfeed and eat? Check. Breastfeed and update social media? Can do! Breastfeed and Google breastfeeding questions? Of course.
But when I started feeling more like a milking heifer and less like myself I knew that I needed to find a way to distract my brain while breastfeeding. Since I had learned a few new ways to hold and balance my feeding baby, I found that I could free both of my hands. So I plugged in my game of choice and started my video game therapy. Most of the time I kept the sound very low or off. My newborn son didn’t need to know Mommy was fighting dragons while he ate peacefully.
“Most of the time I kept the sound very low or off. My newborn son didn’t need to know Mommy was fighting dragons while he ate peacefully.”
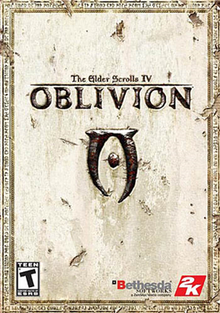
Video games can be a great stress reliever. They can also cause stress, so you have to be careful which ones you choose to play while momming. Personally, I chose three open world role playing games to focus on throughout my new-mom-journey. I started with a game I had owned for years and never had a chance to play, The Elder Scrolls IV: Oblivion.
Oblivion is a game from Bethesda Game Studios, released back in 2006. A first person style dungeon crawler. For some (or most) of you, that may not sound like much fun, especially since the graphics are outdated by today’s standards. But this game was nostalgic for me and just what I needed to get back into gaming. Back in 2002 I played the previous game in this series for hours a day. It was my temporary obsession. So, playing Oblivion was a fun way to experience some of my favorite gaming elements. I ended up playing all the way through Oblivion, twice, before I realized I needed another game. So, I moved on to Skyrim and then onto Fallout 4. I spent months in these worlds, relaxing and enjoying my in-game freedom. Killing monsters, looting EVERYTHING, and making gobs of gold coins. The worlds were relatively quiet and beautiful. I was alone (other than NPCs) and free to explore at my pace. I was in introvert heaven!
In the end, I learned that it’s healthy to have an outlet for stress and anxiety. Video games worked for me, but every mom and her experience are completely unique. Find what works for you and enjoy it unapologetically. Don’t let it come between you and your children or spouse, but treat it as a self-preservation, mental health break. You deserve it.