This recipe has been passed down through our family for several generations. It reminds me of the holidays because every day or two after Thanksgiving, my grandfather would make up a huge batch of this with the leftover turkey. I loved it as a kid and would happily devour this morning, noon, and night until the leftovers were gone. I hope you enjoy it too! Be sure to check out my note section below the recipe for additional ideas on how to prepare this recipe. Ingredients and instructions with alternative methods are marked with (*) with the corresponding (*) found in the notes section.
Prep time: 10-15 minutes
Cook time: 30 minutes – 4/8 hours depending on your cooking method
Makes about 6-8 cups
Ingredients
Ingredients used to make the sauce.
4+ cups of chopped turkey (rotisserie chicken works well as a replacement*)
2 Tbsp cornstarch dissolved in 2 Tbsp cold water
¾ cup brown sugar
¼ cup soy sauce
¼ cup ketchup
½ cup apple cider vinegar
1 cup chicken broth
Instructions
In a medium sized (3 quart) cooking pot**, begin heating chicken broth on medium high heat and add in vinegar, soy sauce, brown sugar and ketchup. Stir to dissolve and mix ingredients.
As ingredients start to bubble and steam, add in cornstarch mix*** and stir briskly with a whisk. Continue to stir until ingredients begin to thicken.
Reduce heat to low and allow ingredients to simmer together for about 10 minutes. Make sure to check and stir sauce every few minutes to prevent burning or congealing on the bottom of the pan.
Once sauce is thickened, add in chopped meat and stir to evenly mix ingredients together. Let this mix simmer on low heat for about 15-20 minutes to allow the meat to absorb some of the sauce flavors.
Serve over leftover mashed potatoes, on top of leftover rolls, on buns with coleslaw, or by itself!****
Notes
*As I mentioned, rotisserie chicken can be used as a substitution for turkey. You could also make this recipe in a crock pot and start with raw chicken breasts along with the sauce ingredients. If you choose to do this method, I suggest you cook it on low for 8 hours to allow the chicken breasts to fully cook. After they cook you could shred the chicken right in the sauce and then mix the ingredients together.
I used pre-cooked rotisserie chicken for a quick and easy meal!
**You can also make this recipe in a crockpot. Using this method allows for better flavor absorption by the meat but you want to make sure to cook it on low to keep the meat from over cooking if you are using pre-cooked leftovers. If you choose the crock pot method, just place all your sauce ingredients in and mix well before adding the meat (raw or cooked).
***The cornstarch mix will only slightly thicken up the sauce and it may appear more runny than you expect. You’re welcome to play around with the cornstarch mix ratio but this recipe allows for the sauce to be thin but not watery.
****There are so many ways to enjoy this recipe. Aside from using it for leftovers, it’s great on top of rice or veggies too. The sauce is very versatile so I’d love to hear how you’ve used it. Leave a comment here on the recipe page and let me know what you did with it. Thanks!
Coleslaw is a great addition to this meal. The textures and flavors compliment each other!
I use this recipe in place of traditional taco meat. It’s perfect for tacos, nachos, chip dip, burritos, or taco salads! I like it because it has a ton of flavor without having to rely on a lot of salt or spices. I keep the ingredients on hand in the pantry (aside from the meat) so that I can easily make it any time. Also, it can be made in less than 30 minutes! Bonus!
Prep time: no prep time unless you count opening packages.
Cook time: approx. 10-15 minutes.
Makes about 1-2lbs of meat mix.
Ingredients
1 lb ground beef (I use the leanest I can afford)
1 lb ground turkey meat (I use this to add volume without adding more beef, but you can use whichever meat choices work for you)
about 16oz your favorite salsa (I use chunky Pace because I like the texture it adds)
1 can black beans (about 16oz)
2 Tbsp taco seasoning
Instructions
Put all meat into a large cooking pan. Brown and mash the meat into crumbles on medium heat until only a slight amount of pink remains in the meat.
Add the can of black beans. Simmer for a minute or two.
Add taco seasoning and mix into meat using the juices created by the cooking meat to help mix it in.
Once taco seasoning is mixed into the meat, add the salsa. Mix all ingredients well until they are evenly mixed.
Set heat to low and simmer for about 5 minutes. This allows the beans to soften and the flavors to mingle.
Serve hot and enjoy!
Steps 1-2 in the instructions above. Brown meat, add beans.Steps 3-6 in the instructions above. Simmer beans to soften, add taco seasoning, add salsa, stir, and simmer. Enjoy!
Notes
It was really tough to come up with a name for this recipe because in our family, we affectionately refer to this meal as “Taco Slop” because it is so versatile and can be slopped on anything from a tortilla, a chip, or a salad. When I first started writing my blog, I knew that I wanted to share this family favorite from the start, but I knew that if I titled it “Slop” I probably wouldn’t get that many views. I hope when you try this recipe that you can develop your own name for it. Call it whatever you like! But if you find things about it that you like to change or add, please write a comment below and share it. I’d love to hear about your version!
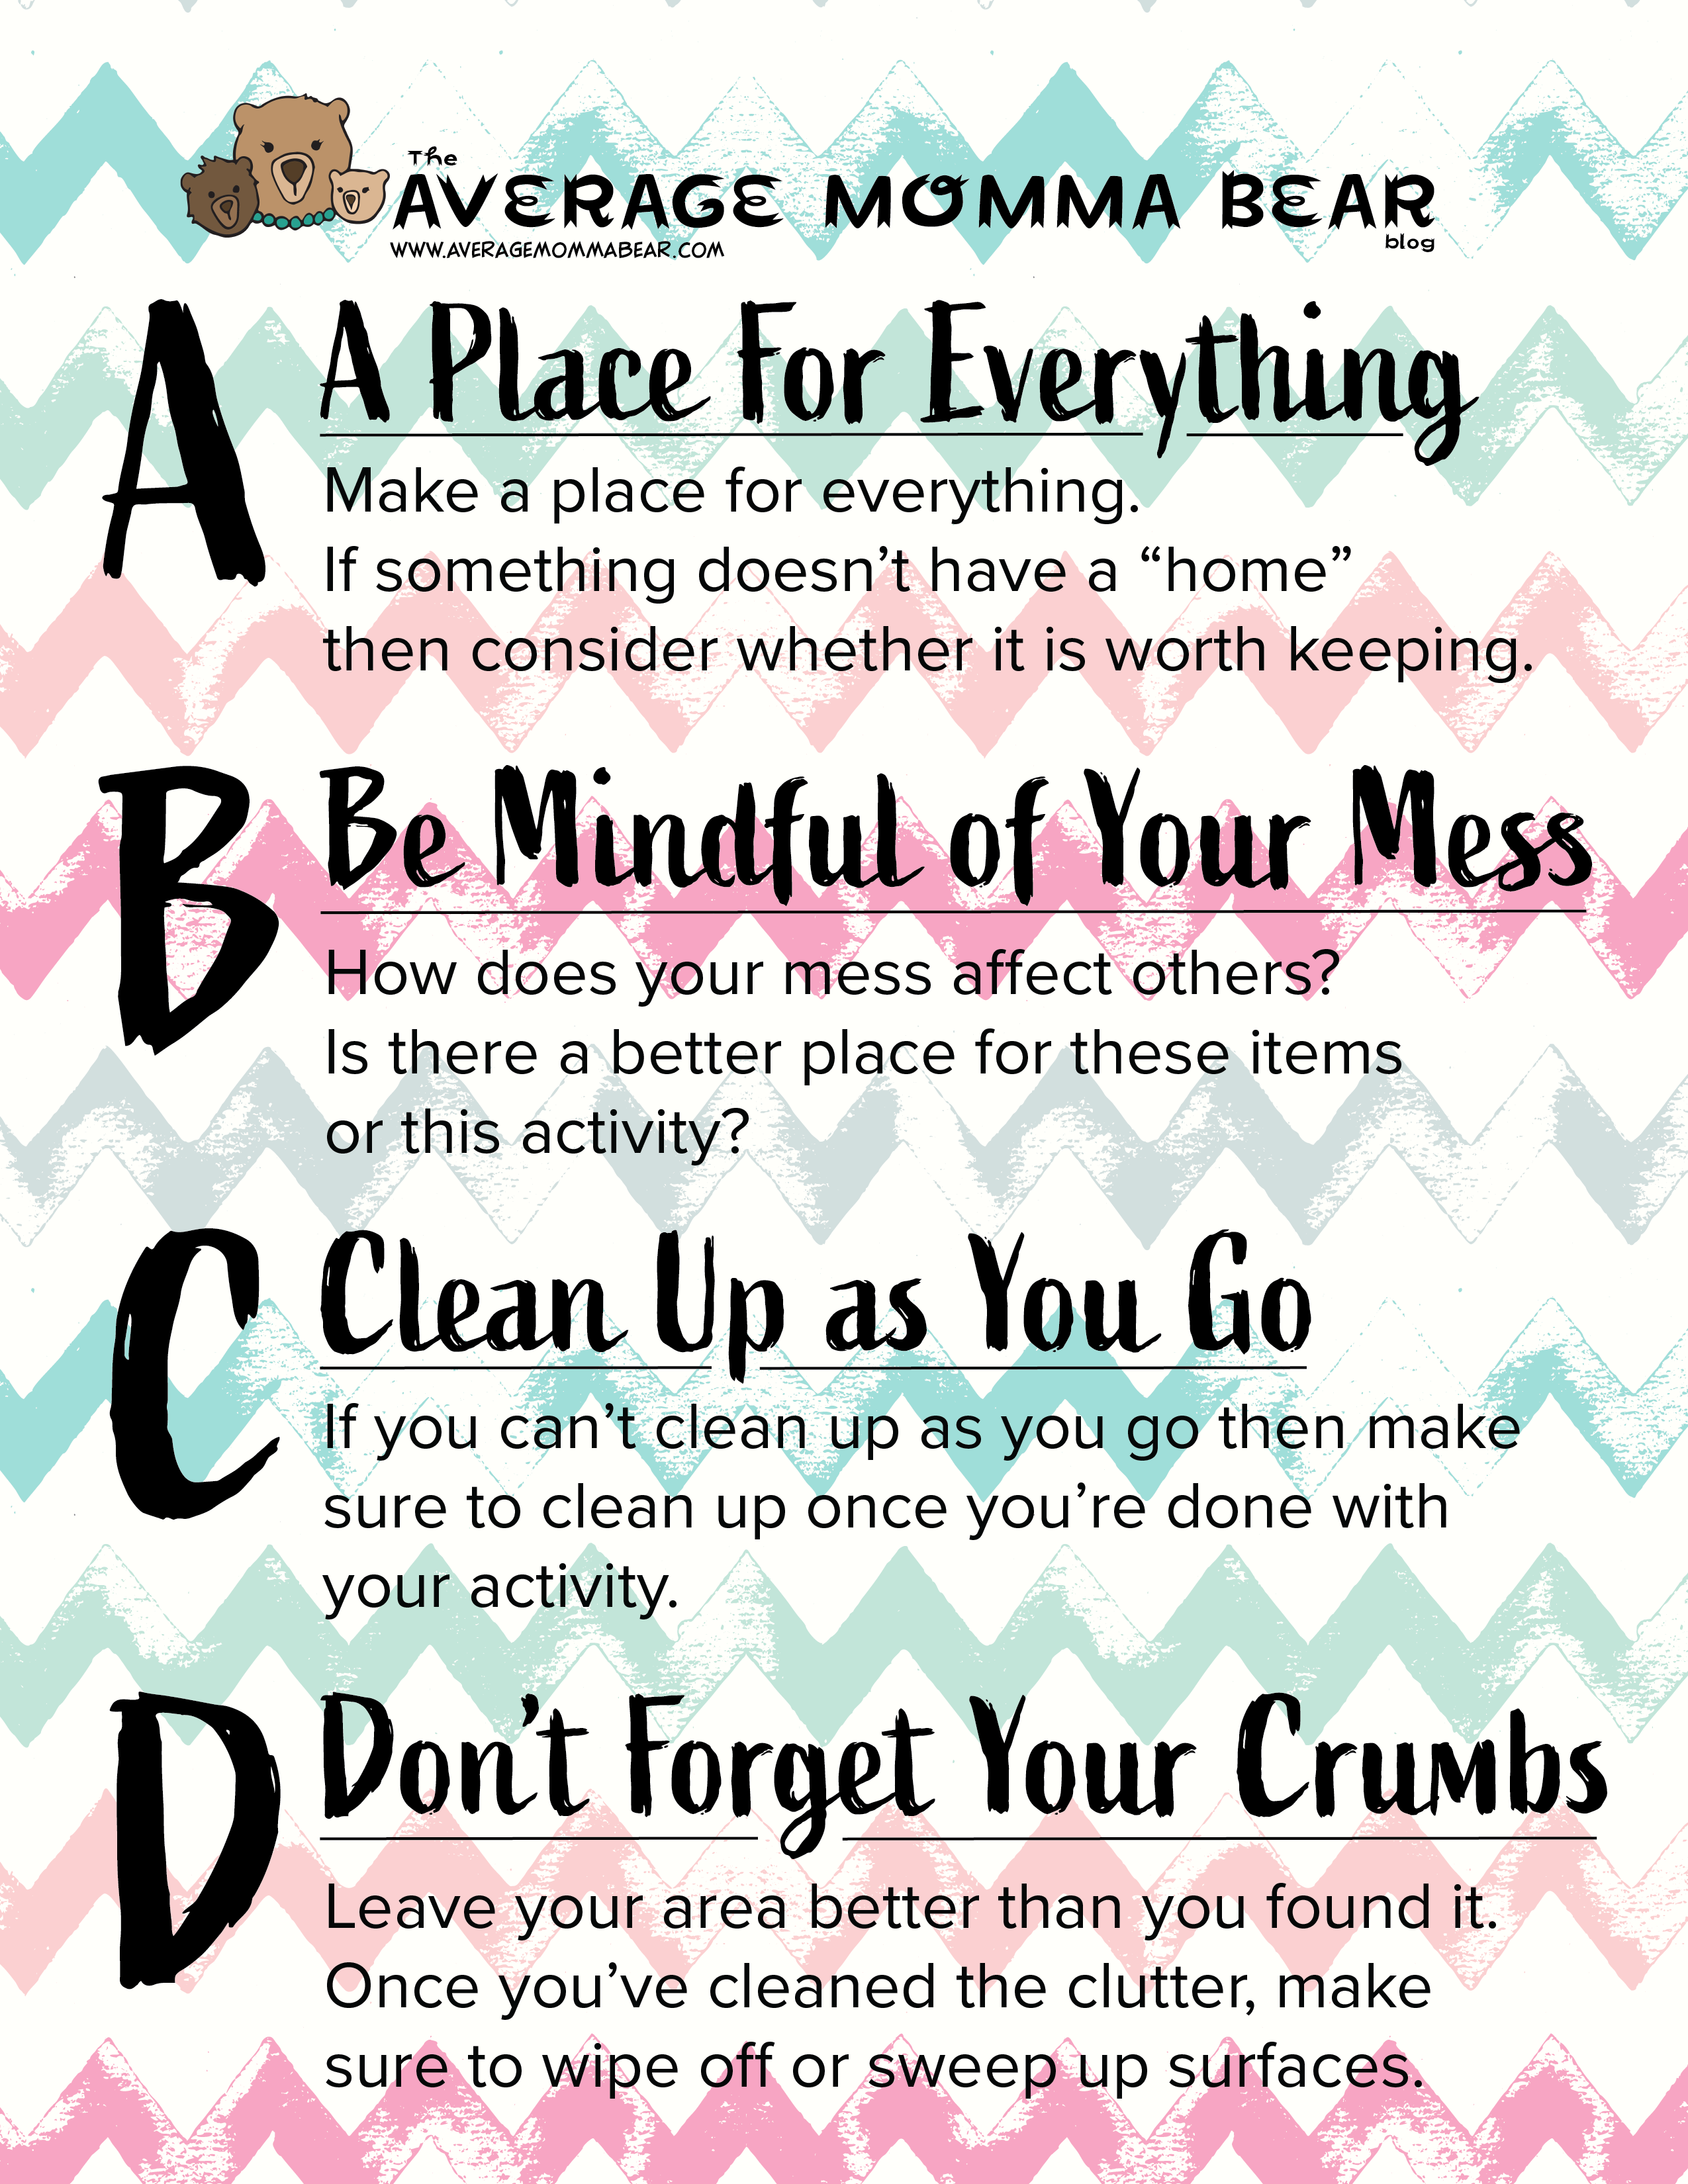
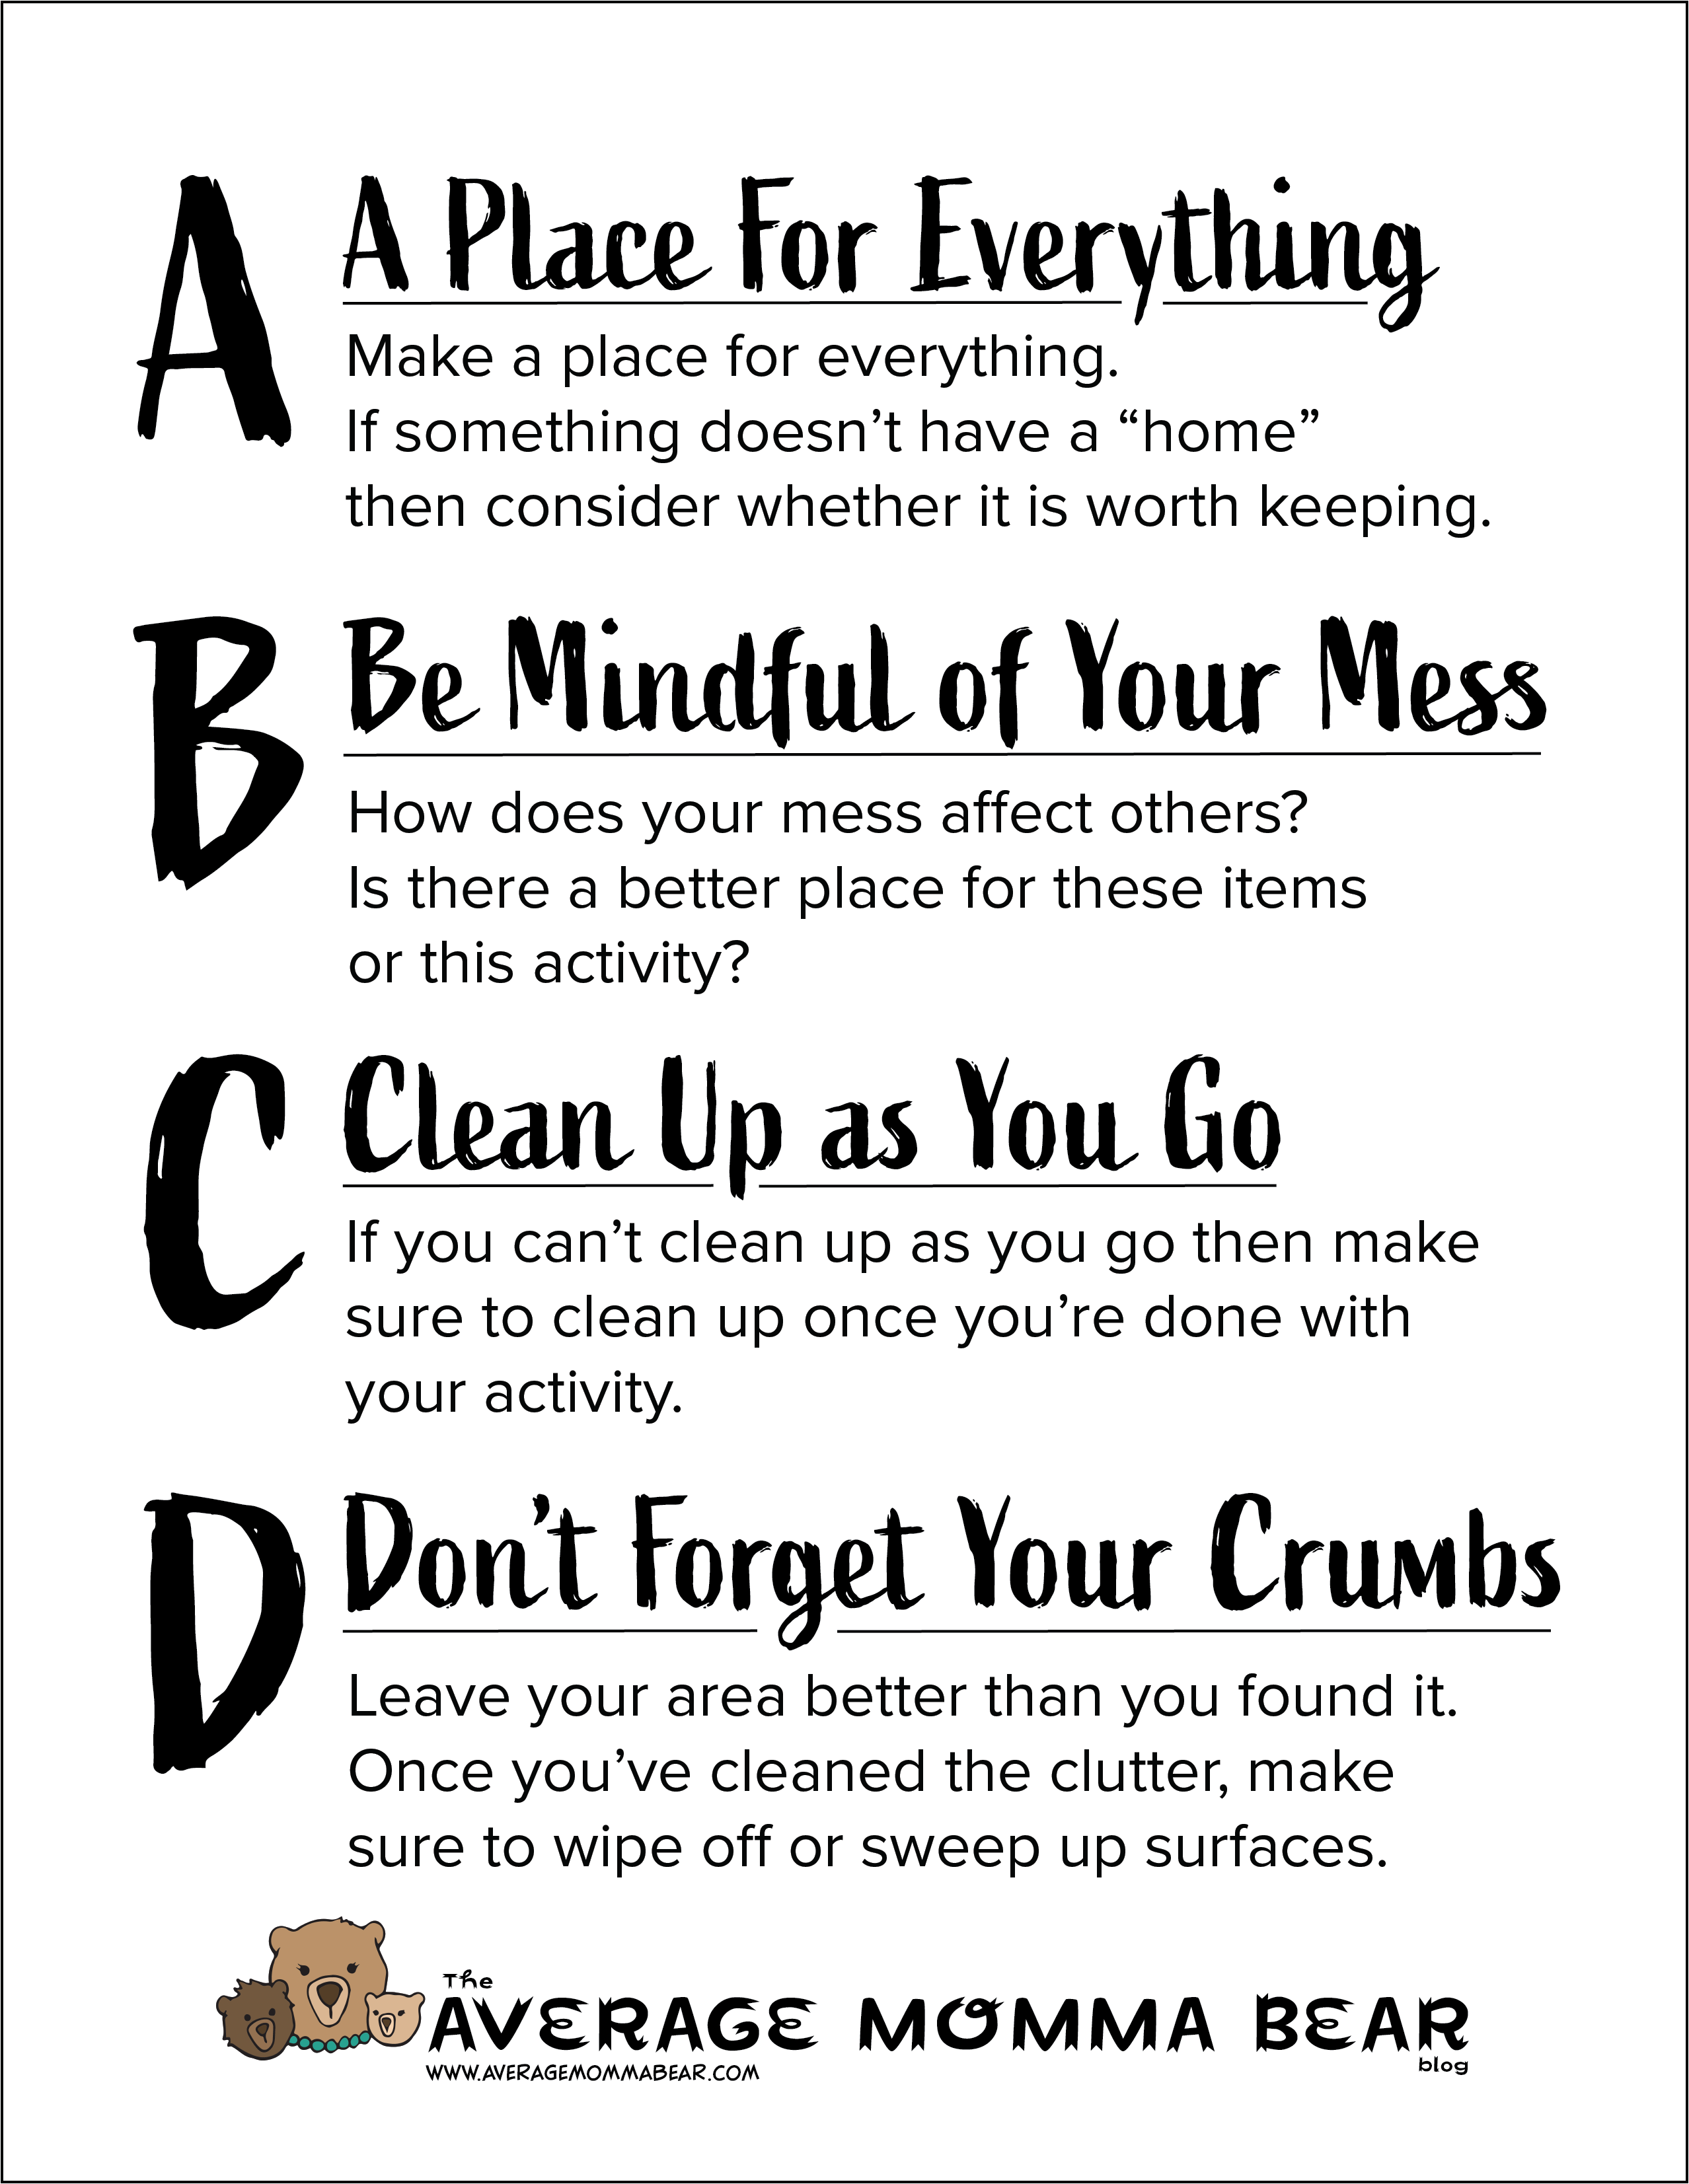
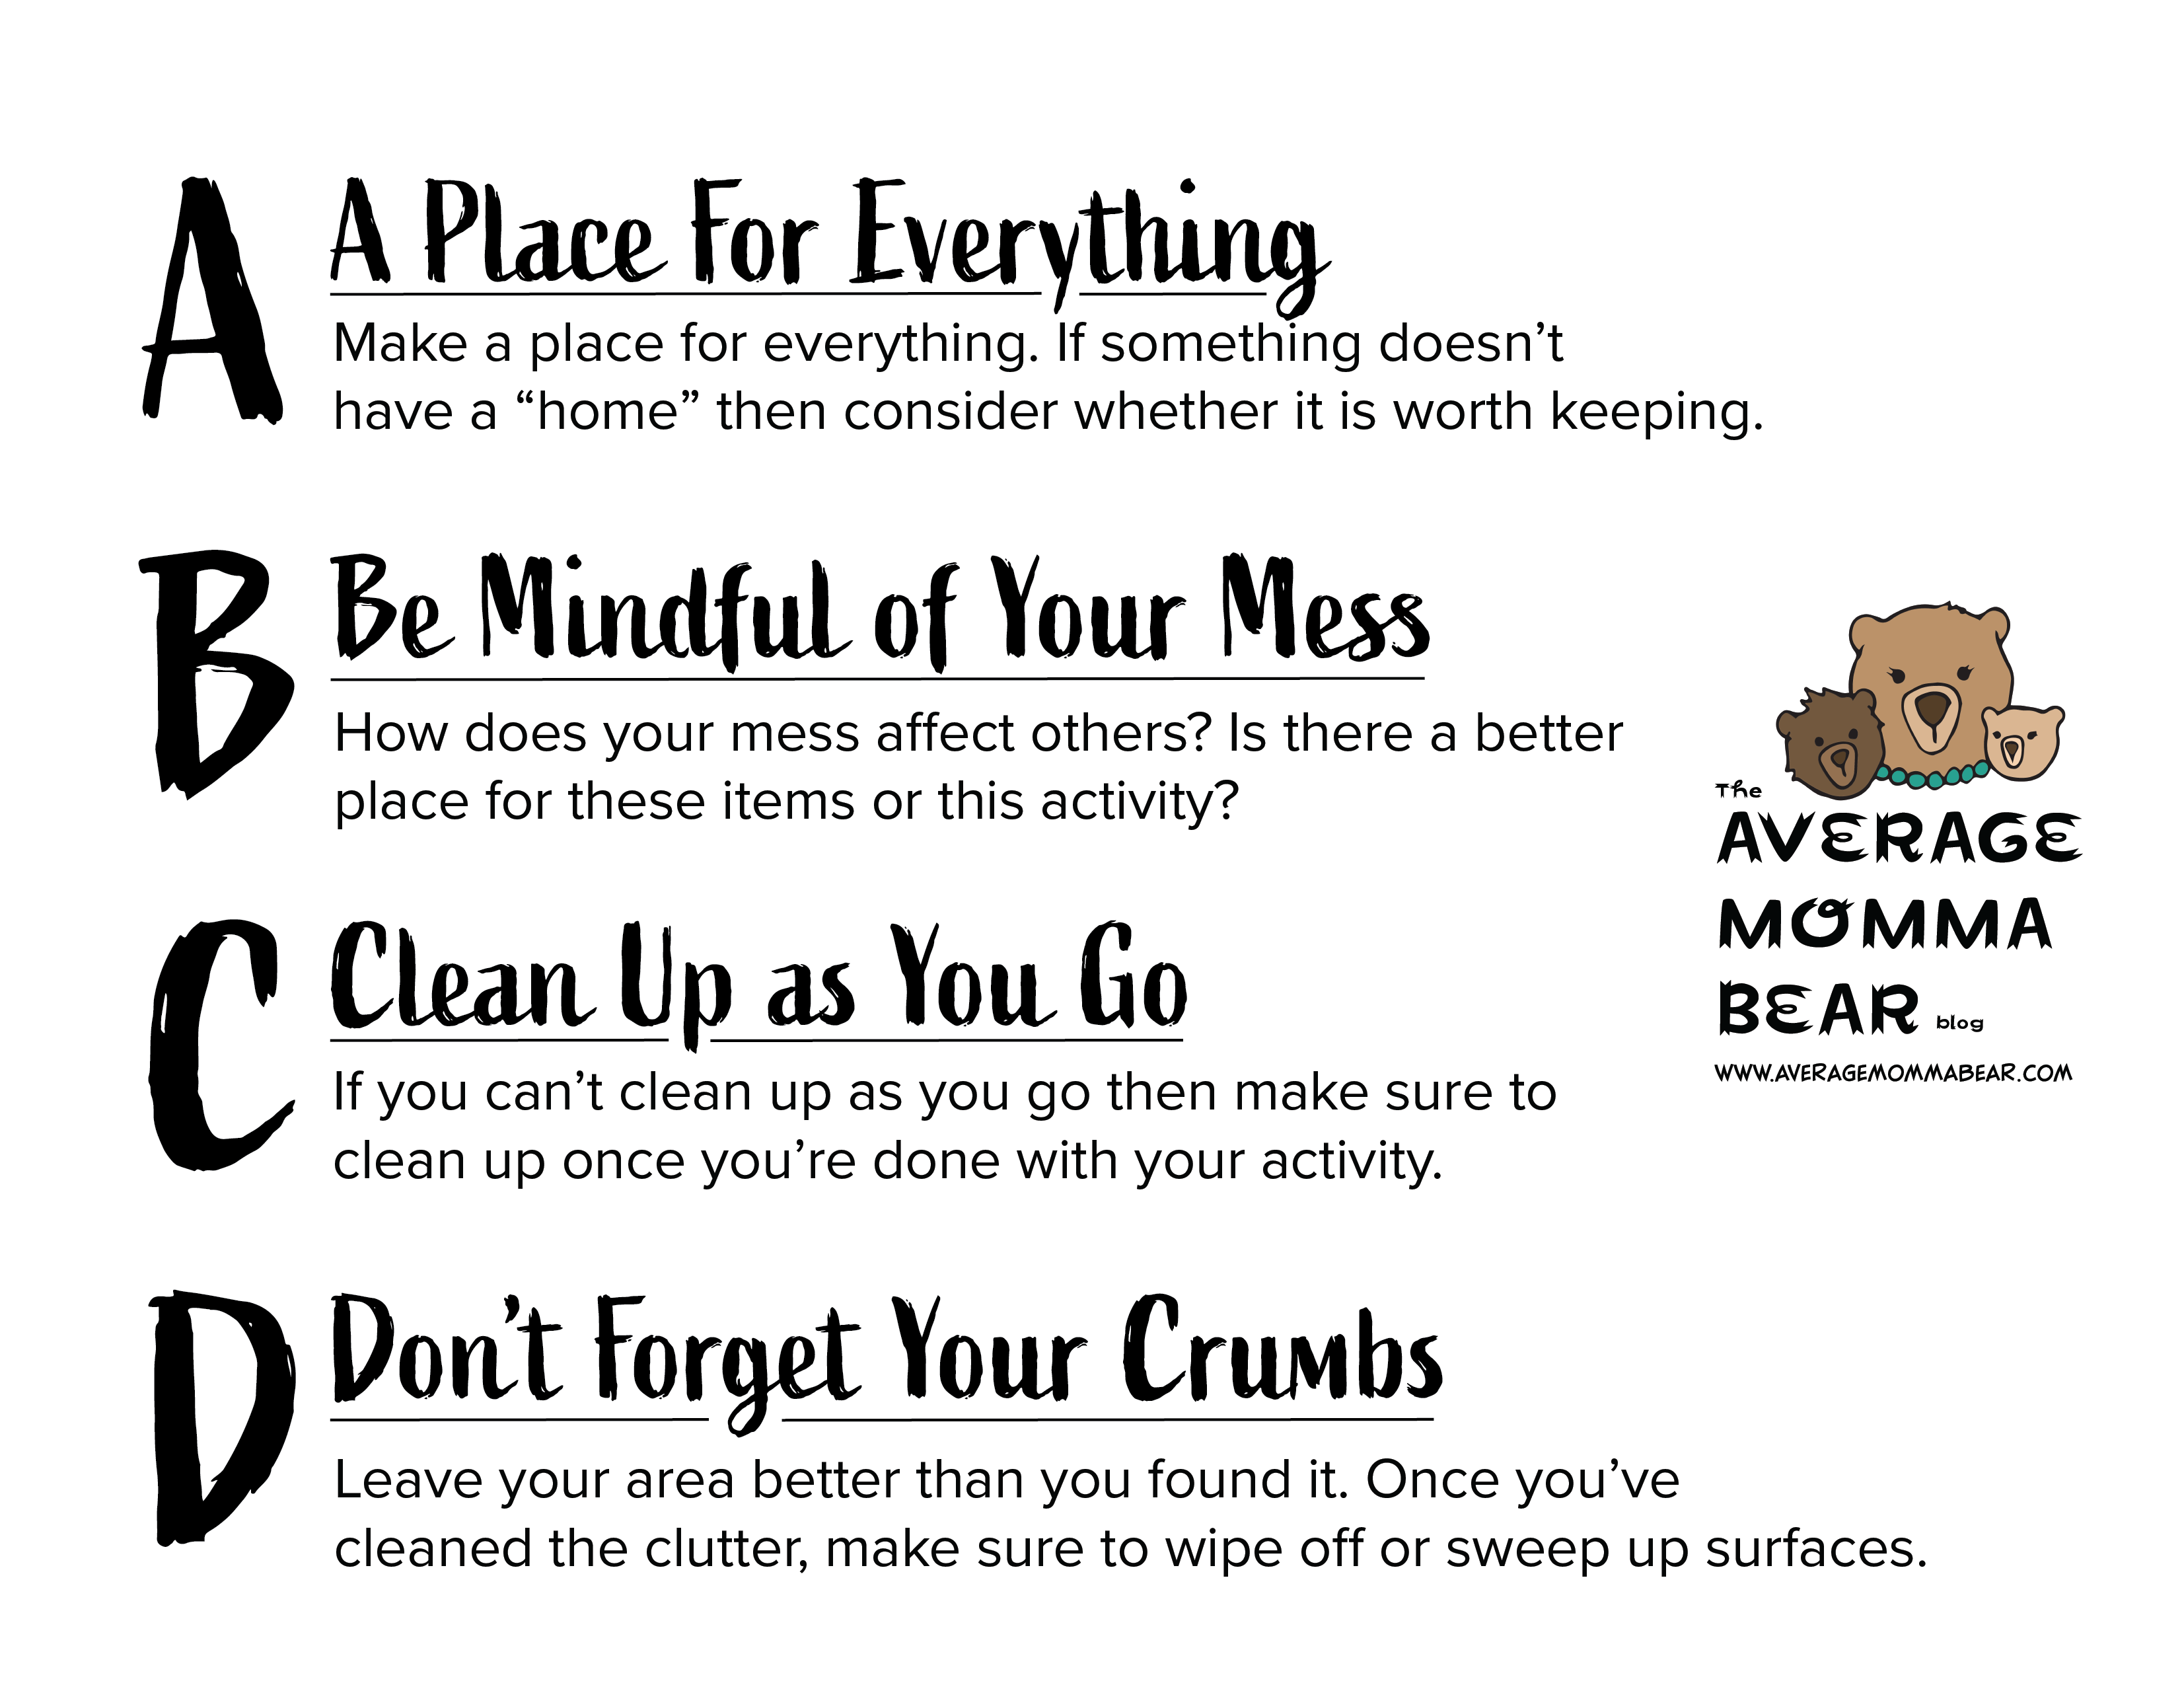
Clutter happens to all of us. But just because it’s a reality doesn’t mean that you can’t conquer it. I’m excited to share these cute little signs I made as a gift for you! They’re great for classrooms, play rooms, bedrooms, or anywhere! Print as many as you want and post them as a great reminder of where to start on your journey of overcoming the mess. If you practice my A, B, C & D rules you can start to build a good habit! Be sure to check out my POST about the first 5 steps I take when cleaning and organizing a cluttered area. I’ve also written about my secret to keeping my bathrooms clean HERE. Good luck!
Cleaning and organizing does not come easy to everyone. If you’re hoping to improve your methods and attack some cluttered areas, you’ve come to the right place. I have a passion for cleaning and organizing, but that didn’t always come naturally to me; I had to work at it over the years. Now that I’ve found some shortcuts and tips, I love sharing them to help others. Here are the 5 main ideas I use when first attempting to clean and organize something.
Number 1: Break it Down
This idea applies both to physically breaking things down to fit into the space better and to breaking the job down into manageable pieces. For example, if you want to organize a whole room, start with the closet. Even that might need to be broken down even further (i.e., organizing clothes before other items). This idea can take an overwhelming project and turn it into bite-sized pieces. Dedicate your time and energy into doing things carefully and slowly. Be aware of the fact that a project like a whole room might take several C&O (cleaning and organizing) sessions. Typically, I dedicate myself to one project per weekend since that’s the only time I can really focus on a task.
Our old high chair has a great break-down feature of folding up so it fits well in the space in our shallow closet under the clothes.
In regards to breaking things down physically, this is definitely the first thing I do when I approach a project. Is there anything being stored in this area that could be broken down to take up less room? My most recent project was a closet stuffed full of baby items that we’ve grown out of in our current stage. This included things like a bassinet, a jumper, a baby swing, a high chair, etc. Some of these items were made with built-in storage features like collapsable legs or removable covers, but many of them can be broken down further. If you have no plans to use these items in the near future, breaking them down to their easiest-to-store size can be a huge help to you in the meantime. I go in to better detail below in number 4 about breaking items all the way down and the best way to store them.
Number 2: Vertical Space
Vertical space often goes overlooked and underused. If something can be stacked upright as opposed to laying down it can create a lot of extra space. You can also store items in stackable boxes. Depending on how large your items are, you can typically find shoebox-sized plastic bins at the dollar store that work great for stacking to make use of your vertical space. And make sure to label, label, label! Check out the last section, number 5, for more information on that. If you’re storing things like books or folders, make sure to stand them upright. If you still have some vertical space above those books or folders, look into making or buying small shelves that can create another shelf for stacking above them. Refrain from stacking books or folders on top of one another. This makes it extremely difficult to access books on the bottom should the need arise. And if you awkwardly pull something from the bottom, and it knocks down the whole stack, now you have a new mess on your hands. It’s better to think ahead for the sake of accessibility.
In photo #1, I am illustrating a good use of vertical space. The closet space extended vertically beyond the doors so I made use of that vertical space by stacking things upright. In photo #2, I show how things like folders and papers can be placed in a more upright position to save space as well.
Number 3: Out With the Old
Holding onto something “just in case”? Chances are, if that case ever happens, your feelings and circumstances might be different enough that you may not even need the thing you’re holding onto. For example, sometimes I hold onto some shirts or outfits with a plan that I’ll wear them again someday after I magically lose weight and gain confidence. In reality land, if the stars aligned and I was able to wear those outfits again, I’d most likely be more excited to buy new clothes because my tastes change over time as well as my budget and the available styles. As a personal rule, if I haven’t worn something in 6 months, I consider donating it. If I haven’t worn it in a year, I do. This rule can apply to anything you’re storing. If you don’t have a specific plan for the item, consider donating it after storing it for 6 months to a year. This will help keep your storage levels at a more manageable level and make room for newer items that may need storing.
Number 4: Keep it Together
This idea goes along with breaking items down. If you take something apart or break it down into smaller parts, think ahead to a time when you may need to reassemble it. Before I take things apart, I always make sure I have three things handy (other than tools): a small Ziploc baggie, a permanent marker, and tape (packing tape works best, but most tapes will work). As I remove small parts, screws, nuts and bolts, I place them all in the baggie. Then I label that baggie with the name of the thing I took apart and tape the bag to one of the larger pieces to make sure they stay together. Just throwing the small parts baggie in with the larger pieces creates a risk of losing them. Make the effort to keep the parts together. This method also works great if you’re disassembling furniture when moving. Labeling the baggie and taping it to the piece of furniture has saved me from losing the small parts several times.
Garbage bags work great to keep all pieces together but aren’t the best long-term solution. If something needs to be stored long-term, look into getting it its own storage container.
Number 5: Label Now, Find Later
Labeling things is a labor of love. It takes a lot of extra work and planning to keep things organized in the long run. I find it best to label things as I go and to commit to finishing the job completely, which means labeling things as best as possible before moving on to another section. Too many times have I started to label things only to get distracted by another section that needs my attention, and when I come back to where I was originally working, I’ve forgotten what I’ve packed in which bin. I find the easiest way to label is to use a white duct tape or colored masking tape and a permanent marker. This is the fastest, cheapest way to label. If you’re looking for a more polished look to your organization, you can always take things a step further and invest in a label maker or, better yet, use a vinyl cutting machine to stylize your own personalized labels. But unless you’re hoping to get a lot of likes on Instagram and saves on Pinterest, I suggest going with the quick and easy tape and marker method. It’ll keep you from hating the whole process and giving up before you finish.
In Conclusion
These methods only scratch the surface of deep cleaning and organizing, but they’re a great place to start. They’ll help you tackle any clutter, great and small. Just keep in mind that breaking your C&O jobs down into smaller chunks is the way to go. If the stuff you’re cleaning and organizing hasn’t gone anywhere in years, there’s no real rush if it means things don’t get done right.
The best thing about tacos is that they’re so versatile! This is a fun variation that makes a very hearty, portable meal. This recipe is similar to the Crunchwrap Supremes you find at Taco Bell but with some changes to the ingredients. All ingredients are optional and flexible based on your personal taste.
Prep time: approx. 2-3 minutes per wrap
Cook time: approx. 6-10 minutes per wrap
Makes about 4 large wraps
Ingredients:
3 cans of canned chicken breast
1 8oz. brick of cream cheese (room temp)
About 4 cups shredded Mexican cheese blend
Small can green chilies
About 1/4 cup taco seasoning
Tostada shells (at least one for each wrap you plan to make)
Large flour burrito tortillas (the largest you can find)
Shredded lettuce
Pico de Gallo (or just tomatoes)
Sour Cream
Refried beans (optional)
Most of the ingredients you’ll need to make delicious Crunch Wraps. Not pictured: lettuce, taco seasoning, optional beans.
Instructions:
Open and drain water from canned chicken. Place all canned chicken in a large bowl with cream cheese and about 2 cups shredded Mexican cheese. (Cream cheese can be warmed in the microwave for about 30 seconds to make mixing easier).
Begin mixing ingredients with large spoon or spatula. This can also be done in a stand mixer to make things a lot easier.
Mix in green chilies and taco seasoning with chicken mixture. Stir until all ingredients are evenly mixed.
Create a work station with an assembly line for burrito tortilla > (opt beans) > chicken mixture > tostada shell > lettuce > pico > sour cream > shredded cheese > (opt tortilla circle).
Place a burrito tortilla on a plate or cutting board.
In the center of the burrito tortilla, (spread optional beans in a thin layer first) place about a cup of the chicken mixture- flatten and shape it to be about the size of the tostada shells.
Place 1 tostada shell on top of chicken mixture.
Place about 1 handful (or 1/2 cup) of shredded lettuce on top of tostada shell.
Top lettuce with 1-2 Tablespoons of pico de gallo and 1-2 Tablespoons of sour cream.
Top ingredients with about 1/4 cup shredded cheese (this will melt and work to seal the wrap during grilling).
Fold one edge of the burrito tortilla up and over ingredients reaching for the middle on top of all the ingredients. *If it seems like your burrito tortilla will not reach to meet all edges in the middle, you can cut out circles from extra burrito tortillas using a cereal bowl to trace around with a sharp knife. These circles can then be used directly on top of the wrap ingredients before wrapping the burrito tortilla.* Continue to fold up the edges going around the wrap in one direction. You will end up with a wrap that is shaped like an octagon or something close to it. You can place a small salad plate on top of the wrap to keep it folded. See video below for example.
Warm a large frying pan or a griddle or grill to medium heat. Oil or butter the warming surface.
Carefully place wrap fold side down on your heated surface.
Place a heat-resistant plate on top of the wrap as it is grilling to ensure it makes the most contact with the hot surface as possible.
Heat the wrap for about 3-5 minutes depending on how hot your surface is. Use a spatula to tip up the edge of the wrap as it is cooking to check for doneness.
Once desired doneness level is reached, carefully flip wrap over to other side and repeat grilling process. 3-5 minutes.
Serve hot and enjoy!
Build a tower of deliciousness, one ingredient at a time.
Who doesn’t love pasta? Of course, some of us have to watch our intake because it’s easy to get carried away, but indulging once in a while is such a treat. Alfredo has always been a “treat” for me, a special meal that I look forward to. But I’m also very picky about the taste. It has to be just right. I’ve never found a jarred sauce or a recipe I like. Olive Garden’s Alfredo sauce has probably been my favorite for years. I know there are plenty of people who don’t like OG. That’s okay. But what you can’t deny is that fat and salt can really pump up the flavor in a dish.
Thanks to good ol’ Pinterest, I came across a recipe one night that claimed to be “Olive Garden’s Alfredo Recipe.” Out of sheer curiosity I read the comments left by other Pinterest users. Several of them were claiming that this recipe was incorrect because of one or two of the ingredients. Personally, I didn’t know any better, but I was willing to believe these keyboard warriors because several of them corroborated the story. Further down the comments, I found that someone had posted a comment claiming that Olive Garden actually provides many of their recipes on their website. RECORD SCRATCH. That was news to me. So I did some digging. I was salivating thinking that I could get ahold of the OG Alfredo recipe to make myself. At the same time I was worried that I’d have to get a wider front door put on my house once I ate my weight in Alfredo. Click HERE for the entire online catalog of Olive Garden’s recipes.
Sure enough, after some digging, I found a collection of Olive Garden’s recipes on their website. I scrolled and scrolled until I found the treasure I was digging for. Click HERE for the Olive Garden version, unaltered. Below, I have included the recipe with changes I made after the asterisks (*).
Ingredients
3 oz wt butter *I used ½ cup salted butter or 1 full stick, only slightly more than their recipe calls for.
1 Tbsp garlic *I used a fresh bulb rather than the pre-minced version I usually keep in my fridge for quick recipes and added probably 2 Tbsp because there’s no such thing as too much garlic in a recipe like this.
2 Tbsp flour
1 ½ cup milk *I ended up adding this last and only used ½ cup since I wanted my sauce to be a little thicker than the recipe calls for. Also, I used whole milk.
1 ½ cup heavy cream
½ cup parmesan cheese *I used closer to 1 cup+ because I wanted the cheese to be the main thickening ingredient.
½ cup romano cheese *I did the same thing as with the parm, 1 cup+.
Salt and pepper to taste
*I also added about 1 lb of chopped rotisserie chicken for protein.
Instructions
Fried the chopped garlic in the butter until it started to become fragrant and the butter started to turn golden in color.
I then added the flour and mixed it in to make a roux which would help thicken the sauce.
After that was thoroughly mixed, I added the heavy cream and stirred it all until the coloring of the sauce was even.
Then I added the cheeses and stirred until they melted evenly.
After that, I added the milk, salt and pepper, tasting in between additions to make sure I didn’t over salt the recipe (which, in my opinion, is the only downfall of the Olive Garden recipe made AT the restaurant. It always seems too salty to me.)
Finally, I added my chopped chicken and let everything simmer a bit until it reached my desired thickness.
Final Thoughts
In the end, the recipe was good. Very good. I’m glad I added the extra cheese and didn’t add the same amount of milk that the original recipe called for. It was so much richer but most likely with a lower sodium content than what you get in the restaurant. If I was to try anything different the next time around, I would sauté the chicken in the butter/garlic mixture at the beginning to help give it a little more flavor. When I made this recipe I was in a hurry so I didn’t get the chance to think everything through and use my instincts as much as I like to. If you don’t hear from me again after this post, it means I’ve eaten Alfredo until I burst. But don’t be sad. At least I died happy 🙂
Choosing wall colors, cabinet styles, furniture, decor, and making it all work together is hard enough. What about trying to define and capture your own style? Sure, you can cruise Pinterest for hours, days, years and save a million amazing ideas, but how do you take that collection and make it your own?
There’s a reason those Instagram pictures and Pinterest pins of farmhouse, boho, shabby chic home decor have thousands of shares and saves. They’re beautiful. They feel intentional and put together. Personally, I’m obsessed with many of those and strive to make my house look like the pictures I see online, but in reality, I know my house will never look like those. This might be for a few reasons. First of all, those pictures are staged and heavily edited. I know no one who has a family, especially kids, can live in a house that looks like that 24/7 and stay sane. I also know myself well enough to know that I always try to recreate the home decorating styles I see online but my personal style frequently creates an odd mashup that might not be Insta-worthy.
Decor examples from Pinterest (could not trace original author) using a neutral palette with some contrasting patterns or color. *Not my photos*
The common thing about most of those extremely popular decor styles is that most of them are based on a neutral palette. The main base color is usually a stark, clean white, and the majority of the large accent pieces are neutral browns, tans, and creams. Some designs incorporate black as the contrasting color, while some even go as far as to use a single, non-neutral color as an accent.
As much as I would love the look of a neutral palette, I tend to require a little more color in my personal designs. I do my best not to go overboard with color. A little goes a long way. That rule applies to all of the suggestions further in this post. That being said, some bold color choices can make for a playful and interesting aesthetic. Below, I have included a picture of the dining room wall I painted in my last house. I chose a bright teal because it is my favorite color, and I wanted to create a unique “pop” of color among our mostly neutral paint palette. Adding fun, geeky decor to your home is a nice way to hint at your style, but adding just the right color to a wall can brighten your day and put a smile on your face when you look at it.
A bold teal color I chose for my dining room wall. This became my favorite wall in the house because it breathed life into the otherwise neutral color palette and gave a beautiful color contrast to any artwork placed on it.
Getting to design your own interior space can be overwhelming, but it can also be freeing. Take into account the things you’re interested in. If that happens to be neutral, pattern heavy, boho-inspired, green spaces, then good news- there’s tons of inspiration for you online! But if you’re more like me and appreciate something a little more unique and a lot more geeky then I have some wonderful resources and ideas for you ahead.
“Our family is full of geeks. I can trace it directly to my geeky parents.”
Our family is full of geeks. I can trace it directly to my geeky parents. My husband and I have definitely passed it on to our kids. Because of this, I love finding ways to incorporate our personal, geeky style into our interior decoration. It can be tricky if you’re hoping to stay away from in-your-face, obvious fandom references. I have taken the time to compile several extremely geeky color palettes (found at the end of this article) that reflect different fandoms. These colors can be easily incorporated into your designs with subtle tricks such as decorative throw pillows, wall art, and thoughtfully placed knickknacks or more visible, yet aesthetically pleasing, hints like full colored walls, bedding, or murals.
These ideas should be used in small amounts. Too many of these ideas in one place can get a little too busy and quickly become tacky. So, try to spread the geekery throughout your house. It will be more like an Easter egg hunt for your guests to discover and less like a visually overwhelming mishmash from wall to wall. One way to hide geeky clues in plain sight is to add home decor items like the ones below. (All items can be found at ThinkGeek.) These items can easily be accents in rooms where they blend in with other regular decor. The red clock could be used in a farmhouse style kitchen as an interesting color contrast piece. The towels could be used as decorative hand towels, placed on top of solid color towels with similar palette. The constellation light could be a sweet feature on a guest room nightstand to brighten someone’s night.
Small decor pieces like these can easily be worked in to existing decor schemes to add geeky flair. (These items can be found on ThinkGeek.com)
Here is an example of geeky decor that can be added to even the most elegant dining room. These Harry Potter themed plate and flatware sets (also found at ThinkGeek) are a great way to hint at something without being too obvious. Don’t even mention their theme to your guests and see if they discover it for themselves!
Beautiful Harry Potter dinnerware and flatware can be an elegant way to geek up your dining space. (These items can be found on ThinkGeek.com)
If you happen to have a home theater or a movie viewing area, you can always find beautifully done, artistic posters that celebrate some of your favorite movies. The posters below are just an example of the great ones you can find on the internet. Nowadays, there is such a vast collection of artwork like these that you can use to hint at your fandoms rather than being blatant with an obvious movie poster. Take it a step further and put these artistic posters in wooden poster frames before hanging them. It will create an even more sophisticated and intentional look for your media room.
These posters would be beautiful in a family room or theater. What better way to showcase your favorite geeky movies than with these works of art? (These posters can be found on ThinkGeek.com)
Bedding doesn’t have to be boring. Adding some geeky bedding to your boudoir can allow you to sneak in some geek while allowing the rest of the room to be more neutral. Here are two good examples of geeky bedding that aren’t too flashy or juvenile. You could also carefully add in a themed pillow or two, nestled in with some matching, solid colored throw pillows.
These bedding sets are a fun way to use subtle, geeky prints in the bedroom. The example on the left is a Star Wars theme with TIE Fighters mixed in with the geometric pattern. The example on the right is a damask print using Harry Potter artwork for a more elegant approach. (Both sets found on ThinkGeek.com)
A bedroom is also a great place to make use of the fandom-based color palettes. For example, if you’re looking to hint at what Harry Potter house you belong to, you can always choose a color from the House’s palette, paint your walls with it and use the House’s secondary color as an accent in the decor. Here, I have provided two examples where I used the main color from one represented Hogwarts’ house (Ravenclaw in one example and Slytherin in another) and used the room’s decor as the secondary colors used in the Harry Potter movies. This is a neat way to use bold color schemes without overwhelming the visual aesthetics of the room. The remaining colors should stay neutral to keep the room from feeling too visually “heavy.”
Using Sherwin-Williams online color sample generator, I created two examples of room decor using Harry Potter House colors as wall paint and the secondary color in the room decor.
Using bold colors in your house doesn’t have to be scary. In our last house, my husband and I decided to incorporate our geeky personal touches into some of the most visible places. We researched the exact blue color of the TARDIS from Doctor Who so that we could paint our front door to match it. We wanted to make our front door look as much like the TARDIS as possible without being too obvious. So, we chose a door with windows at the top and used the bright blue paint color to give people that “hmm, this reminds me of something…” feeling every time they looked at it. We actually ended up loving the bright blue color so much that we decided to paint our powder room with the same color. It turned out great! It made that little room feel special and different without being out of place. Check out the photo of our TARDIS blue bathroom below.
We used Sherwin Williams 6811 – Honorable Blue as the paint color for our front door and powder room. This color was the closest color matching the TARDIS blue from Doctor Who.
Wall art can be a tricky decorating tool. So much of the wall art that you can buy in stores looks like stuff you see on the walls of a hospital or dentist’s office. Finding artwork that adds a little bit of geekery into your decor without being blatant can be tough too. Here are a couple examples I found that could work in a pinch. Below, you can see the first is a set of prints based on the art found in the newest Zelda video game, Breath of the Wild. That game has amazing visuals, but I liked that this art set was simple and graphic. Add these into a boho-feel room, and they’ll blend right in. You could even convince your guests that you purchased them abroad, haha! The second piece of art is a clever take on a classic piece of artwork. I love this one because it has a lot of color and visual interest. You could pull colors from this painting to add into your room in other decor pieces- pillows, lamp shades, rugs, etc. to bring the whole room together and keep this painting from standing out too much. Both of these examples have a lot of versatility in helping you visually pull a room together with simple decor using either style or color scheme.
Two great examples of artwork you can hang and enjoy in your home. Guests might not even notice the geeky hints!
And don’t forget about decorating outside your house! The front porch is the first thing people see when they come to visit you. If you’re like me and enjoy letting guests know a little about you before coming into your house, a geeky doormat is a great addition. To accent our Doctor Who door color, we found a great doormat that read “It’s Bigger on the Inside.” This was such a fun conversation piece when other “Whovians” would visit our home and recognize the geeky decor hints. Especially since our house really did look bigger on the inside!
Overall, there are a lot of possibilities and ways you can hint at your fandoms with your interior decor. It takes a light, creative touch. This is a subject I could write a whole book on if I had the time! And no, I don’t make any money off of my recommendation of ThinkGeek, but if you’re looking for anything from decor to gifts to clothes that are geeky in nature, that’s the place to go.
As promised, here are my fandom-based color palettes below. Each color has been assigned a hexadecimal color code (or hex code) that can be found at the bottom of the palette. You can read my previous post where I outline several websites I use when creating color palettes like these. These hex codes are used on several of the sites listed in my post to correspond to specific colors. With these hex codes and the websites I provide, you should be able to replicate these colors in other places for your own use.
Feel free to refer to these palettes when needing geeky color combinations, but please cite me as author. I put in a lot of time and effort developing these collections. Also, I would love to hear any suggestions you have of other fandoms for which I should make color palettes. If I use your suggestion, I will credit you in the next color palette post!
A few of my other favorite fandoms. The Harry Potter colors were borrowed from somewhere else (author unknown) because I felt that they were already pretty accurate. The rest of the palettes are my creations, most sampled directly from pictures of these fandoms.
Over the years, I’ve collected many reliable resources for color sampling, color matching, and palette creation. Deciding colors for your home or design projects can be overwhelming when you don’t have somewhere to start. As a graphic designer, these resources are invaluable to me, but I have found even more uses for them as I help design our dream home. Here is the list I have compiled of the most useful online resources for any of your color projects.
Here’s a screen capture of an Encycolorpedia color page. This is only a small sample of what each page details for any color.
Encycolorpedia is a website that I came upon accidentally one night and has since become one of my go to sites for color information. I usually deal in hex codes (six digit codes, using letters and numbers, that represent each color a computer can understand) for colors in my graphic design, or Pantone colors (a collection of color swatches widely used and recognized over a large variety of color-based industries).
Encycolorpedia works like a color search engine where you can input a hex code, Pantone code, color name, or paint name/code, and it finds information on that color for you. Even if you only have one of those designations for your color, it will find and display all of the others PLUS many other pieces of information about your color all in one place. It finds things like the shades and tints of your original color, different color codes from various paint companies, and what your color looks like when seen with different types of colorblindness, just to name a few. I’m totally blown away by the amount of information Encycolorpedia can find about a single color. I’ve already found so many uses for this website, I’m amazed it’s free.
Paletton is another neat website that offers you a color wheel with movable sliders giving you complete control in finding color palettes based on monochromatic, adjacent, triad, tetrad, or freestyle (2, 3, or 4 colors) colors. Each color palette then gives you tinted and shaded versions of each color, plus the individual color codes for each color. This resource is great for choosing colors that can work well together based on color theory. You can also randomize a color palette or give it a few parameters from which to find you different palette options. I’m so excited to use this site more and learn all of its capabilities.
This is the layout for the Paletton website. The lefthand color wheel has several interactive sliders that give you control over your color picking.
Sherwin-Williams also has a great site for choosing colors. Of course, you’re restricted to their list of paint colors, but their list is pretty extensive. You’re bound to find something very close to what you’re looking for. But if you’re worried they won’t have the perfect color for you, don’t! Sherwin Williams offers a paint color matching service. Take a swatch from any other paint brand to them and they can match it perfectly using their signature paint recipe.
Their site offers a large, easy-to-navigate color palette, and each color gives you a visual example of what that color looks like in a fairly realistic setting. You can change the image used in this visual example, you can even use your own image, and the computer will do its best to superimpose the chosen color on your image. This feature works fairly well, but the more busy and complicated your image is, the harder it is to get the computer to put the color in the right place. Each color also comes with suggestions for similar colors, as well as suggestions for complementary color palettes. This resource is great for helping you find colors that work well in your home. Check out how beautiful their color palette looks below.
The Sherwin Williams color palette allows you to click any color to learn more about it or get access to paint swatch information.
Pinterest is such a great idea resource. It’s such an easy way to find thousands of ideas for nearly anything. The fact that it’s so visual makes finding color palettes that fit your interests fast and simple. There are board after board of color combinations to choose from. The best thing about these color boards is that most of them have been compiled by real people. There is something special and beautiful about the amazing color combinations people create. Sure, a computer can give you an accurate color palette based on color theory, but the human eye, personal experiences, and aesthetic preferences make for some very beautiful combinations. Just try searching for “color palette” in the search bar or click the link I have provided to see my personal collection of color palettes. Below, I’ve included a visual example of how you can collect color palettes on Pinterest. Just scrolling through hundreds of these beautiful palettes will spark so much creativity in you!
A snapshot of some of the color palettes I keep on one of my idea boards on Pinterest.
An example of how AskVal picks colors from your pins.
My last color resource is one that works in combination with Pinterest. It’s called AskVal. Valspar is a specific paint brand that developed a neat app that takes any of your Pinterest pins and turns it into a color palette. It can even sample colors from a whole board to give you a color palette. This is helpful if you’ve found a specific pin or board that you love but don’t have access to any color sampling programs like Photoshop. AskVal will give you five sampled colors, one of which is adjustable with an “eyedropper” tool, allowing you to sample a color by clicking anywhere on the image. Then each color on the palette gives you details about what paint brands have a close match, the paint color designation number, and which retailer carries that paint. This app is a lot of fun to play with. It is fairly intelligent in its color choices, which can save you a lot of guesswork.
Altogether, these resources create a powerhouse of color choice, color matching, color theory, and palette creation. These sites are great to have bookmarked in your favorites for those times when you need help picking out colors and don’t want to stand around fumbling with paint chips in the hardware store.
I love this recipe. It’s quick, easy AND delicious. You can eat this for breakfast, lunch or dinner! We usually treat this as one of our breakfast-for-dinner recipes. It’s definitely comfort food; perfect for a cold night or any time you want something that can easily feed a whole family in about 30 minutes. It is easiest to cook this on a griddle or in a very large frying pan.
INGREDIENTS
Most of the ingredients needed for the breakfast scramble.
1 package/bag of uncooked shredded hash browns (about 1-1/4lbs or 20oz)
Eggs (1-2 per person being served)
Milk (about 1/4 cup per 8 eggs)
Garlic salt for sprinkling
Pepper for sprinkling
Dried parsley for sprinkling
1 medium onion (any color works)
Your favorite cheese, shredded works best
1 package bacon (or preferred breakfast meat, about 12oz)
DIRECTIONS
Heat griddle or pan to medium high heat (I set my griddle to 350 degrees specifically). No need to pre-grease pan because bacon will cook first, and bacon grease can be used for the remainder of foods. If other breakfast meats are used instead, grease griddle or pan accordingly.
Dice onion into about 1/4″ pieces.
Remove bacon from package, keeping pieces together (making it easier to cut). Using a sharp knife, make vertical slices through bacon slab about every 1/2″ until all bacon is cut into pieces about 1/2″ x 1″ pieces. It’s not necessary to separate the pieces, as they will come apart while cooking. *See photo below for example.*
Break eggs into a bowl big enough for all of them plus milk and seasonings. Add milk, some garlic salt, pepper and parsley. I usually eyeball amounts, but to help you estimate- I used 8 eggs for 4 servings (2 eggs per person), about 1/4 cup milk, 1/2+ tsp garlic salt, 1/4+ tsp pepper, 1 Tbsp parsley. Mix until eggs are beaten and all ingredients are evenly mixed in.
Add bacon to heated griddle/pan. Cook bacon until it’s thoroughly cooked. Remove bacon from griddle/pan and set aside on a plate with paper towels to soak up excess grease.
Add cut up onion pieces to griddle/pan using the bacon grease already in place. Brown onion until it is translucent and caramelized.
Remove onion from heated surface and set onion aside on a paper towel covered plate like bacon. Bacon and onion can share a plate at this point if necessary.
With griddle/pan still sufficiently greased, add hash browns. Flatten hash browns with a spatula so that the majority of them are making contact with the heated surface. Sprinkle garlic salt and pepper over the hash browns. Let them cook for about 5-7 minutes on one side before flipping and doing the same on the other side. (5-7 minutes on each side while keeping close watch on them as to not let them burn).
Once hash browns reach desired doneness, add bacon and onions back to the grill/pan.
Slowly and carefully add beaten egg mixture into the hash brown, bacon, onion pile. Begin mixing everything together while also letting the egg cook on the hot surface. The egg mixture will begin to hold the hash brown mixture together.
Once egg is completely cooked, turn off heat and cover mixture with shredded cheese. There should still be enough residual heat to melt the cheese. Enjoy while still hot!
The three stages of the bacon for this recipe. Whole, chopped, and cooked.
This meal can be easily reheated and enjoyed again IF there are leftovers!
Nutrition
Serving size: as cooked with 8 eggs serves about 4 people.
I don’t follow KETO specifically but I try to substitute proteins for carbs whenever I can. My body seems to function better that way. And I stay fuller longer. I found this recipe a couple months back and saved it to my “healthy recipes to try” Pinterest board.
I have found many pins using this same recipe so I have no way to credit the original recipe creator but I will leave the original pin as I found it for proper credit to that pinner.
Here is the original PIN I found next to my finished product:
My Attempt
1 cup shredded mozzarella cheese
½ cup shredded parmesan cheese
1 egg
Garlic salt sprinkled on top before baking
I used the convection setting on my oven which puts it at 375°.
They only needed 15 minutes to cook. Any longer might have made them too crispy.
PROS:
Easy to make
Easy to double or triple recipe to make more
Very fast prep time
I could successfully pretend this was bread
Very versatile
CONS:
Could be bland without some spice for flavoring which is why I sprinkled garlic salt on it.
Needs to be eaten soon after it’s made. Doesn’t age well.
In the future, I plan to use this recipe to make:
Bagels
Breakfast sandwiches
Mini pizzas
Cheese sticks
Nutrition
Serving size: 1 whole regular-sized bagel (2 halves) or 1 regular-sized hamburger bun (top and bottom).


