Moving sucks. Generally. I’ve moved 9 times in my adult life. This doesn’t include the double-digit times my family moved us before I was in college. During the 9 times I’ve moved I’ve learned a lot. I’ve learned what helps and what doesn’t because I spent the first 5 of my moves doing it the way we’ve all done it. Start packing too late. Cram anything and everything into boxes. Run out of boxes. Run out of tape. Get overwhelmed. Ask friends and family to help with the moving in exchange for pizza or beer. Barely get enough help. Everyone’s exhausted.
Every time I’ve had the opportunity to move I’ve learned a new tool or tip that has made my life easier in the process. Currently, we are in the middle of our biggest (and hopefully last) move in terms of size and distance. The last time I moved was a few weeks before my wedding when I moved all of my belongings into my (now) husband’s garage. It was a surprisingly easy move because of the things I’ve learned.
I’ve felt compelled to share my tips with anyone who will listen (or read). So here are my top 10 tips for an easier move:
1. Create a Packing Kit
This tip is one of the easiest and most helpful things you can do for yourself even before you start packing. Start by finding yourself a box or container that is easy to carry like a fishing tackle box or a plastic storage box with a handle on the lid. Here is an example of the box and contents I used for this move:

This box will become and stay your go-to container for your packing needs. This keeps things organized and helps calm some chaos. This box should follow you everywhere while you pack and even through the move to the other side. You’ll want to pack it with things you need before AND after the move. Things you would put in this box could be:
-Packing tape (with extra rolls)
-Large permanent markers (for marking boxes)
-Colored tapes (for marking boxes)
-Box cutters (for packing mistakes AND for unpacking after the move)
-Zip Lock baggies (to collect things like push pins, nails, random misplaced hardware, etc.)
-Measuring tape (can come in handy when you’re planning what furniture to keep or purge)
-Small scissors (for cutting twine or stubborn tape)
2. Boxes
Some people know that you can go to the grocery store and ask for free boxes. But rarely are those good packing boxes. Those are, at best, banana boxes with holes for handles. For my past moves I was fortunate enough to be working a retail job or know someone who was. This gave me a great resource for different sized boxes that were very helpful for packing and this was my go-to for years.
But this move, I found yet another great resource for packing boxes. If you haven’t found and connected with your local Buy Nothing group I STRONGLY encourage it. Moving boxes are only one of the many great things you can find there. If you’re unfamiliar with what Buy Nothing is it’s exactly what it sounds like. It’s a community of people (usually based on where you live) asking for and giving things freely. The link to their website which will help connect you with the appropriate Facebook group can be found HERE.
In a Buy Nothing group you can ask for certain things you’re looking for (i.e. moving boxes, a cup of sugar, a shower head, dog collar, paint brushes, to borrow a lawn mower, insight into legal issues, etc.). Almost anything you can think of is an appropriate ask on Buy Nothing. You can also gift anything you’re trying to get rid of without expecting anything in return (which is great when you’re getting ready to move!). Have too many ceramic mugs? Post it! Want a specific plant in your yard gone? Offer it up! Ready to part ways with your kid’s old clothing? Gift it! I’ve given and seen some of the weirdest, most random things and they’ve been happily received by some person living near me. So don’t be afraid to try.
In short, this resource is incredibly valuable for many things. But for the purpose of this post, it can be a great place to find moving boxes. They will most likely be used but you will be surprised at what some people are willing to give. Among the hundreds of free moving boxes I’ve received from my Buy Nothing community, many of them were brand new and unused! People can be so unexpectedly generous! You have nothing to lose and so much to gain!
The last thing I’ll say about Buy Nothing groups (because I could go on and on) is that they also connect you with your community in a very unique way. You get to know the people you’re trading with. You make new friends. Once you’ve moved, you can also join the Buy Nothing group of the new community you will be moving to and find someone to gift your used moving boxes to once you’ve unpacked. It means you don’t have to worry about packing your recycling and garbage bins full of packing materials. It’s win win!
3. Organize and mark your boxes
For every move before our current one, I labeled the boxes as I had for years- with the general contents of the box. This time I tried something a little different. I was determined to start our packing process early. I knew that I would be almost 9 months pregnant by the time we were moving and I did NOT want to leave packing for the last minute. Plus, we knew we’d be moving in the hottest part of the summer. That’s a baaaaad combo when you’re ultra pregnant! I also knew that we were planning to keep the majority of our belongings in storage for over a year while our new house was being built. This meant that I had to stay organized and leave myself the ability to find things easily that I had already packed. For example, early on I packed up my lesser used items from the kitchen. A month later, I needed my rolling pin that only gets used about twice a year. If I had just packed it in a box labeled “kitchen stuff” I’d be going through several boxes just to find it and making more work for myself in the end. Instead, here was my organizational method:
Start by making a spreadsheet. There should be at least three columns. My main columns were: BOX NUMBER, ROOM (color coded), and CONTENTS. Each box received a number that corresponded with the spreadsheet row. I then decided which room the contents of this box needed to end up in (not necessarily where they came from but that can work too if you haven’t planned that far ahead). To color code my boxes I purchased a set of different colored masking tapes from Amazon. I needed enough different colors to be able to set main rooms apart so that boxes can be easily delivered to the correct rooms when we move into our new house. A link to the tapes I purchased can be found HERE. This is just an example of what you can use, I don’t make any money from featuring it. Each tape color then corresponded to a color on my spreadsheet in the second column so that I could see at a glance which boxes went where. That way I could also group boxes by room if I needed to search for an item I forgot to record.
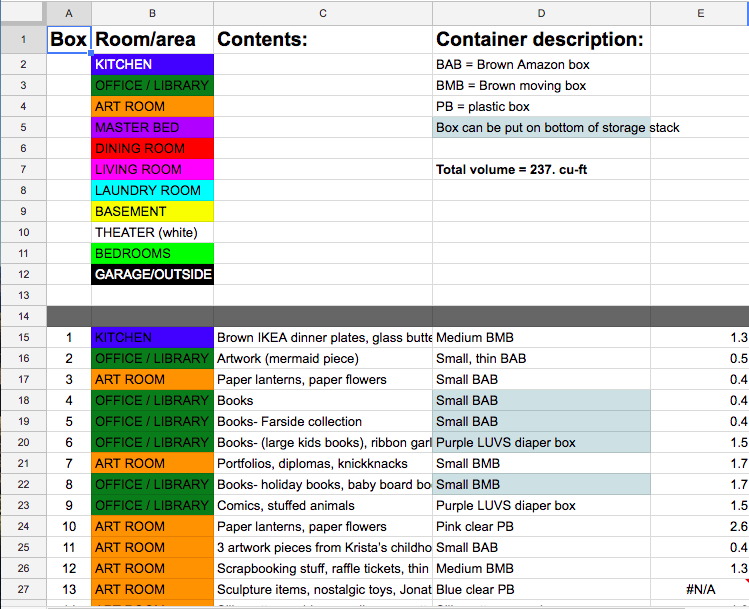
The third column is where I recorded almost every item I placed in the box. This came in handy many times. All I had to do to find something specific was use the search function (or the find and replace function) to quickly find all the rows containing a specific word.
We added a couple more columns because I’m scary organized. Possibly a little obsessed with organizing. I added a column for the type of box (general size and type or identifiable markings) and my husband added a column to track the cubic space the box took up based on its general measurements. The only reason we had this is because we were trying to fit the most of our belongings into a specific sized storage unit and wanted to be able to estimate how much could fit. These last two things aren’t that helpful to everyone but they worked for us. Play with it and see what helps you the most. The most important part is tracking the box number to the contents.
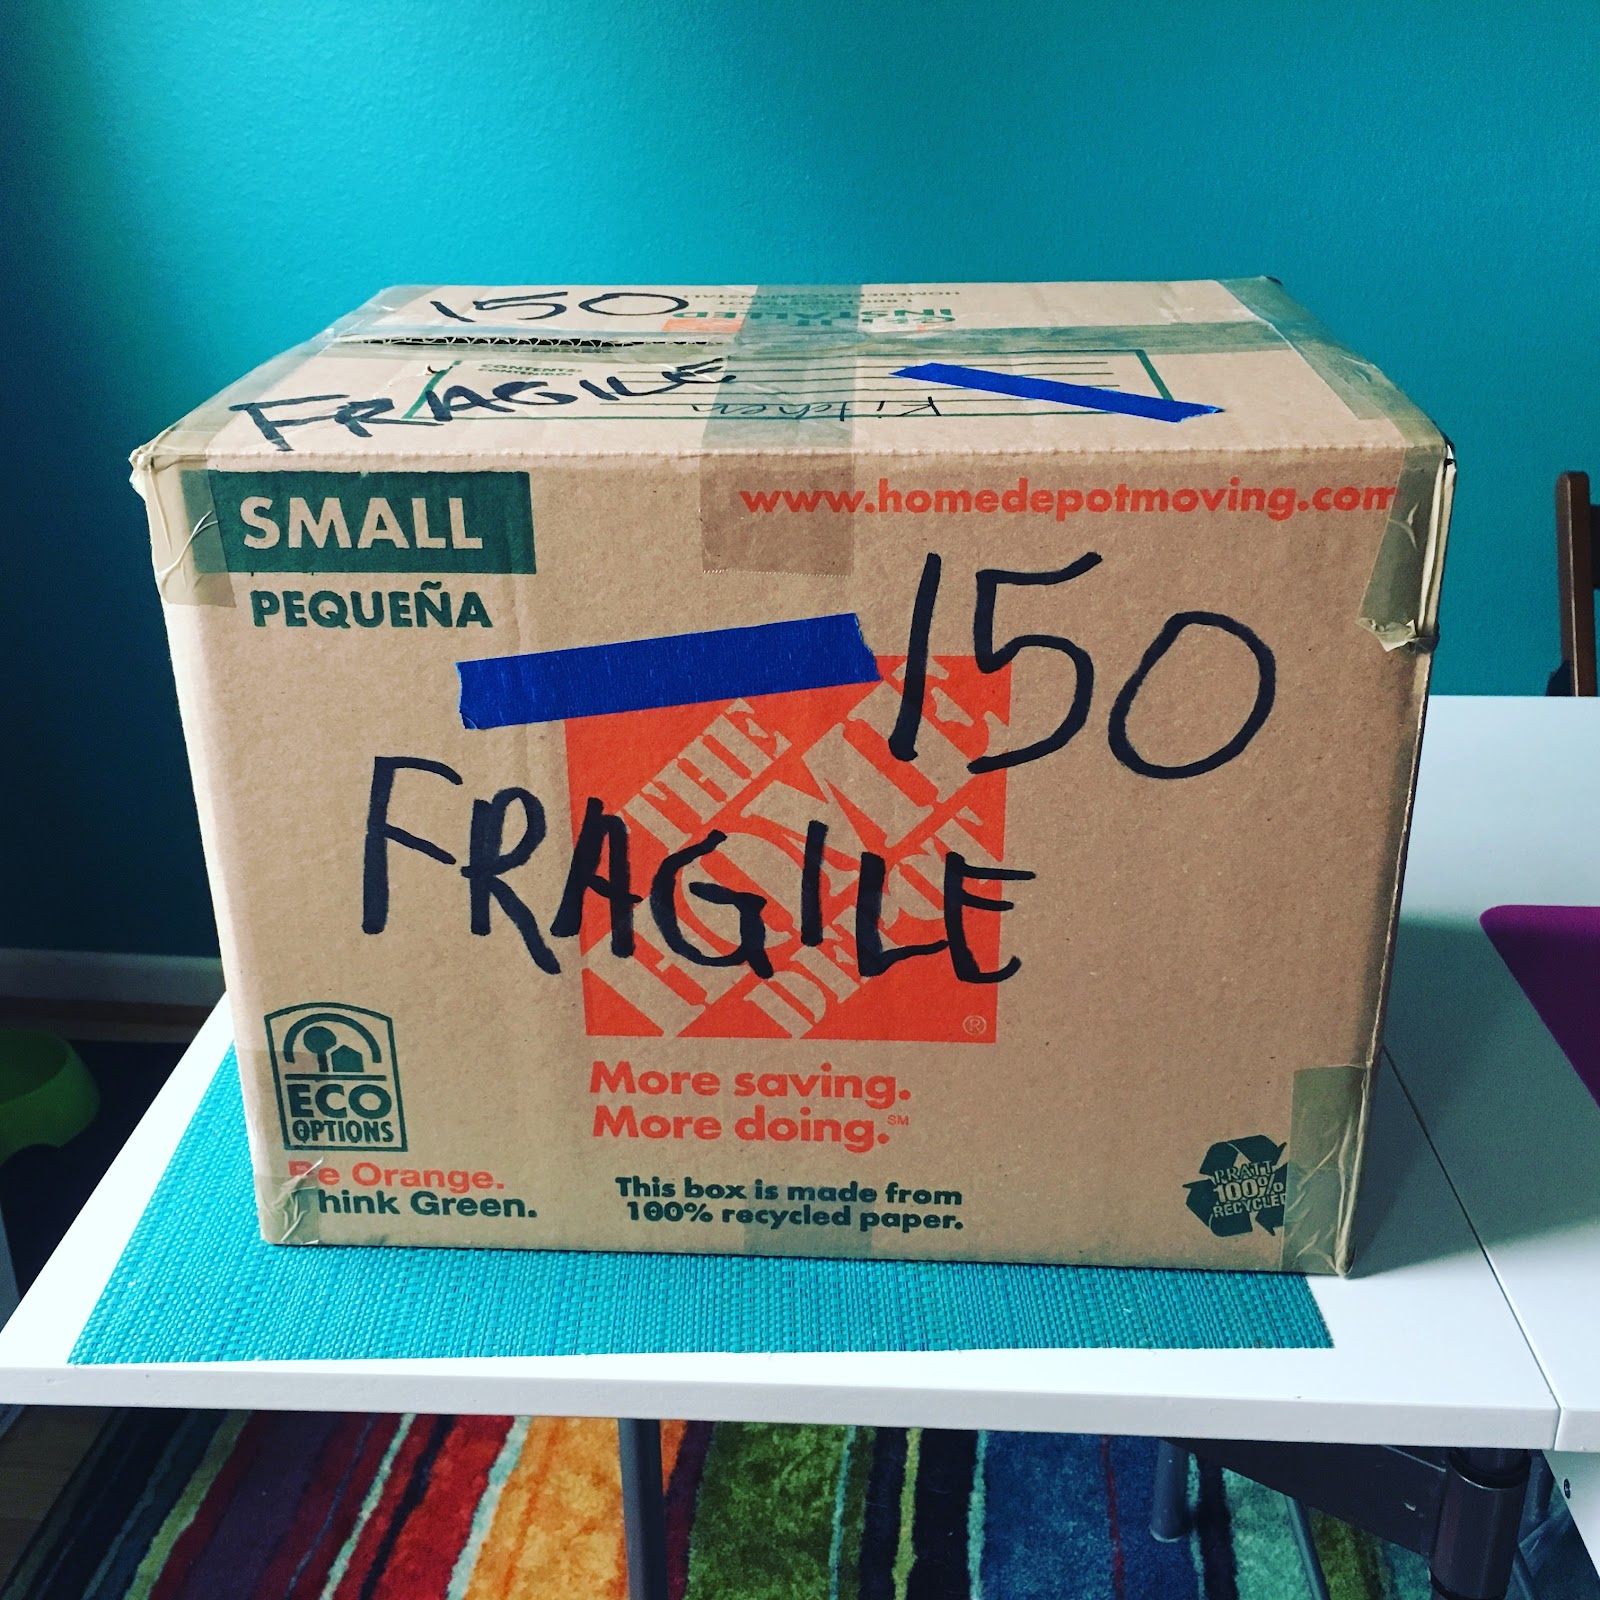
Once you have your spreadsheet just remember to mark the box with its number on all sides as well as the colored tape that corresponds with the room it will need to end up in.
4. Downsize (sell and give)
Once we knew that we were going to need to store our belongings for a year we had to become very selective on what we were keeping and what would be cheaper to just buy later on if we needed it again. I can be a pack-rat so I tend to try and save money by saving things. So it didn’t occur to me that it would possibly be cheaper to re-buy an item later rather than to pay to store it for over a year. This may not be the case for you since not everyone needs to store their belongings during a move but it’s something to consider when you’re making the decision to keep or toss things.
This is another place where the Buy Nothing groups can come in really handy. I was able to give away so many things to my group which saved me trips to the dump, trips to the thrift store donation line, or room in my garbage can. And it meant that someone else was getting use out of the items rather than them just becoming piles at the garbage dump. It was also convenient because the general Buy Nothing practice is that you offer up an item and the person who is chosen to receive that item comes and picks it up from your doorstep. You don’t even have to leave the house! This detail was huge for me as a pregnant mom with a toddler. Any reason to NOT leave the house was helpful during this busy and tiring time.
I was also able to make use of the Facebook Marketplace for some items that were worth something to me. Facebook Marketplace is a slightly more convenient version of Craigslist. You still can’t be 100% sure of people on there, and there are a lot more flaky people than Buy Nothing but it serves its purpose and, if used with caution, can be very helpful in your downsizing.
Get rid of clothing you haven’t worn in years. Even if you plan on fitting back into things, your tastes may change between now and then. When I started looking at some of my clothes like that I realized I could get rid of almost all of the ones I had been holding onto for years. But I still kept a few of my favorite pieces. If you have children, reassess the items you are keeping for them. Will it be necessary for possible future children? Is is a nostalgic item for me or my children? If yes, then it’s a good idea to keep it. Otherwise, find someone to gift it to. When I was pregnant with my first, I got 90% of my baby items from my local Buy Nothing group. The people on there were amazingly generous and saved us a ton of money. Plus, it cleared space in their homes! Again, it’s a win for everyone. And I’ve been able to give back some of the items we were gifted so that some other family can get use out of them.

5. Mark empty cabinets and rooms
This was something I tried in my last move and I’m doing again because of how much it helped me mentally. Moving can be overwhelming. Especially if you’re a task-oriented person like myself. Knowing that your task list goes on and on is daunting but every step forward can help keep you motivated. I had to break the big-picture down into bite-sized chunks for myself. To do this visually, I would place a colored sticky note on the door of a cabinet I had emptied or a room that I had emptied and cleaned. I did this all the way up until moving day. That way I could walk around the house and see at-a-glance what I had already completed and what still needed to be done. It also helped me to feel as though I was making progress even when it felt like I still had a lot more to do. It’s a simple solution to lower some of the stress of moving.
6. Packing materials

My family has a book collecting problem. Every time we move we end up with an entire library to pack up and heft around with us. Over the years I’ve downsized a little but still had to come up with tricks to make things easier on us. I’ve found that packing books into smaller boxes is one method. But because my family basically hordes books, I have to think a little bigger. I usually choose to fill medium boxes about half way with books and then pack lighter materials on top of them to use the space while keeping the box from getting too heavy. I’ve found that I can use things like stuffed animals, guest room pillows, throw pillows and blankets to fill that space. This works out well for us because we also have an overabundance of nostalgic stuffed animals that have followed us since childhood and that collection only ever gets bigger!
7. Pack each box methodically
I know we don’t always have an abundance of time when preparing to move. Many times this is why boxes get packed haphazardly. Random things get thrown in together just for the sake of saving time or as a result of procrastination. In my experiences, I’ve found that it can help your sanity to be a little more methodical about your box packing. Something I’ve tried in my last move and current move is to pack with the idea that I know where I want things to end up in my new house. This makes my life a lot easier once I get to the unpacking phase of the move. If you have towels or pillows that are meant for a specific room, put them in boxes that are to be moved to that room. If you’d rather all the linens be kept in the linen closet or laundry room, pack and label them to be delivered to that room. It will make less work for you in the end.
8. Get movers!
I’m aware that not every move allows funds for professional movers. Sometimes we’re moving because we don’t have the money to stay where we are. In those cases, getting movers usually means depending on the kindness of your friends to help you physically move your stuff. I’ve been there many times. But! I would like to encourage you to try something different when you can. Even if you have to save up for it or cut back on some spending to be able to afford it, hiring movers to move your stuff is so worth it. It takes one of the biggest hassles of moving and makes it happen almost magically.

If you are considering movers, do your research. If possible, find a local company or a smaller, family owned business. But make sure they offer some sort of insurance on your items in case of accidents. It is very important to look out for yourself in these situations. When researching companies, look for user reviews and read a lot of them. Some companies just don’t hire well and this can hurt you in the long run. They could be cheaper but there could be a greater chance that your belongings could be broken, misplaced or stolen. I got very lucky with my first movers because they were amazing. Unbelievably fast, reliable and charged a very fair rate. Of course, distance is a factor. If you’re making a long distance move it will be considerably more expensive than a local move. But run the numbers. It could still be more valuable to pay a little more for movers and regain some sanity rather than have to juggle renting a truck, packing and then driving that truck long distance, unpacking and then returning that truck. Take the time to compare! It could save you some money AND some stress.
9. Make a grocery list
Before you move, sit down and make a list of all the food and non-food items you might need on the other side. On your moving day, you may choose to throw out some perishable items rather than juggle having to move them. This means that on the other side, once you’ve moved into your new place you might be missing a few essentials! Will you have enough toilet paper, paper towels, milk, eggs, etc.? Do you have easy to eat foods like cereal for breakfast or toastable foods. What about microwave dinners just in case you can’t get your pots and pans unpacked fast enough for dinners during your first week. Think ahead and give yourself some options. Do you have easy snacks for kids that won’t require using a lot of dishes? Once you have a list you can always designate someone or go to the store yourself once you arrive in your new city. That way you will not be left sitting in your new house, surrounded by packed boxes and wondering how to survive.
Another good list to make is a list of things to keep accessible during your move. Make sure you have beds, bedding, pajamas, toiletries, etc. accessible and easy to find as soon as you’re done moving your belongings into your new house. This will keep you from having to find where those items were packed while you’re already overly tired from moving.
10. Pizza night!
You’re in your new house, your belongings are still packed, you’re tired from the whole endeavor. Who wants to cook dinner?! NOT YOU! Not anyone else for that matter. It’s understandable. Cut yourself some slack and keep enough money in your wallet for pizza or something equally as deliverable for move-in night dinner. Then kick back, enjoy a slice or five and know that you’ve made it through another of the most annoying adventures that humans have to endure. Well done!