Not Your Average Taco Meat

I use this recipe in place of traditional taco meat. It’s perfect for tacos, nachos, chip dip, burritos, or taco salads! I like it because it has a ton of flavor without having to rely on a lot of salt or spices. I keep the ingredients on hand in the pantry (aside from the meat) so that I can easily make it any time. Also, it can be made in less than 30 minutes! Bonus!

  • Prep time: no prep time unless you count opening packages.
  • Cook time: approx. 10-15 minutes.
  • Makes about 1-2lbs of meat mix.

Ingredients

  • 1 lb ground beef (I use the leanest I can afford)
  • 1 lb ground turkey meat (I use this to add volume without adding more beef, but you can use whichever meat choices work for you)
  • about 16oz your favorite salsa (I use chunky Pace because I like the texture it adds)
  • 1 can black beans (about 16oz)
  • 2 Tbsp taco seasoning

Instructions

  1. Put all meat into a large cooking pan. Brown and mash the meat into crumbles on medium heat until only a slight amount of pink remains in the meat.
  2. Add the can of black beans. Simmer for a minute or two.
  3. Add taco seasoning and mix into meat using the juices created by the cooking meat to help mix it in.
  4. Once taco seasoning is mixed into the meat, add the salsa. Mix all ingredients well until they are evenly mixed.
  5. Set heat to low and simmer for about 5 minutes. This allows the beans to soften and the flavors to mingle.
  6. Serve hot and enjoy!
Steps 1-2 in the instructions above. Brown meat, add beans.
Steps 3-6 in the instructions above. Simmer beans to soften, add taco seasoning, add salsa, stir, and simmer. Enjoy!

Notes

It was really tough to come up with a name for this recipe because in our family, we affectionately refer to this meal as “Taco Slop” because it is so versatile and can be slopped on anything from a tortilla, a chip, or a salad. When I first started writing my blog, I knew that I wanted to share this family favorite from the start, but I knew that if I titled it “Slop” I probably wouldn’t get that many views. I hope when you try this recipe that you can develop your own name for it. Call it whatever you like! But if you find things about it that you like to change or add, please write a comment below and share it. I’d love to hear about your version!

Nutrition

  • Serving size: 1/2 cup of meat mix
  • 1 serving is approximately 144 Calories; 10.7g Fat; 2.3g Sat. Fat; 42.4mg Cholest.; 439mg Sodium; 8.5g Carbs; 1.8g Fiber; 2.5g Sugar; 14.8g Protein.

Chicken Taco Crunch Wraps

The best thing about tacos is that they’re so versatile! This is a fun variation that makes a very hearty, portable meal. This recipe is similar to the Crunchwrap Supremes you find at Taco Bell but with some changes to the ingredients. All ingredients are optional and flexible based on your personal taste.

  • Prep time: approx. 2-3 minutes per wrap
  • Cook time: approx. 6-10 minutes per wrap
  • Makes about 4 large wraps

Ingredients:

  • 3 cans of canned chicken breast
  • 1 8oz. brick of cream cheese (room temp)
  • About 4 cups shredded Mexican cheese blend
  • Small can green chilies
  • About 1/4 cup taco seasoning
  • Tostada shells (at least one for each wrap you plan to make)
  • Large flour burrito tortillas (the largest you can find)
  • Shredded lettuce
  • Pico de Gallo (or just tomatoes)
  • Sour Cream
  • Refried beans (optional)
Most of the ingredients you’ll need to make delicious Crunch Wraps. Not pictured: lettuce, taco seasoning, optional beans.

Instructions:

  1. Open and drain water from canned chicken. Place all canned chicken in a large bowl with cream cheese and about 2 cups shredded Mexican cheese. (Cream cheese can be warmed in the microwave for about 30 seconds to make mixing easier).
  2. Begin mixing ingredients with large spoon or spatula. This can also be done in a stand mixer to make things a lot easier.
  3. Mix in green chilies and taco seasoning with chicken mixture. Stir until all ingredients are evenly mixed.
  4. Create a work station with an assembly line for burrito tortilla > (opt beans) > chicken mixture > tostada shell > lettuce > pico > sour cream > shredded cheese > (opt tortilla circle).
  5. Place a burrito tortilla on a plate or cutting board.
  6. In the center of the burrito tortilla, (spread optional beans in a thin layer first) place about a cup of the chicken mixture- flatten and shape it to be about the size of the tostada shells.
  7. Place 1 tostada shell on top of chicken mixture.
  8. Place about 1 handful (or 1/2 cup) of shredded lettuce on top of tostada shell.
  9. Top lettuce with 1-2 Tablespoons of pico de gallo and 1-2 Tablespoons of sour cream.
  10. Top ingredients with about 1/4 cup shredded cheese (this will melt and work to seal the wrap during grilling).
  11. Fold one edge of the burrito tortilla up and over ingredients reaching for the middle on top of all the ingredients. *If it seems like your burrito tortilla will not reach to meet all edges in the middle, you can cut out circles from extra burrito tortillas using a cereal bowl to trace around with a sharp knife. These circles can then be used directly on top of the wrap ingredients before wrapping the burrito tortilla.* Continue to fold up the edges going around the wrap in one direction. You will end up with a wrap that is shaped like an octagon or something close to it. You can place a small salad plate on top of the wrap to keep it folded. See video below for example.
  12. Warm a large frying pan or a griddle or grill to medium heat. Oil or butter the warming surface.
  13. Carefully place wrap fold side down on your heated surface.
  14. Place a heat-resistant plate on top of the wrap as it is grilling to ensure it makes the most contact with the hot surface as possible.
  15. Heat the wrap for about 3-5 minutes depending on how hot your surface is. Use a spatula to tip up the edge of the wrap as it is cooking to check for doneness.
  16. Once desired doneness level is reached, carefully flip wrap over to other side and repeat grilling process. 3-5 minutes.
  17. Serve hot and enjoy!
Build a tower of deliciousness, one ingredient at a time.

Breakfast Scramble

I love this recipe. It’s quick, easy AND delicious. You can eat this for breakfast, lunch or dinner! We usually treat this as one of our breakfast-for-dinner recipes. It’s definitely comfort food; perfect for a cold night or any time you want something that can easily feed a whole family in about 30 minutes. It is easiest to cook this on a griddle or in a very large frying pan.

INGREDIENTS

Most of the ingredients needed for the breakfast scramble.
  • 1 package/bag of uncooked shredded hash browns (about 1-1/4lbs or 20oz)
  • Eggs (1-2 per person being served)
  • Milk (about 1/4 cup per 8 eggs)
  • Garlic salt for sprinkling
  • Pepper for sprinkling
  • Dried parsley for sprinkling
  • 1 medium onion (any color works)
  • Your favorite cheese, shredded works best
  • 1 package bacon (or preferred breakfast meat, about 12oz)

DIRECTIONS

  1. Heat griddle or pan to medium high heat (I set my griddle to 350 degrees specifically). No need to pre-grease pan because bacon will cook first, and bacon grease can be used for the remainder of foods. If other breakfast meats are used instead, grease griddle or pan accordingly.
  2. Dice onion into about 1/4″ pieces.
  3. Remove bacon from package, keeping pieces together (making it easier to cut). Using a sharp knife, make vertical slices through bacon slab about every 1/2″ until all bacon is cut into pieces about 1/2″ x 1″ pieces. It’s not necessary to separate the pieces, as they will come apart while cooking. *See photo below for example.*
  4. Break eggs into a bowl big enough for all of them plus milk and seasonings. Add milk, some garlic salt, pepper and parsley. I usually eyeball amounts, but to help you estimate- I used 8 eggs for 4 servings (2 eggs per person), about 1/4 cup milk, 1/2+ tsp garlic salt, 1/4+ tsp pepper, 1 Tbsp parsley. Mix until eggs are beaten and all ingredients are evenly mixed in.
  5. Add bacon to heated griddle/pan. Cook bacon until it’s thoroughly cooked. Remove bacon from griddle/pan and set aside on a plate with paper towels to soak up excess grease.
  6. Add cut up onion pieces to griddle/pan using the bacon grease already in place. Brown onion until it is translucent and caramelized.
  7. Remove onion from heated surface and set onion aside on a paper towel covered plate like bacon. Bacon and onion can share a plate at this point if necessary.
  8. With griddle/pan still sufficiently greased, add hash browns. Flatten hash browns with a spatula so that the majority of them are making contact with the heated surface. Sprinkle garlic salt and pepper over the hash browns. Let them cook for about 5-7 minutes on one side before flipping and doing the same on the other side. (5-7 minutes on each side while keeping close watch on them as to not let them burn).
  9. Once hash browns reach desired doneness, add bacon and onions back to the grill/pan.
  10. Slowly and carefully add beaten egg mixture into the hash brown, bacon, onion pile. Begin mixing everything together while also letting the egg cook on the hot surface. The egg mixture will begin to hold the hash brown mixture together.
  11. Once egg is completely cooked, turn off heat and cover mixture with shredded cheese. There should still be enough residual heat to melt the cheese. Enjoy while still hot!
The three stages of the bacon for this recipe. Whole, chopped, and cooked.

This meal can be easily reheated and enjoyed again IF there are leftovers!

Nutrition

  • Serving size: as cooked with 8 eggs serves about 4 people.
  • 1 serving is approximately 498 Calories; 25.2g Fat; 11.1g Sat. Fat; 468mg Cholest.; 829mg Sodium; 38.9g Carbs; 4.4g Fiber; 7.6g Sugar; 35.1g Protein.

My Honest Review: Onion Goggles

There are thousands of ridiculous gadgets on the internet today. Kitchen gadgets is probably the genre with the greatest number of unnecessary items. I worked for 5 years at a retail job that focused largely on kitchen gadgets. I’ve seen it all- strawberry hullers, banana slicers, corn cob butterers. If there is some process that takes place in the kitchen, some hopeful inventor has devised a gadget to “make your life easier.”

Because I spent 5 years exploring what we called the gadget wall, I had the chance to try many gimmicky gizmos. Some of them withstood the test, and some of them became clearly unnecessary. One gadget that I never saw in the store but ran across during one of my late night online impulse buys was called Onion Goggles.

At first, I thought it was silly. Sure, cutting onions sucks…but does it really require eye protection? But, thinking back to all the times I’ve cut onions, I reconsidered my skepticism. It seems like every time I cut onions, my eyes pour tears in defense against the onion’s stinging particles released from the cut. It’s a job I dread. I spend a lot of time cooking. I’m the main cook in our house, and I genuinely enjoy cooking, so I come across this problem frequently. Many times, my husband offers to cut the onions for our dinner because he knows how seriously I react to them. Apparently, his eyeballs are a lot tougher than mine!

So, I purchased a pair of onion goggles and waited for my first opportunity to use them. Recently, we had a meal of pulled pork sandwiches, and I wanted to make caramelized onions to go with it. Caramelizing the onions brings out their natural sweetness and goes very well with the tangy zing of the barbeque sauce on the pork. So, I busted out my newest kitchen fashion accessory and gave them a try.

I wish you could smell pictures!

I was very skeptical. Over the years, I’ve tried many of the Old Wives’ Tales based around ways to keep onions from hurting your eyes and had yet to find one that works. I’ve tried leaving the roots on while cutting the onion. I’ve tried using a very sharp knife. I’ve tried coating my knife in several different substances before cutting into the onion. I’ve tried many others. None of them worked for me, so the onion goggles were really my last effort before giving up on fighting it.

I needed to cut up the entirety of my red onion, so I was able to give my goggles a fair first try. As I began to cut the onion, I noticed that the lenses started to get what looked like tiny water droplets on them. That must be what normally gets in my eyes. Yikes! To me, that was physical proof that the goggles worked. After getting through an onion cutting experience tear-free, I’d say that these onion goggles lived up to their purpose. I’ll be keeping them handy in my kitchen from now on.

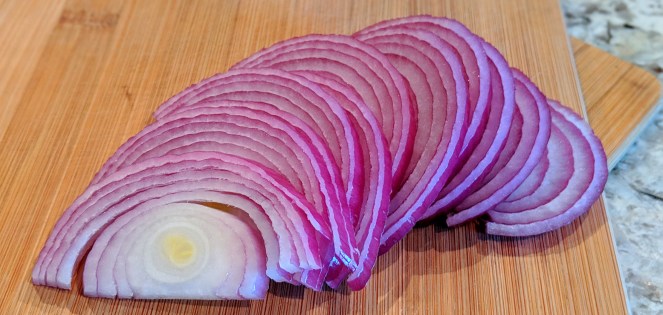
With the onion goggles I didn’t have to worry about cutting myself because of impaired vision so I was able to get perfect slices!

If you’re looking to get a pair for yourself, I’m not here to recommend any specific brands, but I can recommend some criteria for your search. Make sure that the goggles you purchase come with some sort of particle blocking material around the frames where they sit against your face. This is the main protection against the onion’s sting. Additionally, it is useful to purchase a pair with a strap that goes around the back of your head to hold them on rather than them just sitting on your nose like a regular pair of glasses. Even with a foam barrier between the glasses and your face, if they’re not held against your face tight enough, there will be plenty of gaps for onion particles to sneak in and make your purchase pointless. The pair I purchased were like regular glasses but came with an optional band that attaches to the frame. This band worked perfectly and was quite stylish, if you ask me! They made me feel like a kitchen superhero!

Kept my eyes protected AND made me look cool! Haha!

I give this product: 5 out of 5 Bear Tracks!